All products are selected by our editorial team for quality. If you buy through our links, we may earn a small commission at no extra cost to you.
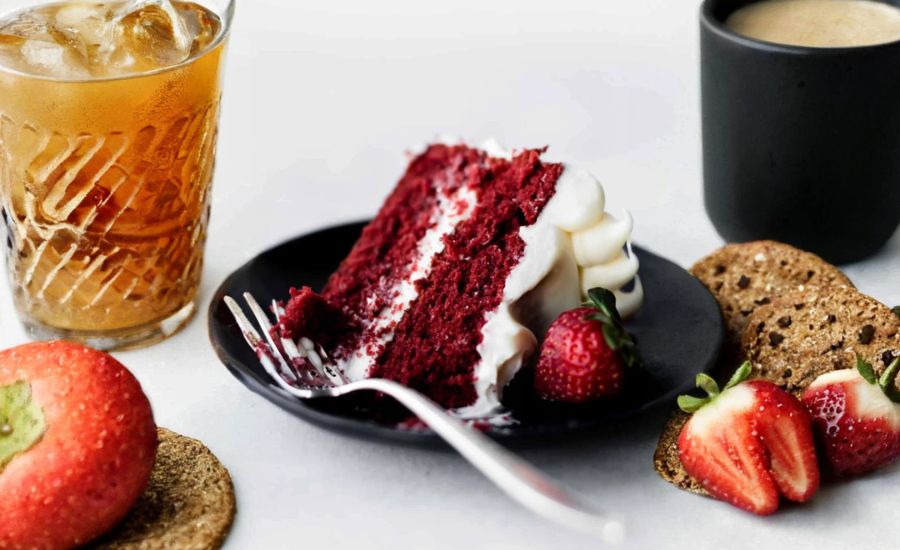
This Red Velvet Cake with Cream Cheese Frosting is a true classic elevated with expert techniques for perfect texture and flavor.
What sets this recipe apart is the whipped egg whites method, which ensures a light, velvety crumb unlike dense traditional cakes.
The harmonious blend of cocoa, buttermilk, and vanilla delivers rich, complex notes while the touch of vinegar brightens the cake’s iconic red hue naturally.
Nutritionally, it offers a balance of healthy fats from canola oil and full-fat cream cheese, with moderate protein from eggs and dairy.
Though indulgent, it’s free from artificial stabilizers and uses natural ingredients, making it a satisfying homemade treat.
The recipe’s straightforward steps and make-ahead options make it ideal for everyday baking or special occasions.
Its forgiving nature and accessible ingredients mean it’s perfect for both beginners and seasoned bakers seeking a reliably delicious, visually stunning dessert.
Must-Have Tools for Perfect Results
9-Inch Round Cake Pans
Essential for shaping perfectly sized, even cake layers.
Durable pans ensure even heat distribution and effortless cake release, crucial for professional-looking results every time.
A staple for any baker aiming for flawless layered cakes.
Electric Hand Mixer or Stand Mixer
Speeds up mixing, whipping, and folding tasks. Its consistent power guarantees smooth batter and fluffy egg whites, saving effort and delivering a tender crumb.
This versatile tool is indispensable for all baking projects.
Silicone Spatula
Perfect for scraping bowl sides and gently folding delicate egg whites into batter without deflating them.
Its flexible design ensures zero waste and easy handling, making it a kitchen essential for mixing and frosting.
Cooling Rack
Allows cakes to cool evenly by promoting airflow underneath, preventing soggy bottoms.
It’s vital for maintaining cake texture and is a multifunctional tool for baking and roasting alike.
Icing Spatula and Bench Scraper
These tools provide smooth, professional frosting application and sharp edges on cakes.
Their precision helps achieve that polished finish every home baker desires, elevating your cake presentation.
Red Velvet Cake
Equipment
- 2 × 9-inch Round Cake Pans
- 1 × Electric Hand Mixer or Stand Mixer
- 1 × Silicone Spatula
- 1 × Cooling Rack
- 1 × Icing Spatula
- 1 × Bench Scraper
- Optional: Parchment Paper Rounds for lining pans
Ingredients
For the Cake:
- 3 cups 360g cake flour, lightly spooned and leveled
- 1 teaspoon baking soda
- 2 tablespoons 10g unsweetened natural cocoa powder
- ½ teaspoon salt
- ½ cup 113g unsalted butter, softened to room temperature
- 2 cups 400g granulated sugar
- 1 cup 240ml canola or vegetable oil
- 4 large eggs separated and at room temperature
- 1 tablespoon pure vanilla extract
- 1 teaspoon distilled white vinegar
- Red food coloring liquid or gel, amount to your preference (about 1–2 teaspoons gel recommended)
- 1 cup 240ml buttermilk, at room temperature
For the Cream Cheese Frosting:
- 16 ounces 452g full-fat cream cheese, softened
- ¾ cup 170g unsalted butter, softened
- 5 cups 600g powdered sugar (confectioners’ sugar)
- 1 ½ teaspoons pure vanilla extract
- Pinch of salt to balance sweetness
Instructions
- Prepare the Oven and Pans: Preheat your oven to 350°F (177°C). Generously grease two 9-inch round cake pans. For easy cake removal, line the bottoms with parchment paper circles and grease the paper lightly.
- Combine Dry Ingredients: In a large mixing bowl, sift together the cake flour, baking soda, cocoa powder, and salt. Whisk these dry ingredients until evenly combined and set aside.
- Cream Butter and Sugar: Using a stand mixer or handheld mixer fitted with a paddle attachment, beat the softened butter and sugar together on medium-high speed for about one minute until smooth and creamy. Scrape down the bowl’s sides with a rubber spatula as needed to ensure even mixing.
- Add Wet Ingredients: Add the oil, egg yolks, vanilla extract, and white vinegar to the creamed mixture. Mix on high speed for two minutes until fully incorporated and slightly fluffy. Scrape down the bowl again.
- Alternate Adding Dry Ingredients and Buttermilk: With the mixer running on low speed, gradually add the dry flour mixture to the wet ingredients in two or three portions, alternating with the buttermilk. Begin and end with the dry ingredients. Mix just until combined after each addition to avoid overmixing.
- Color the Batter: Add your desired amount of red food coloring (gel recommended for deeper color) and gently mix just until the batter turns a uniform red shade.
- Whip Egg Whites: In a clean, dry bowl, vigorously whisk the four egg whites using a hand mixer on high speed until stiff, fluffy peaks form (about 3 minutes). These whipped whites will lighten the batter and create a delicate crumb.
- Fold in Egg Whites: Carefully fold the whipped egg whites into the red batter using a silicone spatula. Use gentle motions to preserve the airy texture, aiming for a smooth, slightly thick batter.
- Bake the Cakes: Divide the batter evenly between the prepared cake pans. Smooth the tops with a spatula and bake in the preheated oven for 30 to 32 minutes. The cakes are done when the tops spring back lightly to the touch and a toothpick inserted in the center comes out clean or with a few moist crumbs.
- Cool Completely: Remove the cakes from the oven and place the pans on wire racks. Let the cakes cool fully in the pans before removing. Cooling completely prevents the frosting from melting when applied.
- Make the Cream Cheese Frosting: In a mixing bowl fitted with a whisk or paddle attachment, beat the cream cheese and softened butter on medium-high speed until smooth and creamy, about 2 minutes. Gradually add the powdered sugar, vanilla extract, and a pinch of salt. Start mixing on low to avoid a sugar cloud, then increase speed and beat for 3 minutes until fluffy and combined. Adjust consistency by adding more powdered sugar (if too thin) or a pinch of salt (if too sweet).
- Assemble the Cake: Using a serrated knife, trim the domed tops of the cakes to create flat, even layers. Place one cake layer on a serving plate or cake stand. Spread an even layer of frosting over the top. Add the second cake layer and cover the entire cake with the remaining frosting, smoothing with an icing spatula and bench scraper for a professional finish.
- Chill and Serve: Refrigerate the assembled cake for at least 30 to 60 minutes before slicing. This chilling step helps the frosting set and holds the cake’s shape for cleaner cuts.
Notes
- Make-Ahead Tips: You can bake the cake layers a day ahead and keep them wrapped tightly at room temperature. The frosting can also be prepared in advance and refrigerated; bring it to room temperature and stir gently before using.
- Food Coloring Alternatives: Gel food coloring gives the richest color with less liquid. For a natural option, beet powder mixed with water works well to tint the batter without artificial dyes.
- Substitute for Buttermilk: If you don’t have buttermilk, mix 1 1/2 teaspoons lemon juice or white vinegar into 1 cup of whole milk, let sit 5 minutes before using.
- Cake Variations: This batter can be used for cupcakes (bake about 20 minutes), a sheet cake (9×13-inch pan, bake 40-45 minutes), or a three-layer cake (bake each 22-25 minutes). Adjust baking time accordingly.
- Storage: Store leftover cake covered in the refrigerator for up to 5 days. You can freeze frosted or unfrosted layers for 2-3 months, thawing overnight in the fridge before serving.
Chef’s Expert Tips For Baking Success
Achieving the perfect red velvet cake hinges on a few crucial techniques.
First, whipping the egg whites separately before folding them into the batter ensures a light, tender crumb instead of a dense texture.
This step creates the signature velvety softness you expect from this classic cake.
Using cake flour instead of all-purpose flour contributes to the cake’s delicate structure and smooth mouthfeel, so it’s worth seeking out or substituting carefully.
Additionally, allowing all ingredients to come to room temperature before mixing helps them blend uniformly, preventing lumps or uneven textures.
Don’t skip the vinegar—it’s key for brightening the red color and balancing the flavors without leaving a sour taste. When baking, resist the urge to open the oven door frequently, as sudden temperature changes can cause the cake to sink.
Finally, chilling the frosted cake before slicing helps the cream cheese frosting set perfectly, yielding clean cuts and beautiful presentation.
Delicious Serving Ideas And Pairings
This rich and moist red velvet cake pairs wonderfully with a variety of accompaniments to elevate your dessert experience.
Serve slices with fresh berries like strawberries or raspberries for a refreshing contrast to the creamy frosting.
A dollop of lightly sweetened whipped cream or a scoop of vanilla bean ice cream adds extra indulgence without overpowering the cake’s subtle cocoa notes.
For a festive touch, consider garnishing with edible flowers or crushed pecans for texture and flavor complexity.
This cake is equally suited for formal celebrations or casual gatherings, so feel free to plate it elegantly or simply alongside your favorite hot coffee or a smooth glass of milk.
Red velvet also pairs well with champagne or sparkling rosé if you want to make your dessert course truly special.
Best Practices For Storing Cake
Proper storage is essential to maintain the freshness and moistness of your red velvet cake.
Once frosted, cover the cake loosely with plastic wrap or store it in an airtight cake container to prevent the cream cheese frosting from drying out or absorbing fridge odors.
Refrigeration is recommended because the frosting contains dairy and needs to stay cool, but allow the cake to come to room temperature for about 30 minutes before serving to enjoy its full flavor and soft texture.
If you have leftover unfrosted cake layers, wrap them tightly in plastic wrap and store at room temperature for up to two days or freeze for longer storage.
For longer preservation, both frosted and unfrosted cakes freeze well when wrapped securely; thaw in the refrigerator overnight, then bring to room temperature before frosting or serving.
Frequently Asked Questions About Recipe
1. Can I substitute buttermilk?
Yes! If you don’t have buttermilk on hand, mix 1 cup of milk (whole or 2%) with 1 ½ teaspoons of lemon juice or white vinegar. Let it sit for 5 minutes before using. This homemade substitute adds the right tang and acidity to the cake.
2. Why whip egg whites separately?
Whipping egg whites separately introduces air into the batter, making the cake lighter and giving it a soft, velvety crumb. Folding them gently prevents deflating this aeration, which is crucial for texture.
3. Can I use natural food coloring?
Absolutely. Beet powder diluted with a little water is a natural alternative to synthetic red food coloring. Keep in mind it may give a slightly different shade but still imparts a beautiful red tint.
4. How do I avoid a dry cake?
Avoid overbaking by checking the cake a few minutes before the recommended time. The cake should spring back lightly when touched and a toothpick inserted should come out mostly clean with a few moist crumbs.
5. How long will this cake stay fresh?
When properly stored in the refrigerator, the frosted cake stays fresh for up to 5 days. For longer storage, you can freeze it wrapped tightly for up to 3 months.
This recipe is inspired by sallysbakingaddiction and has been carefully refined to enhance clarity, streamline preparation steps, and ensure accurate results. We’ve also included health benefits, nutritional highlights, and Must-Have Tools to help you get the best results every time you cook.
