This Roasted Garlic No-Knead Bread is golden, crusty, and bursting with the rich, savory flavor of roasted garlic.
Packed with fiber and plant-based nutrients from wholesome ingredients, it’s a healthier bread option with moderate protein and good fats.
Easy to make and virtually hands-off, it’s perfect for everyday meals, meal prep, or simply pairing with your favorite soups and spreads.
Roasted Garlic No-Knead Bread
Equipment
- 1 large mixing bowl
- 1 small bowl
- Measuring cups and spoons
- Parchment paper
- Dutch oven with lid (6–7 qt)
- Oven
- Foil
Ingredients
Yeast Mixture
- 2 ¼ tsp active dry yeast
- 1 tsp granulated sugar
- ¼ cup warm water
Roasted Garlic Bread
- 3 cups all-purpose flour
- 2 tsp kosher salt
- 1 ¼ cup warm water
- 2 garlic heads
- 3 tbsp olive oil
- 2 tsp flaky sea salt like Maldon
Basil Butter
- ½ cup salted butter softened
- ½ cup fresh basil chopped
- ½ tsp lemon or orange zest optional
- Kosher salt and freshly cracked black pepper to taste
Instructions
- Activate the Yeast: In a small bowl, stir together the active dry yeast, granulated sugar, and 1/4 cup of warm water (around 105–110°F; it should feel like warm bath water, not hot). Mix until the sugar fully dissolves. Let the mixture sit undisturbed for 5–6 minutes.During this time, the yeast will feed on the sugar and create bubbles. When the mixture looks foamy and has a pleasant yeasty aroma, your yeast is alive and ready to use. If it does not foam, start over with fresh yeast.
- Prepare the Dough: In a large mixing bowl, combine the all-purpose flour and kosher salt. Pour in the activated yeast mixture along with the remaining 1 1/4 cups of warm water. Using a wooden spoon or spatula, stir everything together until you have a sticky, shaggy dough. The dough does not need to be kneaded or perfectly smooth — it should look rough, but fully hydrated. Scrape down the sides of the bowl as needed.
- First Rise: Cover the mixing bowl with a clean dish towel or plastic wrap and place it in a warm, draft-free spot. Allow the dough to rest and rise until it has doubled in size, which will take about 3 hours. This slow fermentation builds flavor and develops the dough’s gluten structure without kneading. By the end of this rise, the dough should look airy and bubbly.
- Roast the Garlic: While the dough is resting, prepare the garlic. Preheat the oven to 400°F (200°C). Take each garlic bulb and gently remove the loose, papery outer layers while keeping the cloves intact inside the bulb. Slice about 1 inch off the top of each bulb to expose the tops of the garlic cloves. Place each bulb on a small square of aluminum foil, drizzle with 1 tablespoon of olive oil, and wrap the foil tightly around it. Place the foil-wrapped garlic bulbs on a baking sheet and roast for 45 minutes, or until the cloves are tender, soft, and golden in color. Once roasted, remove from the oven and let them cool completely before handling.
- Extract the Garlic Cloves: When the roasted garlic has cooled, hold a bulb over a small bowl and gently squeeze from the base. The softened garlic cloves should easily slip out of their skins. Collect all the roasted garlic in the bowl and set aside. The texture should be smooth and buttery, with a sweet, mellow garlic flavor.
- Incorporate the Garlic into the Dough: Once the dough has completed its first rise, lightly flour a clean work surface and gently turn the dough out onto it. Using your hands, press the dough down to release some of the trapped air.Spread out the dough slightly, then press the roasted garlic cloves into the dough, spacing them evenly. Fold the dough over itself and gently knead just 4–6 times to incorporate the garlic without overworking the dough. Dust with a little more flour as needed to prevent sticking. Shape the dough into a rough ball.
- Second Rise: Place the shaped dough onto a sheet of parchment paper. Cover it loosely with a dish towel or an overturned bowl. Let it rise again for about 1 hour, or until it has doubled in size once more. This second rise ensures the bread will bake up light and airy.
- Preheat the Dutch Oven: About 30 minutes before baking, place a large Dutch oven (6–7 qt) with its lid inside your oven and preheat to 450°F (232°C). The Dutch oven needs to be very hot before the dough is placed inside; this mimics the effect of a professional steam oven and ensures a crisp, golden crust.
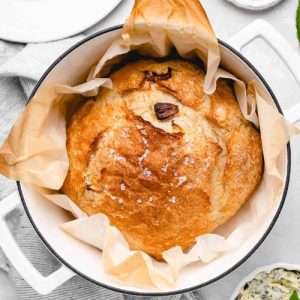
- Bake the Bread: Once the dough has finished its second rise and the Dutch oven is preheated, carefully remove the pot from the oven using oven mitts. Using the parchment paper as a sling, lift the dough and gently lower it into the Dutch oven. Drizzle the remaining 1 tablespoon of olive oil over the top and sprinkle with flaky sea salt. Cover with the Dutch oven lid and return it to the oven. Bake covered for 30 minutes. Then, remove the lid and continue baking for another 10–12 minutes, or until the top is deeply golden brown and crusty.
- Cool the Bread: Carefully lift the bread out of the Dutch oven using the parchment paper and transfer it to a wire cooling rack. Allow it to cool for at least 20 minutes before slicing. Cooling helps set the crumb and prevents the bread from becoming gummy inside.
- Prepare the Basil Butter: While the bread cools, make the basil butter. In a small bowl, add the softened salted butter, chopped fresh basil, and citrus zest (if using). Use a fork to mash and combine until smooth and well mixed. Season with a pinch of kosher salt and freshly cracked black pepper. You can shape it into a log using parchment paper or simply cover the bowl with plastic wrap. Refrigerate until ready to serve.
- Serve and Enjoy: Slice the cooled bread into thick pieces and serve warm or at room temperature with a generous spread of basil butter. The crust will be crisp, the interior fluffy and fragrant, and the roasted garlic will provide pockets of sweet, savory flavor. Perfect alongside soups, salads, or enjoyed as a snack on its own.
Notes
- Always use fresh, active yeast to ensure a good rise; if your yeast mixture doesn’t foam, discard and start over.
- Water should be warm, not hot (around 105–110°F). Hot water can kill the yeast.
- Don’t skip the second rise — it helps the bread become airy and soft inside.
- Roasted garlic should be fully cooled before adding to the dough; hot cloves may disrupt fermentation.
- A preheated Dutch oven is key to achieving a crisp, bakery-style crust.
- Let the bread cool at least 20 minutes before slicing; cutting too soon can result in a gummy texture.
- Use high-quality olive oil and sea salt for the finishing touch — they enhance flavor beautifully.
- The basil butter can be prepared in advance and refrigerated for up to 5 days.
- This recipe is very forgiving — don’t worry if the dough looks sticky; that’s normal for no-knead bread.
- For extra depth, you can add herbs like rosemary, thyme, or chives into the dough.
Chef’s Secrets for Perfect Results
Great bread is more about patience than perfection.
The biggest secret here is giving your dough time to rest and rise without rushing the process — this is what develops flavor and texture naturally.
Always use a preheated Dutch oven; the enclosed heat and steam help the bread achieve that artisan-style golden crust.
Another tip: keep your workspace lightly floured, but resist the temptation to add too much flour to the dough.
A slightly sticky dough is what creates that chewy, tender interior.
Lastly, roasted garlic should be soft, sweet, and spreadable before folding it into the dough — this ensures even distribution without tearing the bread.
Delicious Serving Suggestions to Try
This bread is versatile and pairs well with almost anything.
Serve it warm with a smear of basil butter for a simple yet indulgent treat.
It’s excellent alongside hearty soups like tomato basil, potato leek, or creamy mushroom.
For dinner, use it as a side to roasted chicken, grilled fish, or pasta dishes.
Leftover slices can be toasted and topped with avocado, eggs, or even used for open-faced sandwiches.
For gatherings, cut it into rustic chunks and serve on a charcuterie board with cheeses, olives, and cured meats — it’s guaranteed to be a hit.
Storage Tips to Keep Bread Fresh
To maintain freshness, let the bread cool completely before storing.
Wrap it tightly in plastic wrap or beeswax wrap and keep it at room temperature for up to 3 days.
Avoid refrigerating bread, as it dries out faster in the fridge.
If you’d like to keep it longer, slice the loaf, place slices in a freezer bag, and freeze for up to 2 months.
Reheat in the oven or toast slices directly from frozen.
The basil butter can be stored in the fridge for up to 5 days, wrapped in parchment or sealed in a container, and can also be frozen for up to 2 months.
Frequently Asked Questions
1. Can I make this bread without a Dutch oven?
Yes! If you don’t have a Dutch oven, place the dough on a baking sheet or in a loaf pan. Add a separate oven-safe dish with hot water on the bottom rack to create steam, which will help form a crust. The bread won’t be exactly the same, but it will still be delicious.
2. How do I know if my dough has risen enough?
The dough is ready when it has doubled in size and looks airy with small bubbles on the surface. You can also do the “finger test” — gently press a floured finger into the dough. If the indentation slowly springs back but doesn’t disappear completely, it’s ready.
3. Can I use whole wheat flour instead of all-purpose?
Yes, but for best texture, replace only up to half the all-purpose flour with whole wheat flour. Using 100% whole wheat can make the bread dense and heavy. You may also need to add a little extra water since whole wheat absorbs more liquid.
4. What’s the best way to roast the garlic?
The foil method ensures the garlic steams in its own juices, making it soft and caramelized. For extra depth, you can also roast the garlic in a small oven-safe dish covered with olive oil. Just be sure not to burn it — the cloves should be golden and buttery, not dark brown.
5. Can I prepare the dough ahead of time?
Absolutely. After the first rise, you can refrigerate the dough overnight (up to 12–14 hours). This slow fermentation enhances flavor even more. When ready to bake, let it sit at room temperature for about an hour before shaping and proceeding with the recipe.
