This homemade rye bread recipe stands out for its rich, robust flavor and wholesome ingredients, making it a delightful addition to any meal.
The blend of rye and bread flours delivers a hearty texture, while molasses adds a subtle sweetness and depth without overpowering.
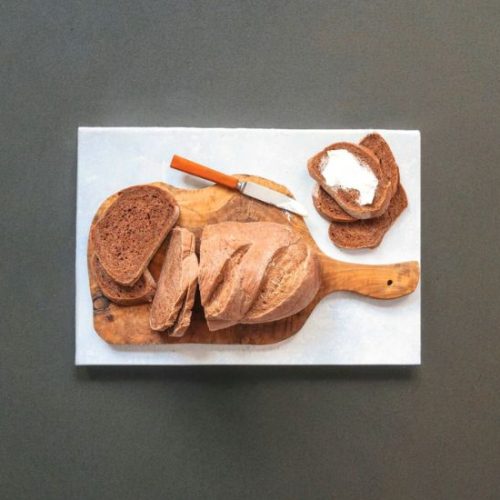
Classic Homemade Rye Bread
Equipment
- 1 large mixing bowl
- 1 digital kitchen scale (optional but recommended)
- 2 bread loaf pans (8×4 inches) or baking stone
- 1 sharp serrated knife
- Measuring cups and spoons
Ingredients
- 2 packets active dry yeast 4 1/2 teaspoons or 16 grams
- 2 ½ cups warm water just warmed to touch
- ⅔ cup molasses regular, avoid blackstrap variety
- 2 tablespoons caraway seeds optional
- 1 tablespoon salt
- ¼ cup vegetable oil
- ¼ cup unsweetened cocoa powder
- 2 cups rye flour
- 5 cups bread flour approximately, adjust as needed
Instructions
- Activate the Yeast: In a large mixing bowl, combine the warm water and molasses, stirring gently to dissolve the molasses completely. Sprinkle the active dry yeast over the surface and let it sit for about 5–10 minutes until it becomes foamy, indicating the yeast is active and ready.
- Build the Dough: Add the salt, vegetable oil, cocoa powder, and caraway seeds (if using) to the yeast mixture. Stir well to incorporate. Gradually mix in the rye flour and then 2 cups of bread flour, stirring after each addition with a wooden spoon or sturdy spatula. Continue adding the remaining bread flour one cup at a time until the dough thickens enough that stirring becomes difficult.
- Knead the Dough: Lightly flour a clean surface and transfer the dough onto it. Begin kneading by pressing the heel of your hand into the dough, then stretching and folding it over. Turn the dough a quarter turn and repeat this pressing and folding motion. Continue kneading for 5 to 7 minutes, adding small amounts of flour as needed, until the dough feels smooth, elastic, and slightly tacky but no longer sticky.
- First Proofing: Coat a large bowl with a thin layer of vegetable oil. Place the kneaded dough into the bowl, turning it gently so all sides are lightly oiled.Cover the bowl tightly with plastic wrap or a damp kitchen towel. Let the dough rise at room temperature until it doubles in size, approximately 1 to 1.5 hours.
- Shape the Loaves: Once risen, gently deflate the dough by pressing it down. Turn it out onto a floured surface and knead it briefly to redistribute the air.Cut the dough evenly in half using a sharp knife. Shape each portion into a smooth loaf by folding and tucking the edges under, then place each loaf into a greased 8×4-inch bread pan or onto a baking sheet dusted with cornmeal for a crustier bottom.
- Second Proofing: Cover the loaves again with a clean cloth or plastic wrap and allow them to rise for 30 to 45 minutes. The dough should increase by about half its volume and just peek over the edges of the loaf pans if used.
- Prepare Oven and Bake: Preheat your oven to 350°F (175°C). If using a baking stone, place it in the oven at this time to heat thoroughly (at least 30 minutes). If baking on a stone, score the top of each loaf with a sharp serrated knife to allow for expansion. Optionally, mist the loaves with water in the first 10 minutes to encourage a crusty exterior.Bake for 40 to 50 minutes, until the crust is firm and the loaf sounds hollow when tapped.
- Cool and Enjoy: Remove the bread from the oven and let it cool in the pans or on the baking sheet for at least 15 minutes. Then transfer the loaves to a wire rack to cool completely before slicing.
Notes
- Molasses Choice: Use regular molasses rather than blackstrap for a milder sweetness and less bitterness. This helps balance the rye’s earthiness.
- Caraway Seeds: These are traditional in rye bread but optional; you can omit or replace with other seeds like fennel or cumin for variation.
- Flour Adjustment: The exact amount of bread flour may vary depending on humidity and flour brand; add flour gradually until the dough feels right—not sticky but still soft.
- Kneading Tip: Proper kneading develops gluten, creating that classic chewy rye bread texture. Don’t rush this step!
- Storage: Store cooled bread wrapped in a clean cloth or bread box for up to 3 days. For longer storage, slice and freeze to maintain freshness.
Caraway seeds provide a traditional aromatic touch, though optional. Nutritionally, this bread is a balanced choice—offering moderate protein (5g per serving) and fiber (2g), with low saturated fat and cholesterol-free content.
The recipe’s reliance on plant-based oils keeps the fat content light and heart-healthy.
With its relatively straightforward preparation, including two rises and kneading, it’s ideal for home bakers wanting satisfying, fresh bread without complex steps.
Perfect for sandwiches, toast, or as a side, it’s a versatile, nutrient-conscious bread great for everyday use and meal prep alike.
Must-Have Tools for Perfect Results
Digital Kitchen Scale
Essential for accurately measuring flours and ingredients by weight, ensuring consistent dough texture and perfect bread every time. Beyond baking, it’s a versatile tool for portion control and recipe precision.
Large Mixing Bowl
Ideal for mixing and proofing dough, a sturdy large bowl provides enough room for the dough to rise and expand comfortably. It’s a kitchen staple for any cooking or baking task involving bulk ingredients.
Bread Loaf Pans (8×4 inches)
These pans shape the dough into uniform loaves, promoting even baking and classic bread form. Their non-stick surfaces make cleanup easy, and they’re invaluable for all bread baking enthusiasts.
Sharp Serrated Knife
Perfect for scoring the dough before baking, a serrated knife creates clean cuts that allow the bread to expand properly in the oven. It’s also indispensable for slicing through crusty breads without crushing them.
Baking Stone
For those who prefer a crispy crust and artisan-style bread, a baking stone evenly distributes oven heat and absorbs moisture. It elevates homemade bread to bakery-quality with beautifully textured crusts.
Chef’s Secrets to Perfect Rye Bread
Mastering rye bread takes some special techniques, and a few chef’s secrets can elevate your loaf from good to exceptional.
First, the key to developing rye bread’s distinctive texture lies in the balance of rye and bread flour.
Rye flour has less gluten, so combining it with strong bread flour helps create a loaf that’s both dense and chewy, yet rises well.
Kneading is crucial—spend at least 5 to 7 minutes working the dough to activate gluten and build elasticity.
Don’t rush the two rise times; patience here ensures a tender crumb and a good crust.
Using molasses instead of sugar adds a subtle sweetness and deep color, while cocoa powder enhances the bread’s rich tone without making it taste chocolaty.
Optional caraway seeds add a traditional aromatic note that complements rye beautifully but can be skipped or swapped to suit your preference.
Lastly, misting the dough with water in the oven’s first minutes helps develop a crisp crust that contrasts nicely with the soft interior.
Serving Suggestions for Every Occasion
Homemade rye bread is incredibly versatile, pairing wonderfully with a variety of meals and snacks.
For breakfast, toast slices and top with creamy butter, jam, or your favorite nut butter.
Rye bread’s robust flavor stands up well to savory toppings like smoked salmon, cream cheese, and fresh dill, making it perfect for brunch or light lunches.
It also shines as the foundation for hearty sandwiches—think corned beef, pastrami, or turkey with sharp mustard and Swiss cheese.
For dinner, serve warm rye bread alongside soups, stews, or robust salads to soak up flavorful broths.
Toasted rye bread cubes can be a delicious addition to croutons or stuffing recipes.
Because of its density and fiber content, it’s quite filling, so smaller portions can satisfy hunger, helping you maintain balanced meals without overeating.
Storage Tips to Keep Bread Fresh
Proper storage is key to maintaining the freshness and texture of homemade rye bread.
After the bread cools completely, wrap it tightly in a clean cotton or linen bread bag, or loosely in foil to allow just enough airflow to prevent sogginess.
Avoid storing bread in plastic bags at room temperature for long periods, as this traps moisture and can cause mold quickly.
If you won’t consume the bread within three days, slice it and freeze the pieces in airtight freezer bags.
Thaw slices at room temperature or toast directly from frozen for a fresh-baked feel.
Avoid refrigerating bread, as this tends to dry it out and make it stale faster.
Keeping your rye bread well wrapped and at room temperature ensures the crust stays crisp and the crumb remains moist and tender.
Frequently Asked Questions About Rye Bread
1. Can I use whole wheat flour instead of bread flour?
You can substitute whole wheat flour, but expect a denser, heavier loaf with a nuttier flavor. Because whole wheat has less gluten than bread flour, you might need to reduce the rye flour slightly or add vital wheat gluten for structure.
2. Why is cocoa powder added to the recipe?
Cocoa powder in small amounts deepens the bread’s color and adds richness without a chocolate flavor. It enhances the molasses’ dark tones and gives rye bread its characteristic appearance.
3. How do I know when the bread is fully baked?
Besides baking for the recommended time, tap the bottom of the loaf—it should sound hollow when done. You can also use an instant-read thermometer; the internal temperature should reach about 190°F (88°C).
4. Is caraway seed necessary in rye bread?
Caraway seeds are traditional and add a distinctive flavor, but they are optional. You can omit them or substitute with fennel or anise seeds if preferred.
5. Can I make this recipe in a bread machine?
While possible, this recipe is designed for hand mixing and kneading to develop texture. Bread machines may not handle the rye flour’s density as well, so results can vary. If using a machine, follow its whole wheat or rye bread settings and adjust flour quantities accordingly.
