This wholesome whole wheat bread is soft, hearty, and packed with natural flavor, making it a nutritious staple for any kitchen.
Rich in fiber, plant-based protein, and healthy fats from butter and honey, it supports digestion and sustained energy.
Easy to prepare and versatile, it’s perfect for everyday breakfasts, sandwiches, or meal prep, delivering homemade goodness in every slice.
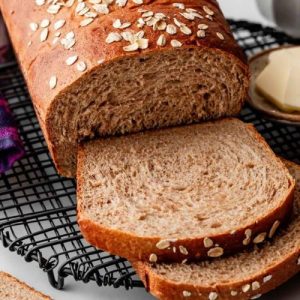
Soft & Nutritious Whole Wheat Bread
Equipment
- 1 large mixing bowl or stand mixer
- Wooden Spoon or Silicone Spatula
- Dough hook (if using stand mixer)
- 9×5-inch loaf pan
- Rolling Pin
- Pastry brush (optional, for topping)
- Instant-read thermometer
- Wire cooling rack
Ingredients
Sponge:
- 1 cup 240 ml warm water (~110°F / 43°C)
- ⅓ cup 80 ml warm whole milk (~110°F / 43°C)
- 2 ¼ tsp 7 g active dry or instant yeast
- 2 cups 260 g whole wheat flour
Dough:
- 3 Tbsp 63 g honey
- 3 Tbsp 43 g unsalted butter, softened
- 1 tsp fresh lemon juice or apple cider vinegar
- 1 ⅓ cups 173 g whole wheat flour, plus extra if needed
- 1 ¼ tsp salt
Optional Topping:
- 1 egg white beaten
- 1 Tbsp whole oats
Instructions
- Prepare the Sponge: Start by creating the foundation for your bread: the sponge. In a large mixing bowl or the bowl of a stand mixer, combine 1 cup (240 ml) warm water and 1/3 cup (80 ml) warm whole milk. The liquids should be warm to the touch, around 110°F (43°C), which helps activate the yeast without killing it. Sprinkle in 2 1/4 teaspoons (7 g) active dry or instant yeast and whisk gently until dissolved. Gradually add 2 cups (260 g) whole wheat flour, stirring with a spatula or wooden spoon until a thick, sticky batter forms. Cover the bowl lightly with a clean kitchen towel or plastic wrap, and let it sit at room temperature for 60–90 minutes, or until it doubles in size. Some batches may take up to 2 hours depending on your kitchen temperature. This step develops flavor and ensures a strong, elastic dough.
- Combine the Dough Ingredients: Once your sponge has doubled, it’s time to bring the dough together. Add 3 tablespoons (63 g) honey, 3 tablespoons (43 g) softened unsalted butter, 1 teaspoon fresh lemon juice or apple cider vinegar, 1 1/3 cups (173 g) whole wheat flour, and 1 1/4 teaspoons salt directly to the sponge. Use a dough hook attachment on medium speed if using a stand mixer, or mix vigorously with a wooden spoon until the dough begins to come together. If the dough feels too wet or sticky to handle, sprinkle in extra flour 1 tablespoon at a time until the dough is workable. It should feel soft, slightly sticky, but manageable.
- Knead the Dough: Kneading is essential to develop the gluten structure for a tender, airy loaf. If using a stand mixer, keep the dough in the bowl and beat with the dough hook on medium speed for 8–10 minutes. If kneading by hand, turn the dough onto a lightly floured surface and fold, push, and stretch for 8–10 minutes, maintaining a soft and slightly tacky consistency. Avoid adding too much flour, as this will make the bread dry. Test your dough by gently poking it with a finger—if it slowly springs back, it’s ready for its first rise.
- First Rise: Lightly grease a large bowl with oil or nonstick spray. Transfer the dough into the bowl, turning it to coat all sides in oil to prevent drying. Cover the bowl with a towel or plastic wrap and let the dough rise in a warm, draft-free place for 1.5–2 hours, or until it approximately doubles in size. The first rise allows the yeast to ferment, producing gases that make the bread soft and airy.
- Prepare the Loaf Pan: While the dough rises, grease a 9×5-inch loaf pan with butter or nonstick spray to prevent sticking. This ensures your loaf slides out easily after baking.
- Shape the Dough: Once risen, gently punch the dough to release excess air. Lightly flour your work surface, hands, and a rolling pin. Roll the dough into a rectangle about 8×15 inches—don’t worry if the edges aren’t perfect. Roll the rectangle tightly into a log, then place it seam-side down into the prepared loaf pan. This shaping step gives your bread a uniform structure and even crumb.
- Second Rise: Cover the shaped loaf with a clean towel or lightly greased plastic wrap. Allow it to rise again until the dough extends about 1 inch above the top of the pan, roughly 45–60 minutes. This rise ensures your loaf will be tall, soft, and airy.
- Optional Oat Topping: If desired, prepare a simple oat topping. Lightly brush the risen dough with 1 beaten egg white and sprinkle 1 tablespoon whole oats evenly across the top. This gives the bread a golden, textured crust and a subtle nutty flavor.
- Preheat the Oven: Position your oven rack in the lower third of the oven and preheat to 350°F (177°C). Baking the bread lower in the oven prevents the top from browning too quickly while allowing the loaf to cook evenly.
- Bake the Bread: Place the loaf in the preheated oven and bake for 36–40 minutes, or until the crust is golden brown.If the top is browning faster than expected, loosely cover the loaf with aluminum foil around the 20-minute mark to prevent burning. To check doneness, tap the top of the bread; it should sound hollow. For precision, insert an instant-read thermometer—the internal temperature should reach 195–200°F (90–93°C).
- Cool and Serve: Remove the loaf from the oven and allow it to cool in the pan on a wire rack for a few minutes. Then, carefully remove it from the pan and let it cool completely before slicing. Cooling allows the crumb to set, making slicing easier and preventing a gummy texture. Serve fresh, toast slices for breakfast, or use it for sandwiches. Store leftovers at room temperature in an airtight container for a few days, or freeze for longer storage.
Notes
- Freezing Instructions: Prepare the dough through shaping, then cover and freeze in a greased loaf pan for up to 3 months. Thaw at room temperature for 4–5 hours and bake as usual. Baked bread can also be frozen once cooled; thaw in the fridge or at room temperature and reheat.
- Overnight Rise Option: Shape the dough, cover tightly, and refrigerate for up to 15 hours. Remove 1–2 hours before baking to allow it to rise at room temperature. Alternatively, refrigerate after the sponge step and continue rising the next day.
- Milk Choices: Whole milk gives the best texture, but low-fat or plant-based milk work well too.
- Yeast Tips: Instant yeast is recommended for faster rise. Active dry yeast works with slightly longer fermentation times.
- Flour Notes: Ensure whole wheat flour is fresh to prevent bitterness. You can substitute 1 cup of bread flour for a taller, fluffier loaf if desired.
- Sweetener Options: Honey gives optimal flavor. Granulated sugar or brown sugar can be substituted, though the flavor will be slightly different.
- Shaping Advice: This dough is designed for a loaf pan; it does not hold a boule shape. For round bread, try no-knead or seeded oat bread recipes.
- Doubling Recipe: For best results, make two separate batches due to dough heaviness and long rise times.
Chef’s Secrets For Perfect Loaf
Creating a soft, fluffy whole wheat loaf depends on careful temperature and timing.
Always use warm liquids, around 110°F (43°C), to activate the yeast without killing it.
Knead the dough thoroughly to develop gluten, which supports a light, tender crumb.
When rolling the dough into the loaf pan, avoid over-handling—it should be gently shaped, not pressed too tightly.
For a richer flavor, consider using honey and room-temperature butter for the dough.
If your kitchen is cool, place the dough in a slightly warm spot, such as near a preheated oven (turned off), to encourage a consistent rise.
Small adjustments, like tenting with foil if the crust browns too fast, ensure even baking and a golden top.
Serving Suggestions For Every Meal
This versatile whole wheat bread pairs beautifully with both sweet and savory toppings.
Serve thick slices toasted with avocado and a sprinkle of chili flakes for a fiber-rich breakfast, or layer with turkey, cheese, and fresh vegetables for a hearty sandwich.
For a cozy snack, enjoy it with almond butter and a drizzle of honey, or alongside soups and stews for a wholesome accompaniment.
It also makes excellent French toast or bread pudding, transforming simple slices into a satisfying meal.
Because of its hearty texture, it holds up well to spreads and toppings without falling apart.
Storage Tips To Preserve Freshness
To keep your bread soft and flavorful, store at room temperature in an airtight container or a resealable bag for 3–4 days.
Avoid refrigerating, as this can dry the bread and make it crumbly.
For longer storage, wrap cooled loaves tightly in plastic wrap or foil and freeze for up to 3 months.
Thaw frozen bread overnight in the refrigerator or at room temperature for several hours.
To refresh slightly stale slices, lightly toast or warm them in the oven at 300°F (150°C) for 5–7 minutes.
Frequently Asked Questions
1. Can I use all-purpose flour instead?
Yes, all-purpose flour can replace whole wheat flour, but the bread will be lighter and less nutty. To retain some fiber, consider a 50/50 mix of whole wheat and all-purpose flour.
2. How can I make the bread taller and fluffier?
Substitute 1 cup of bread flour for whole wheat flour, either in the sponge or dough step. Proper kneading and giving the dough enough rise time also contribute to height and softness.
3. Why is my dough sticky?
Whole wheat flour absorbs more liquid, so the dough may feel sticky.
This is normal. Add small amounts of flour, 1 tablespoon at a time, until manageable, but avoid over-dusting to prevent dryness.
4. Can I bake this bread without a stand mixer?
Absolutely! Use a large bowl and wooden spoon or spatula to mix. Knead by hand on a lightly floured surface for 8–10 minutes. Arm muscle is your secret ingredient!
5. How do I know when the bread is fully baked?
The loaf should be golden brown, sound hollow when tapped, and register 195–200°F (90–93°C) in the center with an instant-read thermometer.
Over-baking can dry the bread, so keep a close eye toward the end.
