This easy homemade soft pretzel recipe stands out for its beginner-friendly approach, fast prep time, and authentic bakery-style results.
With only 10–30 minutes of rest time and a brief kneading session, you can achieve that signature chewy texture and golden crust without fuss.
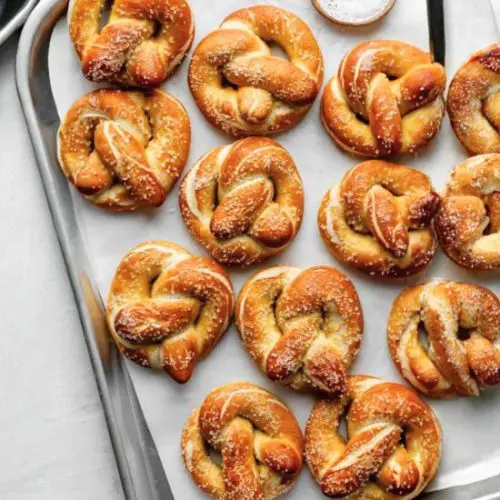
Soft Pretzels
Equipment
- 1 Stand Mixer or Large Mixing Bowl – for combining and kneading dough
- 1 Wooden Spoon or Dough Hook – for initial mixing
- 2 Baking Sheets – for baking the pretzels
- 2 Silicone Baking Mats or Parchment Sheets – to prevent sticking
- 1 Pizza Cutter or Sharp Knife – for portioning the dough
- 1 Large Pot or Dutch Oven – for the baking soda bath
- 1 Slotted Spatula – for removing pretzels from boiling water
- 1 Kitchen Towel – for covering and resting the dough
Ingredients
For the Pretzel Dough:
- 2¼ teaspoons 7g instant or active dry yeast (1 standard packet)
- 1 tablespoon brown sugar or granulated sugar
- 1½ cups 360ml warm water (around 100°F/38°C, lukewarm to touch)
- 1 tablespoon 14g unsalted butter, melted and slightly cooled
- 1 teaspoon fine salt
- 3¾ to 4 cups 469–500g all-purpose flour (spooned and leveled), plus extra for kneading and shaping
- Coarse salt or flaky sea salt for topping
For the Baking Soda Bath:
- 9 cups 2.13 liters water
- ½ cup 120g baking soda
Instructions
- Activate the Yeast: In a large mixing bowl, whisk together the yeast and sugar with the warm water. Let the mixture sit for about 1 minute to begin activating the yeast—it may look slightly foamy or cloudy.
- Mix the Dough Base: Stir in the melted butter and salt. Add 3 cups (375g) of flour and mix with a wooden spoon (or dough hook if using a stand mixer) until it begins to form a sticky, shaggy dough.
- Develop the Dough Texture: Gradually add ¾ cup (94g) more flour and mix until the dough starts pulling away from the bowl and feels slightly tacky but not wet. If needed, incorporate an additional ¼ cup flour (about 31g), a tablespoon at a time, until the dough feels soft yet manageable. Poke it with your finger—if it springs back, you're ready to knead.
- Knead Until Smooth: Turn the dough onto a lightly floured surface and knead by hand for 3–5 minutes, or continue using a stand mixer fitted with a dough hook. The dough should be elastic and slightly springy. If it’s sticky while kneading, dust lightly with flour—but avoid over-flouring to keep the dough tender. Use the “windowpane test” to check: stretch a small piece between your fingers. If light passes through without tearing, it’s ready.
- Rest the Dough Briefly: Form the dough into a smooth ball and cover it with a clean towel. Let it rest at room temperature for 10 to 30 minutes—this gives the gluten time to relax, making it easier to shape.
- Prepare for Shaping: While the dough rests, preheat the oven to 400°F (204°C) and line two baking sheets with silicone mats or parchment paper (greased if using parchment). Begin bringing the 9 cups of water and baking soda to a boil in a large pot.
- Divide and Shape Pretzels: Cut the rested dough into 12 equal pieces—each about 75g or roughly ⅓ cup. Roll each piece into a long rope, 20–22 inches in length. Form a large “U,” twist the ends together once or twice, then fold them down to the bottom of the U to create a classic pretzel shape. Press the ends down firmly to hold the shape.
- Boil in Baking Soda Bath: Gently place 1–2 pretzels at a time into the boiling baking soda water for 20–30 seconds. Do not exceed 30 seconds, or the pretzels may develop a bitter flavor. Use a slotted spatula to lift each pretzel out, drain excess water, and transfer them to the prepared baking sheets.
- Top and Bake: Sprinkle each pretzel generously with coarse salt while still damp. Bake in the preheated oven for 12–15 minutes, or until deep golden brown and glossy.
- Serve or Store: Serve warm, ideally with cheese dip or mustard. Store leftovers at room temperature in an airtight container for up to 3 days. To reheat, bake at 350°F (177°C) for about 5 minutes or microwave briefly until warm.
Notes
- Make-Ahead Options:
- Boiled but Unbaked Pretzels: You can refrigerate them (covered) for up to 24 hours before baking.
- Baked Pretzels: Once completely cooled, freeze them in an airtight container for up to 3 months. Reheat from frozen by brushing with water, sprinkling with salt, and baking at 350°F (177°C) for 20 minutes.
- Freezing the Dough:
Pretzel dough can be made ahead and frozen (shaped or unshaped) in an airtight container for 2–3 months. Thaw in the fridge overnight before shaping or boiling. - Alternative Topping – Cinnamon Sugar:
Skip the coarse salt. After baking, brush warm pretzels with 4 tablespoons (56g) of melted butter and coat with cinnamon sugar (mix ¾ cup granulated sugar + 1½ teaspoons cinnamon). These are best eaten fresh, as they soften after a few hours. - No Baking Soda Bath?
If skipping, brush the shaped pretzels with a mixture of 1 beaten egg and 1 tablespoon of milk before baking. This egg wash will help browning and allow salt to adhere. - Tips for Beginners:
Watch your dough’s hydration level—it should be soft and pliable, not stiff or sticky. The baking soda bath may seem intimidating, but it’s key for that traditional crust and flavor.
The baking soda bath is the game-changer—it adds a rich, deeply savory flavor and helps create the traditional pretzel chew we all crave.
From a nutritional standpoint, these pretzels are a smart alternative to store-bought versions.
They contain no preservatives and are made with just a handful of wholesome pantry staples.
Using only 1 tablespoon of butter and no added oils beyond that, they’re relatively low in saturated fat. If you opt for whole wheat flour (a variation many bakers love), they can be a good source of fiber and plant-based energy.
Perfect for snacking, dipping, or even sandwich-making, this recipe is ideal for everyday cooking.
It’s also highly meal-prep friendly—just freeze after baking or refrigerate the dough for next-day shaping.
Whether you’re planning a party tray or a cozy movie-night snack, these pretzels deliver comfort, ease, and a touch of homemade charm.
Must-Have Tools for Perfect Results
KitchenAid Artisan Stand Mixer
Perfect Dough, Effortlessly
This mixer streamlines kneading, producing a smooth, elastic dough in minutes without tiring your hands. It’s a lifelong investment for every home baker—ideal for breads, cookies, and even pasta.
OXO Good Grips 6-Inch Dough Cutter
For Precision and Easy Portioning
Ideal for cutting dough into even 75g portions, this tool ensures uniform pretzel sizes for consistent baking. Also handy for cleaning work surfaces and shaping pastries.
Nordic Ware Aluminum Baking Sheets (Set of 2)
Even Baking and Durable Performance
These commercial-grade baking sheets offer superior heat conductivity, ensuring your pretzels brown beautifully. They’re warp-resistant and versatile enough for roasting, cookies, and more.
Silpat Non-Stick Silicone Baking Mats
Zero Sticking, Easy Cleanup
A reusable, eco-friendly alternative to parchment paper. These mats provide a nonstick surface that prevents pretzels from sticking while promoting even browning. Great for all baking needs.
Lodge 6-Quart Enameled Dutch Oven
Reliable for Boiling and Baking Soda Baths
A must for the baking soda boil step, this Dutch oven maintains heat evenly and is perfect for soups, stews, and deep frying too. Sturdy and stylish for stovetop-to-table use.
Chef’s Secrets for Foolproof Pretzels
The key to bakery-style soft pretzels at home lies in the details.
First, don’t rush the dough. Even though it only needs 10–30 minutes to rest, that short pause allows the gluten to relax, making it easier to shape the ropes and form perfect twists.
When kneading, aim for a dough that’s soft and springy—slightly tacky but not sticky.
Avoid adding too much flour, which can make the pretzels dry and dense.
The signature chew and golden crust come from the baking soda bath, which should not be skipped.
A quick 20–30 second dip in boiling alkaline water sets the crust and develops that rich, deep flavor.
Finally, use coarse salt right after boiling, while the dough is still damp—it’ll stick best and bring out the classic flavor contrast.
For an extra glossy finish, bake on a silicone mat for even browning and no sticking.
Serving Ideas to Savor Them
These homemade soft pretzels are incredibly versatile and can shine in both casual and more creative presentations.
For a traditional touch, serve them warm with yellow mustard or spicy brown mustard. Craving something richer?
A velvety cheese sauce—like beer cheese or jalapeño nacho dip—takes things to another level.
For a sweet twist, skip the salt and try brushing baked pretzels with melted butter and dipping them in cinnamon sugar.
They’re perfect for party platters, after-school snacks, game-day spreads, or even as the bread for sandwich sliders.
You can also cut them into bite-sized pieces before baking for pretzel nuggets—great for dipping and sharing.
Storage Tips to Keep Them Fresh
Soft pretzels are best enjoyed fresh out of the oven, but they can be stored and reheated with excellent results.
Once fully cooled, store them in an airtight container at room temperature for up to 3 days.
To bring back that oven-fresh texture, reheat in a 350°F (177°C) oven for 5 minutes, or microwave for 15–20 seconds.
If you’re making a batch ahead, baked pretzels freeze beautifully—just skip the salt before baking, cool completely, and freeze in a zip-top bag or airtight container for up to 3 months.
To serve, brush with water, sprinkle with salt, and bake directly from frozen.
You can also refrigerate shaped, unbaked pretzels for up to 24 hours or freeze the raw dough for future baking.
Frequently Asked Questions Answered Clearly
1. Can I skip the baking soda bath?
While you can skip it, the baking soda bath is what gives pretzels their deep color, chewy crust, and signature flavor. Without it, the pretzels will taste more like soft rolls. If needed, an egg wash (1 beaten egg + 1 tablespoon milk) can help with browning and salt adhesion, but the flavor won’t be the same.
2. What type of yeast should I use?
You can use either instant yeast or active dry yeast—both work well in this recipe. Instant yeast doesn’t require proofing and can be added directly, while active dry yeast may need a few extra minutes to fully dissolve in warm water before continuing.
3. How do I know if I’ve kneaded the dough enough?
The dough should feel smooth, slightly elastic, and soft. A good trick is the “windowpane test”: stretch a small piece of dough—if you can see light through it without it tearing, it’s ready.
4. Can I use whole wheat flour instead?
Yes, you can substitute up to 50% of the all-purpose flour with whole wheat flour for a slightly denser, heartier pretzel. You may need to add a little extra water, as whole wheat absorbs more moisture.
5. How can I make these vegan?
This recipe can easily be made vegan. Use a plant-based butter alternative and skip the egg wash (if you’re using it). For the topping, use non-dairy milk to brush the pretzels before baking and help the salt adhere if not doing the baking soda bath.
