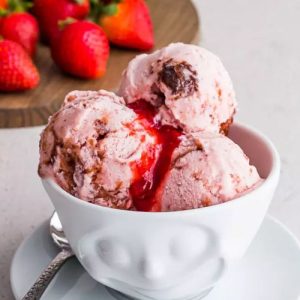
This Strawberry Balsamic Ice Cream is a refreshing twist on classic strawberry ice cream—creamy, fruity, and lightly tangy.
Roasted strawberries bring out natural sweetness, while white balsamic vinegar enhances brightness and black pepper boosts depth.
With fewer saturated fats than custard-based ice creams and a touch of honey instead of refined sugar, it’s a wholesome indulgence.
Perfect for everyday enjoyment, this recipe is simple, meal-prep friendly, and freezer-stash worthy.
Strawberry Balsamic Ice Cream
Equipment
- 1 Sheet pan (lined with parchment paper)
- 1 Blender or Food Processor
- 1 Mixing Bowl
- 1 Whisk
- 1 Ice Cream Maker
- Freezer-safe container with lid (1 pint capacity)
- Parchment paper (for covering)
Ingredients
- 10 oz about 1 pint fresh strawberries, hulled and halved
- ¼ cup honey
- 3 cups eggless ice cream base chilled
- ¼ cup white balsamic vinegar
- ⅛ teaspoon freshly ground black pepper
- ¾ cup strawberry preserves
Instructions
- Preheat & Prep the Berries: Heat the oven to 300°F / 150°C. Line a rimmed sheet pan with parchment so the juices don’t burn and you can scrape every flavorful drop later. Hull the strawberries, halve any large ones, and pat them dry so they roast, not steam.
- Honey Coat & Arrange: Spread the strawberries in a single, roomy layer on the lined pan. Drizzle ¼ cup honey evenly over the fruit, turning a few pieces with a spoon so most surfaces get a light gloss. Keep space between berries; crowded fruit won’t caramelize as well.
- Slow Roast for Concentrated Flavor: Slide the pan onto the center rack. Roast 15 minutes, then gently stir to expose new surfaces.Continue roasting ~20 minutes more, until the berries look slightly collapsed, edges darken in spots, and the pan juices thicken into a sticky, ruby syrup. You’re looking for soft, jammy fruit with light caramel notes, not dryness.
- Cool & Save Every Drip: Remove the pan and let the berries rest until warm, not hot—about 10–15 minutes. Tip the tray so the juices pool; use a flexible spatula to scrape all the syrupy goodness and berries into a blender. The parchment makes this easy—don’t leave any caramelized bits behind.
- Blend into Silky Purée: Blend on high until completely smooth—about 30–60 seconds depending on your blender. If seeds bother you, press the purée through a fine sieve back into the blender jar or a bowl. Aim for a pourable, glossy sauce with no chunky pieces.
- Chill the Purée Thoroughly: Transfer the strawberry purée to a covered container and refrigerate until cold throughout (at least 2 hours). Starting cold is key for a fine, creamy texture during churning.
- Build the Tangy Base: In a large, cold mixing bowl, whisk together the chilled strawberry purée, ¼ cup white balsamic vinegar, and ⅛ tsp freshly ground black pepper until the mixture smells bright and aromatic. Pour in 3 cups cold eggless ice cream base, whisking just until uniform and smooth—no streaks. Over-whisking can add bubbles, so stop once blended.
- Churn to Soft-Serve: Pour the mixture into your pre-chilled ice cream maker. Churn according to the manufacturer’s directions until the ice cream reaches soft-serve thickness and clings to the dasher, typically 18–25 minutes. It should form soft mounds that hold gentle peaks. Avoid over-churning, which can turn the texture icy.
- Loosen the Preserves for Swirling: While the machine runs (or right before it finishes), stir ¾ cup strawberry preserves with a fork to loosen to a spoonable, ribboning consistency. If very stiff, microwave 5–10 seconds to relax—don’t let it get hot; you just want it fluid enough to ripple.
- Layer & Ripple Like a Pro: Spoon a 1-inch layer of churned ice cream into a freezer-safe pint container (or two smaller containers). Add scattered dollops of preserves (about 2–3 tablespoons per layer), then repeat: ice cream, dollops, ice cream, dollops. Do not stir. For a natural ripple, lightly zigzag a butter knife once through the layers, stopping before it blends pink throughout.
- Parchment Cap & Freeze to Set: Press a piece of parchment directly onto the surface to prevent ice crystals, then seal with a lid. Place the container in the coldest zone of your freezer (back corner, away from the door). Freeze until scoopable-firm, at least 6 hours or overnight.
- Serve, Store & Small Fixes: Before serving, let the pint sit at room temp 3–5 minutes for an easy scoop. Store tightly covered for up to 3 months. If the texture feels too firm, a brief temper on the counter restores creaminess; if slightly icy, a longer initial chill before churning usually prevents it next time.
Notes
- Roast the strawberries slowly at low heat to intensify sweetness and enhance natural fruit flavors.
- Always chill the purée completely before blending with the ice cream base to ensure creamy results.
- White balsamic vinegar adds brightness and balance without overpowering sweetness.
- A tiny pinch of black pepper enhances the fruitiness, not spiciness.
- Swirl preserves gently for a ripple effect—avoid overmixing.
- Freeze in the coldest part of the freezer to maintain a smooth, scoopable texture.
- For best flavor, let the ice cream sit out for 3–5 minutes before scooping.
- The ice cream will keep for up to 3 months but tastes best within 2–3 weeks.
- Swap honey with maple syrup or agave for a plant-based version.
- Strawberry purée can be made ahead and stored in the fridge or freezer for later use.
Chef’s Secrets for Perfect Texture
The key to making silky, scoopable homemade ice cream lies in temperature control and layering techniques.
Always begin with chilled ingredients—warm purée or base can lead to icy results.
Roasting strawberries at a low temperature ensures the fruit develops a deeper, jam-like richness without drying out.
When swirling in the preserves, use a gentle hand to avoid overmixing, which can dull the contrast between cream and jam.
Lastly, freezing the container in the back of the freezer minimizes exposure to warm air and prevents crystal formation.
Serving Suggestions to Try at Home
This ice cream shines as a stand-alone dessert but can easily become the star of a larger spread.
Try serving scoops in crisp waffle cones or alongside buttery shortbread cookies for an indulgent pairing.
It also makes a wonderful topping for warm brownies, pound cake, or even a slice of cheesecake, where the tangy vinegar cuts through richness.
For a lighter touch, spoon it over fresh berries or serve as a refreshing finale to a summer barbecue.
A drizzle of dark chocolate or a sprinkle of fresh mint adds extra flair.
Storage Tips for Long Freshness
Homemade ice cream doesn’t include the stabilizers found in store-bought versions, so proper storage is essential.
Always press parchment or plastic wrap directly onto the surface before sealing the container with a lid—this prevents freezer burn and keeps the texture smooth.
Store in the coldest corner of your freezer, away from the door, where temperature swings are less frequent.
The ice cream tastes best within the first few weeks, but if stored properly, it will remain enjoyable for up to three months.
To refresh slightly hardened ice cream, let it soften on the counter for five minutes before scooping.
Frequently Asked Questions
1. Can I make this recipe without an ice cream maker?
Yes! Prepare the base as directed, then pour it into a shallow, freezer-safe dish. Freeze for 30–40 minutes, stir vigorously to break up ice crystals, and repeat every 30 minutes until creamy.
While texture won’t be as smooth as churned, it will still taste delicious.
2. What can I use instead of white balsamic vinegar?
White balsamic is mild and fruity, but if unavailable, you can use a splash of apple cider vinegar or lemon juice. Stick to small amounts to avoid overpowering the strawberries.
3. Do I have to use honey, or can I substitute it?
Honey adds floral sweetness, but you can replace it with agave syrup or maple syrup for a vegan-friendly version.
Keep in mind that maple will add a deeper flavor, while agave is more neutral.
4. How do I prevent ice crystals from forming?
Ensure all components (purée and base) are thoroughly chilled before churning.
Always cover the surface with parchment or plastic wrap before sealing with a lid, and avoid frequent opening of the freezer to maintain consistent temperature.
5. Can I make this ice cream ahead for a party?
Absolutely! This recipe is great for meal prep. Make the ice cream up to a week in advance, store it properly, and simply let it soften slightly at room temperature before serving.
For presentation, consider pre-scooping into balls and freezing them on a tray so you can serve quickly.
