This Strawberry Cheesecake recipe perfectly balances richness and lightness, offering a creamy texture without the heaviness typical of classic New York-style cheesecakes.
The use of sour cream and lemon zest adds a subtle tang that enhances the flavor complexity, while the homemade strawberry topping bursts with natural sweetness and freshness.
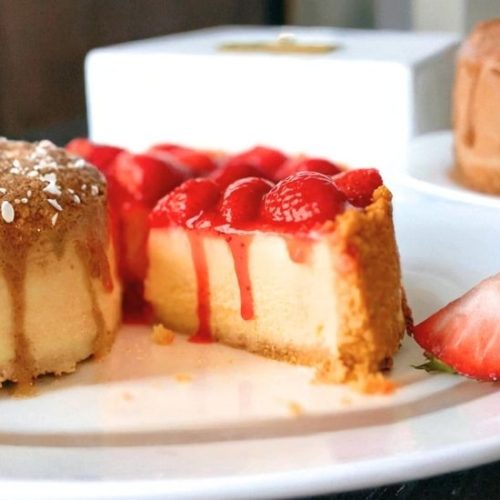
Deliciously Fresh Strawberry Cheesecake
Equipment
- 1 20cm / 8-inch Springform Pan
- 1 Food processor
- 1 Electric Mixer or Hand Beater
- 1 Medium saucepan
- Measuring cups and spoons set
Ingredients
For the Biscuit Base:
- 200 g plain biscuits such as Marie biscuits or Graham crackers, crushed
- 120 g unsalted butter melted
For the Cheesecake Filling:
- 500 g cream cheese softened to room temperature
- 2 tablespoons all-purpose flour
- 1 teaspoon pure vanilla extract
- ½ cup full-fat sour cream
- 1 ½ cups superfine caster sugar
- Zest of 1 lemon
- 3 large eggs at room temperature
For the Strawberry Topping:
- 500 g fresh strawberries half diced and half halved
- 2 tablespoons lemon juice or water
- ½ cup granulated white sugar
- ½ teaspoon vanilla extract
- 1 ½ teaspoons cornstarch
- 2 tablespoons water
Instructions
- Prepare the Pan: Preheat your oven to 160°C (320°F) for a conventional oven, or 140°C (295°F) if using a fan-forced oven.Take a 20 cm (8-inch) springform pan and flip the base upside down. Lightly grease the bottom and line it with parchment paper that extends beyond the edges for easy removal. Grease the sides of the pan as well.
- Make the Biscuit Crust: Place the biscuits in a food processor and pulse until they become fine crumbs. Add the melted butter and pulse briefly until the mixture resembles damp sand. Press the crumbs evenly into the prepared pan, pressing firmly against the bottom and up the sides to form a sturdy crust. Use a flat-bottomed cup or measuring cup for even pressure.
- Prepare the Cheesecake Filling: In a mixing bowl, beat the cream cheese on medium speed just until smooth—avoid whipping to prevent cracks. Add the flour and beat briefly to combine. Mix in the vanilla extract, sour cream, sugar, and lemon zest until incorporated. Add the eggs one at a time, mixing briefly after each, just until blended. Pour the filling over the biscuit crust, smoothing the surface gently.
- Bake the Cheesecake: Place the springform pan in the oven and bake for about 55 minutes.The top should turn a light golden color without cracking, and the center should still slightly wobble when gently shaken. Once done, leave the oven door slightly ajar and let the cheesecake cool inside for 20 minutes to prevent surface cracking.
- Chill the Cheesecake: Transfer the cheesecake to the refrigerator, keeping it in the pan, and chill for at least 4 hours or overnight to set completely.
- Prepare the Strawberry Topping: In a saucepan, combine the diced strawberries, sugar, vanilla extract, and lemon juice (or water). Cook over medium heat, stirring occasionally, until the strawberries break down and release juices, about 10 minutes. Mix the cornstarch with water to form a slurry and stir it into the pan.Add the halved strawberries and cook for another minute until the sauce thickens to a syrupy consistency. Remove from heat and cool completely.
- Assemble and Serve: Once the cheesecake is chilled and firm, carefully remove the sides of the springform pan. Use the parchment paper to slide the cheesecake onto a serving platter. Spoon the cooled strawberry sauce evenly over the top, arranging the halved strawberries cut-side down for a beautiful presentation. Chill for an additional 2 hours before slicing and serving.
Notes
- Choice of Biscuits: Use plain, lightly sweet biscuits like Marie, Graham crackers, or Digestives. The crumbs should be fine but slightly coarse to hold the crust firmly when pressed.
- Cream Cheese Texture: Softened cream cheese at room temperature ensures a smooth filling. If only spreadable cream cheese is available, omit the sour cream to maintain texture.
- Lemon Juice or Water: Use lemon juice for a slight tang if strawberries are sweet. If strawberries are tart, water is a good alternative to balance flavors.
- Cooling Tips: Cooling the cheesecake slowly with the oven door ajar helps prevent cracking. Patience in chilling is key to a creamy, stable texture.
- Strawberry Sauce Consistency: Aim for a thick, jam-like sauce that still “oozes” slightly when cut. Adjust thickness by adding a small amount of water if too thick after cooling.
- Storage: Store the cheesecake in the refrigerator and consume within four days for optimal freshness. The strawberry topping is best added on the day of serving or the day before.
Nutritionally, this dessert provides a moderate source of protein from cream cheese and eggs, alongside a good amount of calcium, contributing to bone health.
Although indulgent, the recipe uses real ingredients, avoiding processed fillers.
It’s an excellent option for everyday cooking because it’s straightforward to prepare, with clear step-by-step instructions and a prep time that fits well into a busy schedule.
The make-ahead aspect makes it ideal for entertaining or meal prepping desserts, and the fresh strawberry sauce adds a wholesome twist that feels both luxurious and approachable.
Must-Have Tools for Perfect Results
Springform Pan (20cm/8-inch)
Essential for baking cheesecakes, this pan’s removable sides make it easy to release your delicate cheesecake without damaging the crust or top. A versatile must-have for all layered desserts and delicate cakes.
Food Processor
Perfect for turning biscuits into fine crumbs quickly and evenly, a food processor saves time and effort. Beyond cheesecakes, it’s invaluable for making doughs, purees, and chopping ingredients with precision.
Electric Mixer or Hand Beater
Achieve smooth, lump-free cheesecake filling by gently blending cream cheese, eggs, and other ingredients without over-aerating. This tool is essential for batters, frostings, and whipping creams in everyday baking.
Saucepan
Ideal for preparing the strawberry topping, a quality saucepan ensures even heat distribution for simmering fruit and thickening sauces. Its versatility extends to cooking sauces, custards, and more.
Measuring Cups and Spoons
Precision in baking is key—these tools guarantee accurate ingredient quantities for perfect texture and flavor every time. A fundamental set for any kitchen.
Chef’s Secrets for Creamy Perfection
Achieving a perfectly smooth and crack-free cheesecake starts with gentle mixing.
Over-beating the cream cheese filling introduces too much air, which can cause cracks during baking, so mix just until the ingredients come together.
Using room temperature ingredients—especially the cream cheese and eggs—ensures they blend smoothly and evenly, preventing lumps. Pressing the biscuit crust firmly up the sides of the pan creates a sturdy base that supports the filling while baking.
Cooling the cheesecake slowly by leaving the oven door slightly open helps prevent sudden temperature changes that lead to cracks on the surface.
Lastly, chilling the cheesecake thoroughly for several hours or overnight allows it to set properly, resulting in a creamy texture that holds its shape beautifully when sliced.
Serving Suggestions to Impress Guests
This strawberry cheesecake is wonderfully versatile and pairs beautifully with a variety of accompaniments.
Serve it simply with a dollop of freshly whipped cream for added richness or garnish with a sprinkle of toasted almonds or crushed pistachios for extra crunch and visual appeal.
For a festive touch, add fresh mint leaves or a dusting of powdered sugar on top. It also complements a glass of sparkling wine or a light rosé, making it ideal for celebrations or special occasions.
If you want to lighten the indulgence, pair slices with a fresh berry salad or citrus sorbet for a refreshing contrast.
Storage Tips for Freshness and Flavor
Proper storage is key to maintaining the cheesecake’s creamy texture and fresh flavor.
Always refrigerate the cheesecake, covered loosely with plastic wrap or stored in an airtight container, to prevent it from absorbing any odors from the fridge.
If you prepare the strawberry topping in advance, keep it in a separate sealed container and add it just before serving to avoid sogginess.
The cheesecake tastes best within four days of preparation, although it remains safe to eat beyond that but may become denser.
For longer storage, cheesecake can be frozen without the topping, tightly wrapped in plastic and foil.
Thaw overnight in the fridge and add fresh strawberry topping before serving.
Frequently Asked Questions (FAQs) Answered
1. Can I use other fruits instead of strawberries?
Absolutely! This cheesecake pairs well with various fruit toppings such as blueberries, raspberries, or mixed berries. Simply cook down your chosen fruit with sugar and a bit of lemon juice, thickened with cornstarch, just like the strawberry topping.
2. How do I prevent cracks on my cheesecake?
Avoid over-mixing the filling and bake the cheesecake at a low temperature. Cooling it slowly with the oven door slightly open after baking also helps reduce cracking. Using room temperature ingredients and not overbaking are crucial.
3. Can I make this cheesecake ahead of time?
Yes, the cheesecake benefits from chilling overnight, which enhances flavor and texture. Prepare the crust and filling a day in advance and add the strawberry topping just before serving for best results.
4. Is it possible to make this cheesecake gluten-free?
Yes! Simply substitute the biscuit base with gluten-free plain crackers or cookies. Ensure the cornstarch used in the topping is also gluten-free to keep the entire recipe safe for gluten-sensitive diets.
5. What is the best way to soften cream cheese?
For smooth mixing, leave cream cheese at room temperature for about 30-60 minutes before using. Avoid microwaving as it can cause uneven softening or melting. Softened cream cheese blends more easily into the batter, ensuring a silky filling.
