This Toasted Marshmallow Ice Cream is a nostalgic treat that brilliantly captures the essence of campfire cookouts with its creamy custard base studded with toasted, slightly charred marshmallows.
What makes it stand out is the rich, velvety texture created by using high-fat whole milk and double cream, which delivers a luxuriously smooth mouthfeel while reducing icy crystals.
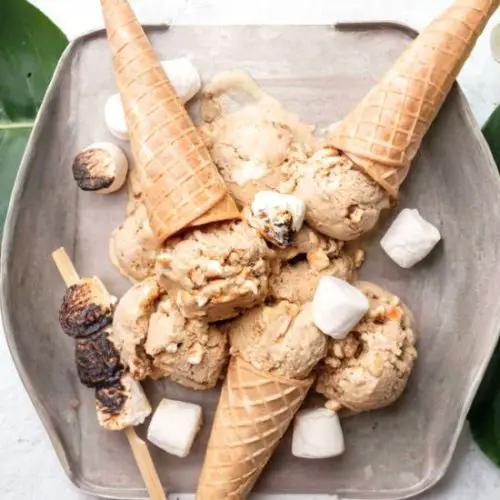
Easy Toasted Marshmallow Ice Cream
Equipment
- 1 heavy-based saucepan
- 1 medium mixing bowl
- (1) Ice Cream Machine
- 1 Fine Mesh Sieve
- 1 Baking tray
Ingredients
- 480 ml whole milk
- 300 ml heavy cream double cream
- 5 large egg yolks
- 100 g granulated sugar
- 1 vanilla bean pod
- 200 g mini marshmallows divided into two equal portions
Instructions
- Infuse Milk and Cream with Vanilla: In a heavy-bottomed saucepan, gently warm the whole milk and heavy cream together. Split the vanilla bean pod lengthwise and scrape out the seeds using the back of a knife. Add both the seeds and the pod into the milk mixture. Heat the liquid over medium heat until it begins to simmer lightly, with tiny bubbles forming around the edges. Avoid boiling to prevent curdling. Once it reaches this stage, remove the pan from heat.
- Whisk Egg Yolks and Sugar: In a medium-sized bowl, combine the egg yolks and granulated sugar. Whisk vigorously until the mixture becomes pale, thickened, and slightly fluffy, indicating the sugar has dissolved and the yolks have lightened.
- Temper the Egg Yolks: Slowly pour a small amount of the warm milk mixture into the yolks while continuously whisking to gently raise their temperature. Gradually add the rest of the milk mixture in a slow, steady stream, whisking constantly to prevent the eggs from scrambling.
- Cook the Custard Base: Transfer the combined mixture back into the saucepan. Place it over low heat and stir continuously with a whisk or wooden spoon. Cook gently until the custard thickens enough to coat the back of a spoon and holds a trail when you run your finger through it. Take care not to boil, as overheating can cause the eggs to curdle.
- Strain and Toast Marshmallows: Remove the vanilla pod and pour the custard through a fine mesh sieve into a clean bowl to ensure a silky texture. Next, spread half of the mini marshmallows evenly on a baking sheet and place them under the broiler (grill) until they develop a golden brown, toasted surface. Watch closely to avoid burning.
- Incorporate Toasted Marshmallows and Chill: While the custard is still warm, stir in the toasted marshmallows until they melt and fully blend into the custard, imparting a rich toasted flavor. Cover the bowl with plastic wrap, pressing it directly onto the custard’s surface to prevent a skin from forming. Allow the custard to cool to room temperature, then refrigerate for at least two hours, or ideally overnight, to chill thoroughly.
- Churn the Ice Cream: Pour the chilled custard into your ice cream machine and churn according to the manufacturer’s instructions. The mixture will transform into a smooth, soft-serve consistency.
- Add Final Toasted Marshmallows and Freeze: Toast the remaining mini marshmallows under the broiler as before. Gently fold them into the churned ice cream. Transfer the ice cream to a freezer-safe container and freeze for a minimum of six hours to firm up. When ready, scoop and serve your delicious homemade toasted marshmallow ice cream!
Notes
- Step-by-Step Visuals: For additional guidance, detailed photos are available on my blog to walk you through each stage of the process.
- Storage Advice: Store your ice cream in an airtight container for up to six weeks to maintain freshness.
- No Grill? No Problem: If you lack a broiler, use a kitchen torch to toast the marshmallows carefully. Alternatively, heating them in a hot oven will melt them but won’t provide the same toasted flavor.
- Quality Ingredients Matter: Since this recipe relies on few ingredients, opt for the highest quality milk, cream, and vanilla you can find to enhance flavor.
- Creaminess Tip: Using full-fat dairy is key to achieving a smooth, creamy texture by minimizing ice crystals.
- Marshmallow Size: Feel free to swap mini marshmallows for larger ones if you prefer chunkier pieces in your ice cream.
- Watch Closely When Toasting: Marshmallows can ignite quickly under high heat, so never leave them unattended during toasting.
- No-Churn Version: Heat one can of condensed milk gently and stir in 100 g toasted marshmallows until melted. Let cool completely, then whip 600 ml heavy cream with 1 teaspoon vanilla extract to soft peaks. Fold in remaining toasted marshmallows, freeze in a container for at least four hours, then serve.
The inclusion of egg yolks adds protein and a silky custard consistency, making it more satisfying than typical ice creams.
Though indulgent, the recipe balances sweetness with a hint of smoky caramelization from the toasted marshmallows, adding depth without overwhelming richness.
With moderate protein and fat content, this dessert offers a satisfying treat that pairs well with summer gatherings or cozy nights.
Its flexibility—whether churned traditionally or made no-churn style—makes it accessible and perfect for everyday indulgence or meal prepping for easy desserts on demand.
Must-Have Tools for Perfect Results
Heavy-Based Saucepan
Essential for gently heating milk and cream evenly without scorching, ensuring a smooth custard base. This durable pan is a kitchen staple for sauces, custards, and soups.
Medium Mixing Bowl
Perfect for whisking egg yolks and sugar to a pale, thickened consistency, this bowl’s size and stability simplify combining ingredients. A versatile tool for mixing, marinating, and prepping.
Ice Cream Machine
The heart of this recipe, it churns the custard to soft-serve perfection, incorporating air for creamy texture. Beyond ice cream, it’s invaluable for sorbets and frozen yogurts.
Fine Mesh Sieve
Crucial for straining the custard to remove any cooked egg bits or vanilla pod remnants, ensuring a silky smooth finish. A must-have for soups, sauces, and delicate custards.
Baking Tray (for grilling marshmallows)
Enables even toasting under the broiler for that signature caramelized flavor. A multipurpose tray perfect for roasting, baking, and grilling small ingredients.
Chef’s Secrets for Ultimate Creaminess
Achieving the perfect texture and flavor in this toasted marshmallow ice cream hinges on a few key techniques.
First, be patient with your custard base: heating the milk and cream slowly and avoiding boiling ensures a silky smooth texture without scrambling the eggs.
Tempering the egg yolks gradually prevents curdling and creates that rich custard consistency essential for creamy ice cream.
Using high-fat dairy is crucial — whole milk and heavy cream reduce ice crystal formation, giving you that luxurious mouthfeel.
When toasting marshmallows, keep a close eye because they can catch fire instantly; aim for a golden caramelization that imparts smoky depth without bitterness.
Finally, chilling the custard thoroughly before churning is the secret to light, airy ice cream that scoops easily and melts slowly on the tongue.
Serving Suggestions to Impress Guests
This ice cream is a delightful centerpiece for any summer dessert spread or cozy winter treat.
Serve it simply in a bowl to savor the toasted marshmallow flavor fully, or elevate it by pairing with warm chocolate brownies or a drizzle of caramel sauce for extra indulgence.
For a festive touch, add crushed graham crackers or toasted nuts on top to mimic classic s’mores flavors.
You can also serve it alongside fresh berries to balance the richness with a pop of tartness.
In addition, it works beautifully as an accompaniment to smoky barbecue meals or rich cakes, offering a cool contrast that refreshes the palate.
Storage Tips for Freshness and Flavor
Proper storage is key to maintaining your ice cream’s texture and taste.
Always keep it in an airtight container to prevent freezer burn and absorption of other freezer odors.
Press a piece of parchment paper or plastic wrap directly onto the surface before sealing to minimize ice crystal formation.
Store the ice cream in the coldest part of your freezer, not the door, where temperature fluctuations can cause melting and refreezing. Consume within six weeks for the best quality.
If the ice cream hardens too much after extended freezing, let it thaw at room temperature for 5 to 10 minutes before scooping to restore its creamy consistency.
Frequently Asked Questions About This Recipe
1. Can I use regular marshmallows instead of mini ones?
Absolutely! Larger marshmallows will give you chunkier, more noticeable bites of toasted sweetness, while mini marshmallows melt more thoroughly into the custard. Choose based on your texture preference.
2. What if I don’t have an ice cream machine?
You can try the no-churn method included in the notes, which uses whipped cream and sweetened condensed milk. It won’t be quite as airy but still delicious and easy to make.
3. How do I avoid the custard curdling?
Cook the custard gently over low heat and whisk constantly. Temper the eggs by slowly adding warm milk while whisking to raise the temperature gradually. Never let it boil.
4. Can I prepare the custard base in advance?
Yes, you can make the custard a day ahead. Just cover it tightly with plastic wrap pressed to the surface and refrigerate. Chill thoroughly before churning.
5. How should I toast marshmallows safely?
Use the broiler on low heat and watch them closely, as they can burn or catch fire in seconds. Alternatively, use a kitchen torch for more control and even caramelization.
