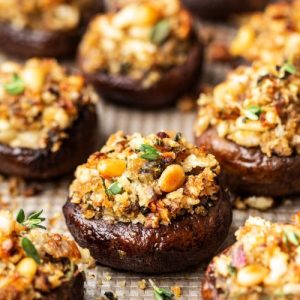
These vegan stuffed mushrooms are a savory, nutrient-packed treat that’s perfect for any occasion.
Loaded with plant-based protein, fiber-rich mushrooms, and heart-healthy nuts, they offer a satisfying, low-carb option with minimal saturated fat.
Quick to prepare, flavorful, and easy to make ahead, they’re ideal for weekday dinners, appetizer spreads, or meal prep that feels indulgent yet wholesome.
Vegan stuffed mushrooms
Equipment
- 1 Baking tray
- 1 Medium frying pan
- 1 Pestle and mortar (or knife for crushing garlic)
- 1 small mixing bowl
- 1 spoon or spatula
Ingredients
- 18 medium chestnut mushrooms
- 2 –4 tbsp olive oil
- 3 garlic cloves 2 diced finely + 1 whole
- Pinch of coarse sea salt
- Pinch of dry rosemary optional
- 2 medium shallots very finely diced
- 5 fresh sage leaves finely chopped
- 1 sprig rosemary leaves finely chopped
- Few thyme sprigs leaves picked
- 1 tbsp nutritional yeast
- ¼ tsp black pepper
- 2 tsp white or shiro miso
- Zest of 1 lemon + 1 tbsp lemon juice
- 35 g / ¾ cup panko breadcrumbs GF breadcrumbs optional
- 2 tbsp pine nuts or chopped walnuts
Instructions
- Preheat the Oven: Begin by setting your oven to 200°C (390°F). Allow it to fully preheat while you prepare the mushrooms and stuffing. Preheating ensures the mushrooms cook evenly and develop a tender yet flavorful texture.
- Clean and Prepare the Mushrooms: Gently brush each mushroom with a damp cloth to remove any dirt. Avoid washing them under running water as mushrooms absorb water easily, which can make them soggy. Carefully remove the stems from the caps and set the caps aside. Finely chop the stems; these will form the base of the stuffing mixture.
- Roast the Mushroom Caps: Lightly coat the mushroom caps with 2 tablespoons of olive oil. Place them on a baking tray, gill side down. Bake in the preheated oven for approximately 15 minutes. Flip them halfway through to ensure even cooking. Roasting first will deepen their flavor and reduce moisture, creating a perfect vessel for the stuffing.
- Prepare the Garlic Oil: While the mushrooms roast, crush the whole garlic clove with a pinch of coarse salt and a small amount of dried rosemary using a pestle and mortar. If you don’t have one, slice the garlic thinly and press it gently with the side of a knife. Once crushed into a smooth paste, slowly stir in 2 tablespoons of olive oil. Set this garlicky oil aside to brush inside the mushroom caps later.
- Cook the Aromatic Base: Heat 1 tablespoon (15 ml) of olive oil in a medium frying pan over medium heat. Add the finely diced shallots and cook gently, stirring often, until they become translucent and soft. This usually takes 3–4 minutes and forms the aromatic base that will enhance the flavor of the stuffing.
- Add Herbs and Seasoning: Once the shallots are soft, stir in the diced garlic (from the remaining cloves), chopped fresh sage, rosemary leaves, thyme leaves, nutritional yeast, black pepper, and ¼ teaspoon of salt. Fry for another 1–2 minutes until the garlic is fragrant. This step builds layers of flavor that make the stuffing rich and aromatic.
- Incorporate the Mushroom Stems: Add the finely chopped mushroom stems to the pan. Cook, stirring frequently, until they soften and release their natural moisture, about 5–6 minutes. The stems absorb the herb and garlic flavors, forming a savory, cohesive stuffing base.
- Prepare the Miso Mixture: Take the baking juices from the roasted mushroom caps and combine them with 2 teaspoons of white or shiro miso in a small bowl.Stir until smooth. Then fold this miso mixture into the cooked mushroom stem mixture. The miso adds umami depth and a gentle saltiness, enhancing the overall flavor.
- Add Zest, Lemon Juice, and Crunchy Ingredients: Mix in the zest of 1 lemon and 1 tablespoon of fresh lemon juice. Add ¾ cup (35 g) of panko breadcrumbs and 2 tablespoons of pine nuts or chopped walnuts. Stir well, ensuring that the crumbs and nuts are evenly distributed. This step adds texture, brightness, and a nutty crunch to the stuffing.
- Adjust Moisture and Seasoning: Drizzle 1–2 tablespoons (15–30 ml) of olive oil into the stuffing mixture, stirring until it is moist but not soggy. Taste the mixture and adjust salt, pepper, or lemon juice as needed. A well-balanced stuffing should be flavorful, aromatic, and easy to scoop into the mushroom caps.
- Stuff the Mushroom Caps: Remove the roasted mushroom caps from the oven (lower the temperature to 170°C / 340°F). Brush the insides of each cap generously with the prepared garlic oil. Using a spoon, fill each cap with the prepared stuffing, pressing gently to hold the mixture in place.
- Bake the Stuffed Mushrooms: Place the stuffed mushrooms back onto the baking tray. Bake at 170°C (340°F) for 15–20 minutes, or until the tops turn golden brown and slightly crisp. Keep an eye on them during the last few minutes to prevent burning.
- Serve and Enjoy: Remove the stuffed mushrooms from the oven and allow them to cool slightly for 2–3 minutes. Serve them warm as an appetizer, side dish, or part of a main meal. They pair beautifully with fresh salads, roasted vegetables, or grain bowls. Enjoy the herb-infused, garlicky, nutty flavors in every bite!
Notes
- Use fresh, firm mushrooms for the best texture; avoid wet or overly soft mushrooms.
- For a gluten-free version, substitute regular panko breadcrumbs with gluten-free panko or crushed nuts.
- Garlic oil can be made ahead and stored in the fridge for up to 3 days.
- Adjust herbs and spices according to taste; rosemary and thyme can be swapped for oregano or parsley.
- These mushrooms are perfect for meal prep, as they reheat well without losing flavor.
Chef’s Secrets For Maximum Flavor
To get the most intense flavors, make sure to finely dice the mushroom stems and shallots.
This ensures the stuffing cooks evenly and absorbs all the herb and garlic aromatics.
Don’t skip the garlic oil—it adds a subtle, rich garlicky depth to the caps.
Toasting the pine nuts lightly before adding them can enhance their nutty flavor.
Also, letting the mushrooms sit at room temperature for 10 minutes after baking allows flavors to settle and intensify.
Serving Suggestions For Every Occasion
These vegan stuffed mushrooms are highly versatile and can elevate any meal.
Serve them as an elegant appetizer at dinner parties or alongside a fresh green salad for a light lunch.
They pair beautifully with grain bowls, roasted vegetables, or even creamy soups.
For a festive touch, drizzle a balsamic reduction over the mushrooms before serving, or sprinkle extra toasted nuts and fresh herbs on top.
Storage Tips To Keep Mushrooms Fresh
Store any leftover stuffed mushrooms in an airtight container in the refrigerator for up to 3 days.
Reheat gently in the oven at 160°C / 320°F to maintain their texture—avoid microwaving, as it can make the mushrooms soggy.
For longer storage, the stuffing can be prepared separately and frozen for up to 2 months.
When ready to serve, thaw in the refrigerator overnight and bake until warmed through.
Frequently Asked Questions
1. Can I use other types of mushrooms?
Yes! Button mushrooms or cremini mushrooms can work, but chestnut mushrooms are preferred for their firm texture and deep flavor. Avoid very large or watery mushrooms, as they may release too much liquid.
2. Is this recipe nut-free?
If needed, you can omit the pine nuts or walnuts and replace them with sunflower seeds or extra breadcrumbs to keep the crunch. The recipe will still be flavorful and satisfying.
3. Can I make this recipe ahead of time?
Absolutely! You can prepare the stuffing and garlic oil a day in advance. Assemble the mushrooms and store them in the refrigerator overnight, then bake just before serving for fresh, hot results.
4. How can I make this recipe lower in fat?
Reduce the amount of olive oil in both the stuffing and garlic oil, or skip brushing the caps with oil before baking. You may also lightly spray the pan or use a non-stick tray to avoid excess oil.
5. Can this recipe be frozen?
Yes. Assemble the mushrooms without baking and freeze in a single layer on a tray. Once frozen, transfer them to a freezer-safe container. Bake directly from frozen at 170°C / 340°F, adding a few extra minutes to ensure even heating.
