
All products are selected by our editorial team for quality. If you buy through our links, we may earn a small commission at no extra cost to you.
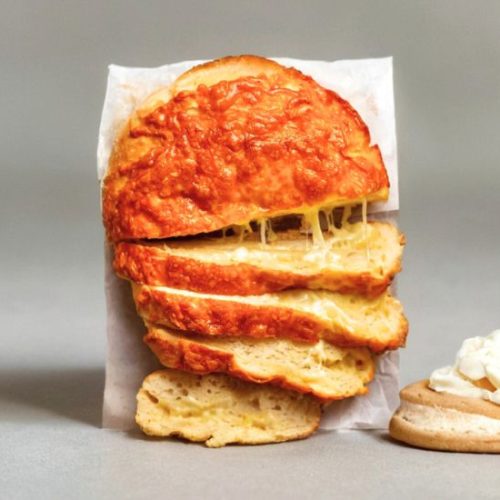
This no-knead cheese bread is a brilliant blend of simplicity and flavor, making it a standout choice for both novice and seasoned bakers.
Its appeal lies in the effortless preparation—just mix, rise, and bake—delivering an artisan-style loaf without the usual fuss.
Packed with 13 grams of protein and 2 grams of fiber per slice, this bread offers a satisfying, nutrient-rich option.
The use of Colby or similar melting cheeses contributes good fats and calcium while enhancing flavor and texture.
While it contains some saturated fat, the overall balance makes it a tasty yet mindful indulgence.
Ideal for everyday cooking, the recipe’s minimal hands-on time and forgiving dough make it perfect for meal prep, casual family dinners, or impressing guests with fresh homemade bread.
Its golden crust and cheesy interior create a comforting, satisfying bite every time.
Must-Have Tools for Perfect Results
Dutch Oven or Heavy-Based Pot
Essential for creating the steam environment that gives the bread its characteristic crusty exterior and tender crumb. Beyond this recipe, it’s perfect for soups, stews, and braises that require even heat distribution.
Rubber Spatula
Ideal for mixing the sticky, shaggy dough gently without deflating it, preserving the bread’s airy texture. This versatile tool is a kitchen staple for baking and cooking alike.
Digital Kitchen Thermometer
Ensures your water is the optimal warm temperature (~95°F) for yeast activation, crucial for consistent dough rising. Useful for monitoring temperatures in all kinds of cooking and baking projects.
Dough Scraper
Makes folding the dough easy and mess-free, helping to incorporate cheese evenly while gently shaping the dough. It’s also great for cleaning work surfaces and handling sticky doughs.
Parchment Paper
Facilitates effortless transfer of the dough into the hot pot and prevents sticking, making cleanup quick and easy. It’s indispensable for baking delicate or sticky goods.
Cheese Bread
Equipment
- 1 large mixing bowl
- 1 rubber spatula
- 1 dough scraper (or cake server/spatula)
- 1 digital kitchen thermometer (optional but recommended)
- 1 heavy-based pot or Dutch oven (24–28 cm / 4.5–8 quart) with lid
- Parchment paper sheet
Ingredients
- 3 cups bread flour see note on flour choice
- 2 teaspoons instant yeast rapid-rise yeast
- 1½ teaspoons kosher salt or cooking salt
- 1½ cups warm water about 95°F/35°C, comfortably warm to the touch
- 2½ cups tightly packed shredded Colby cheese or another melt-friendly cheese
Instructions
- Combine Dry Ingredients: In a large mixing bowl, whisk together the bread flour, instant yeast, and kosher salt until evenly blended.
- Add Warm Water and Mix: Pour the warm water into the dry ingredients. Using a rubber spatula, stir vigorously until the mixture forms a sticky, shaggy dough with no visible dry flour. The dough will be too sticky to knead but thicker than a batter.
- First Rise: Cover the bowl tightly with plastic wrap. Place it in a warm, draft-free area and let the dough rise for 2 to 3 hours, or until it doubles in size and the surface appears bubbly. You should notice the dough jiggle slightly when you gently shake the bowl.
- Prepare for Baking: About 30 minutes before the dough is ready, preheat your oven to 450°F (230°C) with a heavy lidded pot (Dutch oven) inside. This will ensure the pot is hot and ready for baking.
- Shape the Dough and Add Cheese: Lightly dust your work surface with 1 tablespoon of flour. Turn the dough out onto the surface and gently pat it into a roughly 8-inch (20 cm) round. Reserve about one-third of the shredded cheese for topping. Sprinkle half of the remaining cheese evenly over the dough surface.
- Fold and Layer Cheese: Using a dough scraper or similar tool, fold the dough edges toward the center four times, each time layering with a portion of the remaining cheese between folds. The final fold should leave the cheese mostly enclosed, with the last layer cheese-free to act as the bread’s base.
- Transfer to Parchment Paper: Flip the folded dough onto a sheet of parchment paper, seam-side down. Adjust the shape slightly if needed. Then sprinkle the reserved cheese generously on top.
- Bake Covered: Carefully remove the hot pot from the oven. Lift the parchment paper with the dough and place it inside the pot. Cover with the lid and bake for 35 minutes.
- Bake Uncovered for Browning: Remove the lid and continue baking the bread for another 10 minutes to develop a deep golden crust.
- Cool Before Slicing: Using the parchment paper, transfer the bread to a cooling rack. Let it rest for at least 10 minutes to finish cooking and set the crumb before slicing.
Notes
- Flour Choice: Bread flour gives a chewier, more artisan texture, but all-purpose flour can be used for a softer result.
- Yeast Tips: Instant yeast can be mixed directly with the dry ingredients. If using active dry yeast, dissolve it first in ¼ cup warm water before mixing with the remaining water and flour.
- Water Temperature: Aim for warm water that feels comfortable to your skin (~95°F/35°C). Too hot will kill yeast; too cold slows rising.
- Cheese Selection: Freshly shredded cheese melts better than pre-shredded varieties, which often contain anti-caking agents. Colby or similar melting cheeses (cheddar, Monterey Jack, Gruyere) work well. Avoid mozzarella alone as it lacks strong flavor.
- Warm Rising Spot: A cozy, draft-free place around 77°F (25°C) is ideal for rising. Using an empty dryer on low heat for a few minutes is a handy trick.
- No Dutch Oven? Use a metal baking pan with boiling water placed underneath in the oven to create steam and mimic the Dutch oven environment (avoid glass pans).
- Resting the Bread: Allowing the bread to cool at least 10 minutes before slicing prevents a gummy texture.
- Storage: Best fresh but remains tasty for 24-36 hours. Toast leftovers for renewed crispness and flavor.
Chef’s Secrets to Perfect Cheese Bread
Creating the ideal cheese bread without kneading is all about mastering the dough’s texture and timing.
Using bread flour helps develop a chewy crumb and crispy crust, but if you prefer a softer bite, all-purpose flour works just fine.
The dough should be sticky but manageable—this ensures the bread remains airy inside.
Don’t rush the rising stage; a full 2 to 3 hours at a warm, draft-free spot encourages a bubbly, flavorful dough.
Folding the cheese inside the dough layers, rather than simply mixing it in, creates pockets of molten cheese that surprise your palate with every bite.
Freshly shredded cheese is crucial because it melts more evenly without the anti-caking agents found in pre-shredded bags, giving you that gooey, luscious texture.
Finally, baking the bread covered traps steam, helping to develop a golden, crackly crust reminiscent of artisan bakery loaves.
Serving Suggestions for Delicious Cheese Bread
This versatile cheese bread is a crowd-pleaser that pairs wonderfully with a variety of dishes.
Serve it warm alongside a fresh green salad for a light lunch, or use it as the base for an indulgent grilled cheese sandwich.
It also complements soups and stews beautifully, adding richness and texture to each meal.
For a savory snack, slice the bread and toast it lightly before spreading with butter or garlic herb butter.
Leftovers can be transformed into hearty croutons or breadcrumbs for topping casseroles.
Because of its cheesy flavor, it pairs well with tangy dips like marinara or a creamy ranch dressing, making it perfect for casual get-togethers or game day treats.
Storage Tips to Keep Bread Fresh
To enjoy your cheese bread at its best, store it properly to maintain freshness and flavor.
Wrap the cooled loaf tightly in plastic wrap or place it in an airtight container at room temperature for up to two days.
Beyond that, slice the bread and freeze it in resealable bags—this way, you can toast individual slices straight from the freezer without sacrificing taste or texture.
Avoid refrigeration, as this tends to dry out bread quickly. When reheating, a quick toast or a few minutes in a warm oven will revive the crust’s crunch and soften the interior.
If you notice the bread is getting stale, repurposing it in recipes like bread pudding or savory strata is a delicious way to avoid waste.
Frequently Asked Questions About Cheese Bread
1. Can I use all-purpose flour instead of bread flour?
Yes, you can substitute all-purpose flour if bread flour is unavailable. The texture will be slightly softer and less chewy, but the bread will still be delicious.
2. What cheeses work best in this recipe?
Cheeses that melt well and offer good flavor are ideal, such as Colby, cheddar, Monterey Jack, or Gruyere. Avoid mozzarella alone, as it lacks strong flavor, though it can be combined with other cheeses.
3. How important is the water temperature for the dough?
Water temperature is key to activating the yeast properly. It should feel warm but not hot—around 95°F (35°C). Too hot water can kill the yeast, while too cold water will slow the rise.
4. Can I make this bread without a Dutch oven?
Absolutely. Use a metal baking pan filled with boiling water on a lower rack to create steam in the oven, mimicking the Dutch oven effect and producing a crispy crust.
5. How long can I store this bread before it goes stale?
Fresh cheese bread is best eaten within 24 to 36 hours. Storing it properly wrapped at room temperature helps preserve freshness. For longer storage, freezing sliced bread is recommended.
This recipe is inspired by recipetineats and has been carefully refined to enhance clarity, streamline preparation steps, and ensure accurate results. We’ve also included health benefits, nutritional highlights, and Must-Have Tools to help you get the best results every time you cook.
