All products are selected by our editorial team for quality. If you buy through our links, we may earn a small commission at no extra cost to you.
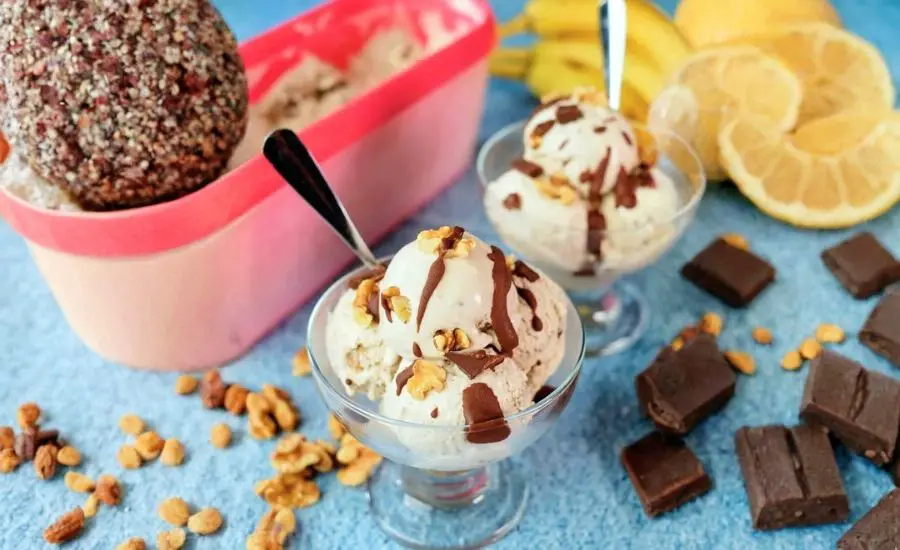
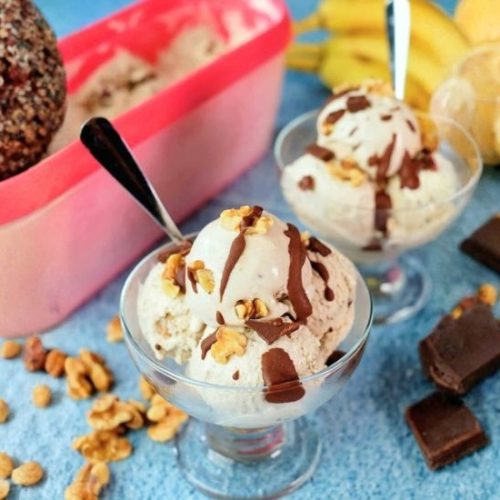
This Chunky Banana Nut Ice Cream is a delightful homage to the classic Chunky Monkey flavor, but with a wholesome twist.
What makes it special is the use of blended walnut milk and ripe bananas as the creamy base—cutting down on heavy cream without compromising richness.
It’s naturally sweetened with honey (or sugar), offers plant-based protein from walnuts, and includes heart-healthy fats.
Cornstarch replaces egg yolks, making the custard lighter and suitable for those avoiding eggs.
With just 253 calories per half-cup serving, this dessert manages to be satisfying yet mindful.
It’s packed with fiber, potassium, and antioxidants from bananas and dark chocolate, while offering a satisfying crunch from walnuts.
Perfect for meal prepping ahead of summer gatherings or as a treat anytime, this recipe is easy, indulgent, and nutritionally thoughtful—ideal for families or health-conscious dessert lovers.
Must-Have Tools for Perfect Results
Vitamix Blender
For ultra-smooth walnut milk and banana purée.
This high-speed powerhouse effortlessly transforms nuts and fruit into a velvety base, ensuring creamy texture without grit. Beyond ice cream, it’s perfect for smoothies, soups, nut butters, and sauces—an essential for any health-focused kitchen.
Saucepan (Heavy-Bottomed)
For cooking and thickening the custard base.
A quality saucepan prevents scorching and distributes heat evenly for perfect custards, sauces, or reductions. It’s a workhorse in everyday cooking from breakfast oatmeal to savory soups.
Ice Cream Maker
To churn and freeze the ice cream to perfection.
This appliance introduces air while freezing, giving your ice cream a professional-grade texture. A must-have for homemade frozen treats with consistent results every time.
Ice Cream Container (Freezer-Safe with Lid)
To store ice cream and prevent freezer burn.
A flat, shallow container with a tight lid helps the ice cream freeze evenly and maintain freshness. Great for portioning leftovers, too.
Nut Milk Bag or Cheesecloth
To strain walnut milk for a smooth, creamy base.
This reusable tool is key for silky plant-based milks. Also ideal for making yogurt, cold brew, or straining broths and sauces.
Banana Walnut Ice Cream
Equipment
- 1 Vitamix Blender – For blending walnut milk and banana mixture
- 1 Saucepan – For preparing custard base
- 1 Ice Cream Maker – for churning and freezing
- 1 Ice Cream Container – For freezing and storing the finished product
- 1 Nut Milk Bag or Cheesecloth (2 layers) – For straining walnut milk
Ingredients
For the Ice Cream Base
- 2 cups whole milk
- 1½ cups chopped walnuts divided
- ½ cup honey or granulated sugar
- 1½ tablespoons cornstarch
- ¼ teaspoon fine sea salt
- 3 large ripe bananas
- 1 cup heavy cream
- 1 tablespoon pure vanilla extract
- 2 ounces semi-sweet chocolate finely chopped
Optional Chocolate Swirl
- 2 ounces semi-sweet chocolate
- 2 tablespoons heavy cream optional, for a silkier texture
- 1 teaspoon light olive oil or other neutral oil
- 1 teaspoon instant coffee granules optional, enhances flavor
Instructions
- Blend Creamy Walnut Milk Base: In a high-speed blender, combine 1 cup of chopped walnuts with 1 cup of whole milk. Blend on high until the mixture is completely smooth and creamy. Strain the walnut milk through a nut milk bag or double-layered cheesecloth into a bowl, gently stirring to help it pass through. Discard solids or reserve for another use.
- Create Banana Walnut Purée: Return the strained walnut milk to the blender. Add peeled bananas and blend until the mixture is smooth and fully combined. Set aside.
- Thicken the Milk Custard: In a small bowl, whisk cornstarch with ¼ cup of milk until smooth—this will be your thickener. In a medium saucepan over medium-high heat, warm the remaining ¾ cup milk along with honey (or sugar), stirring occasionally. Once it begins to steam and small bubbles form at the edges, reduce the heat and slowly whisk in the cornstarch slurry. Continue cooking, stirring constantly, until the mixture thickens slightly and coats the back of a spoon.
- Cool the Custard Base Quickly: Remove the saucepan from heat. Prepare an ice bath by placing the saucepan in a large bowl filled with ice and cold water. Stir occasionally until the custard cools to room temperature.
- Combine Creamy Elements: To the cooled custard, stir in the salt, vanilla extract, reserved banana-walnut purée, and heavy cream. Whisk until well incorporated. Cover the mixture and refrigerate for at least 4 hours or overnight for optimal flavor and texture.
- Churn and Add Mix-Ins: Pour the chilled mixture into your ice cream maker and churn according to your machine’s instructions. Just as the ice cream reaches a soft-serve consistency, fold in the remaining ½ cup chopped walnuts and chopped semi-sweet chocolate.
- Optional Chocolate Swirl Finish: In a small bowl, microwave chocolate with heavy cream and oil in 20-second bursts, stirring in between until melted and smooth. Stir in instant coffee powder if using. Drizzle or swirl this into the churned ice cream as you transfer it to a storage container.
- Freeze to Set: Spoon the ice cream into a freezer-safe container. Press a piece of parchment paper directly over the surface to minimize ice crystals. Seal with a lid and freeze for at least 3 hours or until firm.
Notes
- Best Bananas to Use: Go for bananas that are soft, speckled, and deeply fragrant. The riper they are, the more naturally sweet and flavorful the ice cream will be.
- Sweetener Swap: Honey adds a gentle floral note, but you can use white or light brown sugar for a more neutral sweetness.
- Chocolate Swirl Tip: The instant coffee is optional but deepens the chocolate flavor beautifully. Use it if you want a bolder, mocha-like swirl.
- Freezing Tip: Storing the ice cream near the freezer door helps avoid rock-hard freezing since the temperature is slightly warmer there.
- Texture Tip: Let the ice cream sit at room temperature for 5–10 minutes before scooping for the creamiest texture.
Chef’s Secrets for Creamy Perfection
The key to achieving a luscious, scoopable banana nut ice cream lies in thoughtful ingredient prep and technique.
Start with very ripe bananas—the kind with deep brown speckles—because they’re naturally sweeter and pack maximum banana flavor.
Blending the walnuts with milk instead of simply folding them in creates a smooth, nutty richness that elevates the base without the need for extra cream or eggs.
When straining the walnut milk, be patient; this step ensures a silky texture and prevents any gritty residue in your final product.
Use a quality ice cream maker and don’t skip the chilling step—it’s crucial for achieving that professional, churned finish.
Finally, stirring in chopped chocolate and walnuts at the right moment—just as the ice cream starts setting—helps them stay suspended throughout rather than sinking.
Delicious Ways to Serve and Enjoy
This banana nut ice cream is incredibly versatile and satisfying on its own, but it also shines when creatively paired.
Scoop it into bowls and top with a drizzle of warm chocolate sauce or a sprinkle of sea salt for a gourmet twist.
Serve it over a slice of banana bread or waffles for a cozy dessert or brunch treat.
For entertaining, sandwich a scoop between oatmeal cookies or chocolate chip cookies for delightful ice cream sandwiches. It also pairs beautifully with fresh berries, caramelized bananas, or chopped dates.
If you’re looking for a beverage pairing, try a cold brew coffee or spiced chai on the side to enhance the nutty, sweet notes of the ice cream.
How to Store It Properly
To maintain that creamy, just-churned texture, store your ice cream in a flat, airtight container.
Press a layer of parchment paper directly onto the surface of the ice cream before sealing the lid—this prevents ice crystals from forming.
For best texture, freeze in the door of the freezer, where the temperature is slightly less intense and helps avoid rock-solid freezing.
It’s best enjoyed within 2 to 3 weeks, though it will stay safe to eat beyond that.
When ready to serve, allow the container to sit at room temperature for 5–10 minutes to soften slightly for easy scooping.
Avoid repeated thawing and refreezing, as this can lead to a gritty texture and diminish flavor.
Frequently Asked Questions and Answers
1. Can I make this dairy-free?
Yes! Replace the whole milk and heavy cream with full-fat coconut milk or a blend of almond milk and coconut cream. Be sure to use a high-fat plant-based option for the creamiest result.
2. Do I need an ice cream maker?
An ice cream maker gives the best texture, but you can try a no-churn version by freezing the blended base and stirring it vigorously every 30 minutes for a few hours to reduce ice crystals. Alternatively, use a high-speed blender with a frozen base for a “soft serve” style.
3. Why use cornstarch instead of eggs?
Cornstarch provides a silky, thick texture without the richness or cholesterol of egg yolks. It also simplifies the cooking process, making the custard easier and quicker to prepare.
4. What’s the benefit of using walnuts in the base?
Blending walnuts into the base not only adds plant-based protein and good fats but also creates a naturally rich and nutty flavor, reducing the need for extra cream or sugar.
5. Can I customize this recipe?
Absolutely! Try swapping walnuts for pecans, using maple syrup instead of honey, or adding cinnamon, nutmeg, or cardamom to the base for a warm spice twist. You can also add chopped dates, shredded coconut, or swirl in peanut butter.
This recipe is inspired by thedeliciouscrescent and has been carefully refined to enhance clarity, streamline preparation steps, and ensure accurate results. We’ve also included health benefits, nutritional highlights, and Must-Have Tools to help you get the best results every time you cook.
