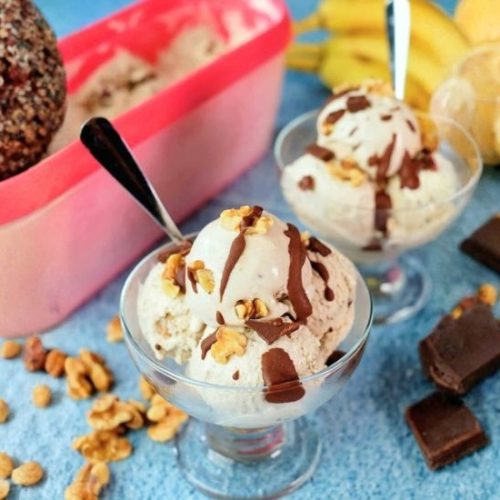
Banana Walnut Ice Cream
Creamy, crunchy, and packed with natural sweetness, this Chunky Banana Nut Ice Cream delivers all the indulgence of your favorite scoop shop treat—but with a healthier twist. Featuring walnut milk, ripe bananas, and a chocolate swirl, it’s a luscious yet guilt-conscious dessert perfect for summer and beyond.
Equipment
- 1 Vitamix Blender – For blending walnut milk and banana mixture
- 1 Saucepan – For preparing custard base
- 1 Ice Cream Maker – for churning and freezing
- 1 Ice Cream Container – For freezing and storing the finished product
- 1 Nut Milk Bag or Cheesecloth (2 layers) – For straining walnut milk
Ingredients
For the Ice Cream Base
- 2 cups whole milk
- 1½ cups chopped walnuts divided
- ½ cup honey or granulated sugar
- 1½ tablespoons cornstarch
- ¼ teaspoon fine sea salt
- 3 large ripe bananas
- 1 cup heavy cream
- 1 tablespoon pure vanilla extract
- 2 ounces semi-sweet chocolate finely chopped
Optional Chocolate Swirl
- 2 ounces semi-sweet chocolate
- 2 tablespoons heavy cream optional, for a silkier texture
- 1 teaspoon light olive oil or other neutral oil
- 1 teaspoon instant coffee granules optional, enhances flavor
Instructions
- Blend Creamy Walnut Milk Base: In a high-speed blender, combine 1 cup of chopped walnuts with 1 cup of whole milk. Blend on high until the mixture is completely smooth and creamy. Strain the walnut milk through a nut milk bag or double-layered cheesecloth into a bowl, gently stirring to help it pass through. Discard solids or reserve for another use.
- Create Banana Walnut Purée: Return the strained walnut milk to the blender. Add peeled bananas and blend until the mixture is smooth and fully combined. Set aside.
- Thicken the Milk Custard: In a small bowl, whisk cornstarch with ¼ cup of milk until smooth—this will be your thickener. In a medium saucepan over medium-high heat, warm the remaining ¾ cup milk along with honey (or sugar), stirring occasionally. Once it begins to steam and small bubbles form at the edges, reduce the heat and slowly whisk in the cornstarch slurry. Continue cooking, stirring constantly, until the mixture thickens slightly and coats the back of a spoon.
- Cool the Custard Base Quickly: Remove the saucepan from heat. Prepare an ice bath by placing the saucepan in a large bowl filled with ice and cold water. Stir occasionally until the custard cools to room temperature.
- Combine Creamy Elements: To the cooled custard, stir in the salt, vanilla extract, reserved banana-walnut purée, and heavy cream. Whisk until well incorporated. Cover the mixture and refrigerate for at least 4 hours or overnight for optimal flavor and texture.
- Churn and Add Mix-Ins: Pour the chilled mixture into your ice cream maker and churn according to your machine’s instructions. Just as the ice cream reaches a soft-serve consistency, fold in the remaining ½ cup chopped walnuts and chopped semi-sweet chocolate.
- Optional Chocolate Swirl Finish: In a small bowl, microwave chocolate with heavy cream and oil in 20-second bursts, stirring in between until melted and smooth. Stir in instant coffee powder if using. Drizzle or swirl this into the churned ice cream as you transfer it to a storage container.
- Freeze to Set: Spoon the ice cream into a freezer-safe container. Press a piece of parchment paper directly over the surface to minimize ice crystals. Seal with a lid and freeze for at least 3 hours or until firm.
Notes
- Best Bananas to Use: Go for bananas that are soft, speckled, and deeply fragrant. The riper they are, the more naturally sweet and flavorful the ice cream will be.
- Sweetener Swap: Honey adds a gentle floral note, but you can use white or light brown sugar for a more neutral sweetness.
- Chocolate Swirl Tip: The instant coffee is optional but deepens the chocolate flavor beautifully. Use it if you want a bolder, mocha-like swirl.
- Freezing Tip: Storing the ice cream near the freezer door helps avoid rock-hard freezing since the temperature is slightly warmer there.
- Texture Tip: Let the ice cream sit at room temperature for 5–10 minutes before scooping for the creamiest texture.
