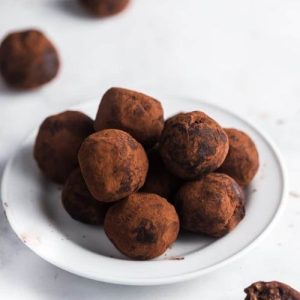
Indulge in a guilt-free chocolate treat with these easy-to-make Chocolate Date Truffles!
Packed with fiber-rich dates, protein from nuts and peanut butter, and healthy fats, they’re a naturally sweet, nutrient-dense snack.
Quick to prepare and perfect for meal prep, these bite-sized truffles satisfy your chocolate cravings while keeping your energy steady throughout the day.
Chocolate Date Truffles
Equipment
- processor
- 1 bowl for cocoa powder
- Parchment-lined baking sheet
- Measuring cups and spoons
- Hands for rolling
Ingredients
- 1 ½ cups 270 g fresh dates, pitted
- ¼ cup 40 g almonds
- ⅓ cup 95 g peanut butter
- 1 tablespoon dutch-processed cocoa powder plus extra for dusting
Instructions
- Prepare the Ingredients: Start by gathering all your ingredients in one place: pitted dates, almonds, peanut butter, and cocoa powder. Make sure the dates are soft and fresh; if they feel a bit dry, soak them in warm water for 10 minutes, then drain thoroughly. This ensures your truffles will be smooth and easy to shape.
- Process the Dates and Nuts: Place the pitted dates and almonds into a food processor. Pulse the mixture in short bursts until the nuts are finely chopped and evenly combined with the dates. The goal is a sticky, cohesive texture where the nuts are noticeable but small enough to blend well with the dates.
- Add Peanut Butter and Cocoa: Once the dates and almonds are ready, add the peanut butter and 1 tablespoon of cocoa powder to the food processor. Process the mixture until all ingredients are fully incorporated. You should have a rich, dark, slightly sticky dough that holds together easily when pressed. Taste the mixture and adjust if needed—if you prefer a sweeter truffle, add a teaspoon of maple syrup or a few extra dates.
- Prepare Your Rolling Station: Line a baking sheet with parchment paper and set it aside. Pour a small amount of cocoa powder into a shallow bowl for dusting later. To make rolling easier and prevent sticking, lightly dampen your hands with water. This will keep the truffles from clinging to your fingers while shaping them.
- Shape the Truffles: Scoop out small portions of the mixture, roughly a tablespoon each. Roll each portion between your palms to form smooth, even balls. Take your time to ensure each truffle is well-shaped; a uniform size helps them look professional and ensures even servings.
- Coat in Cocoa Powder: Once the truffles are shaped, gently roll each one in the cocoa powder until fully coated. This not only adds a finishing touch but also enhances the chocolate flavor while preventing the truffles from sticking together. Shake off any excess cocoa before placing the truffle on the parchment-lined tray.
- Chill the Truffles: After all the truffles are rolled and coated, place the tray in the refrigerator. Allow them to chill for at least 30 minutes to firm up. Chilling not only improves their texture but also makes them easier to handle when serving or packaging.
- Store Properly: Once chilled, transfer the truffles into an airtight container. They can be stored in the fridge for up to 1 week or frozen for longer-term storage. Bring them to room temperature for a few minutes before serving for the best texture and flavor.
- Serve and Enjoy: Present your Chocolate Date Truffles on a small plate or in decorative paper cups for a treat-ready snack. Perfect for a quick energy boost, a dessert alternative, or even a thoughtful homemade gift. Savor the rich chocolate taste balanced with natural sweetness from dates and crunch from almonds in every bite.
Notes
- Use soft, fresh dates for the best texture; if using dry dates, soak them briefly in warm water.
- Almonds can be swapped with walnuts, cashews, or hazelnuts depending on your flavor preference.
- Peanut butter adds creaminess, but almond butter or cashew butter also work beautifully.
- For a sweeter truffle, add a drizzle of maple syrup or honey (if not strictly vegan).
- Rolling with damp hands helps prevent the mixture from sticking to your fingers.
- Dusting with cocoa powder adds a rich chocolate kick and prevents the truffles from clumping together.
- These truffles are naturally gluten-free, dairy-free, and refined-sugar-free.
- Great for meal prep—make a batch and store for grab-and-go snacks all week.
Chef’s Secrets for Perfect Truffles
The key to smooth and flavorful Chocolate Date Truffles lies in ingredient quality and balance.
Always choose fresh, soft dates, as they create a creamy base without the need for added sweeteners.
Toasting the nuts lightly before blending can enhance their flavor, adding depth and nuttiness to each bite.
For a richer chocolate taste, use Dutch-processed cocoa, which delivers a smoother, less acidic flavor than regular cocoa powder.
Finally, don’t rush the processing step—the mixture should be finely blended but still textured enough to keep the truffles interesting.
Serving Suggestions for Every Occasion
These truffles are versatile and can be served in many creative ways.
For a simple snack, enjoy them straight from the fridge as an energy-boosting bite.
To elevate them for a dinner party, place each truffle in a mini paper liner and arrange them on a platter.
For a festive twist, roll them in shredded coconut, finely chopped pistachios, or crushed freeze-dried raspberries instead of cocoa powder.
They also pair beautifully with a cup of coffee, tea, or even a glass of red wine, making them suitable for both casual and elegant occasions.
Storage Tips for Lasting Freshness
To keep your Chocolate Date Truffles at their best, store them in an airtight container in the refrigerator.
They will stay fresh for up to 7 days and maintain their firm texture.
If you’d like to extend their shelf life, freeze them for up to 3 months.
Simply place them on a tray to freeze individually, then transfer to a freezer-safe container or bag.
When ready to enjoy, allow the truffles to thaw in the fridge for a few hours or at room temperature for 15 minutes before serving.
Avoid storing them at room temperature for long periods, as this may cause them to soften too much.
Frequently Asked Questions
1. Can I make these truffles without a food processor?
Yes, but it requires extra effort. You can finely chop the dates and nuts by hand, then mix them with peanut butter and cocoa using a sturdy spoon. The texture may be slightly chunkier, but the flavor will remain delicious.
2. What other nuts can I use instead of almonds?
You can easily substitute almonds with walnuts, cashews, hazelnuts, or even pecans. Each nut brings a unique flavor and texture, so feel free to experiment based on what you have on hand or your personal taste.
3. Are these truffles suitable for a vegan diet?
Absolutely! The recipe is naturally vegan, dairy-free, and gluten-free. Just ensure that the nut butter you use contains only nuts and no added dairy or sweeteners if you want to keep it strictly plant-based.
4. Can I add extra flavor to the truffles?
Yes! You can enhance the flavor with a pinch of sea salt, a dash of cinnamon, or a splash of vanilla extract. For a more indulgent version, add a handful of dark chocolate chips into the mixture before rolling.
5. How can I make these truffles look more festive?
Instead of rolling them in cocoa powder, try coating them with shredded coconut, sesame seeds, finely chopped nuts, or colorful sprinkles. This not only makes them visually appealing but also adds extra flavor and texture.
