All products are selected by our editorial team for quality. If you buy through our links, we may earn a small commission at no extra cost to you.
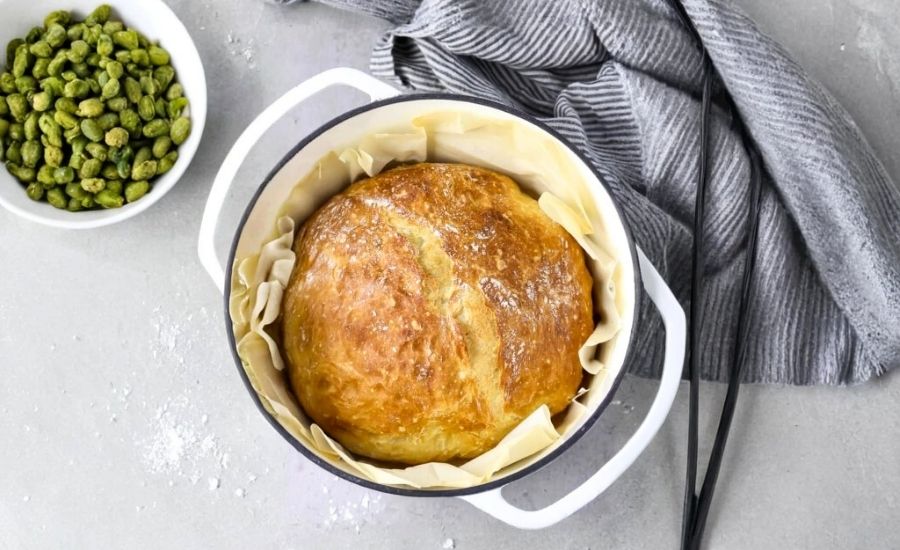
This No Knead Artisan Bread is a minimalist baker’s dream—requiring only four pantry staples and zero kneading.
Its appeal lies in the perfect contrast between a golden, crackly crust and an airy, tender crumb, achieved with virtually no effort.
It’s also surprisingly nutritious for a simple bread: each slice delivers 8 grams of plant-based protein, 2 grams of fiber, and very low saturated fat, making it a heart-friendly option for daily enjoyment.
With no added sugar, preservatives, or dairy, it suits a wide range of diets, including vegetarian and low-fat lifestyles.
This bread is an excellent option for everyday cooking: it’s hands-off, forgiving, and ideal for beginners.
Whether you’re serving it fresh with soup or toasting it for avocado toast, it elevates simple meals into something special.
Plus, it’s freezer-friendly—perfect for meal prep and busy weeks.
Must-Have Tools for Perfect Results
1. Dutch Oven (5–6 Quart)
This heavy-duty pot creates bakery-style steam and insulation, key for achieving a crusty exterior and fluffy interior. Beyond bread, it’s your go-to for stews, soups, and slow-cooked meals.
2. Mixing Bowl (Large, 4–5 Quarts)
Ideal for combining dough and allowing it to rise evenly. Its non-slip base and wide rim make it practical for everything from baking to tossing salads.
3. Bench Scraper or Dough Cutter
Crucial for folding sticky dough and shaping your loaf cleanly. It also doubles as a surface scraper for clean-up or portioning dough for rolls.
4. Parchment Paper (Non-Stick, Heat Resistant)
Prevents sticking and scorching when transferring dough to the hot Dutch oven. Also a baker’s best friend for roasting veggies or baking cookies.
5. Digital Kitchen Thermometer (Optional but Useful)
Ensures your water temperature is yeast-safe (120–130°F). Useful for everything from bread to perfectly cooked meats and candies.
Easy & Delicious No Knead Artisan Bread
Equipment
- 1 Large Mixing Bowl – for combining ingredients and letting the dough rise
- 1 Dutch Oven (5–6 qt) – for baking the bread and creating steam
- 1 Bench Scraper or Spatula – for shaping and folding the dough
- 1 Sheet of Parchment Paper – to prevent sticking in the Dutch oven
- 1 Cooling Rack – to cool the bread after baking
Ingredients
- 3 cups + 2 tablespoons 390g all-purpose flour – plus extra for shaping the dough
- 1½ teaspoons sea salt
- ½ teaspoon instant dry yeast – also known as quick-rise yeast
- 1½ cups 354ml warm water – ideally between 120°F and 130°F (hot but not boiling)
Instructions
- Mix Dry Ingredients: In a large mixing bowl, combine the flour, salt, and instant yeast. Stir well using a whisk or fork to evenly distribute the ingredients throughout the flour.
- Add Warm Water and Stir: Slowly pour the warm water into the bowl. Use a silicone spatula or wooden spoon to stir the mixture until a shaggy, sticky dough forms. It’s normal if it looks rough and lumpy—no kneading is required. Make sure all dry flour is incorporated.
- Cover and Let Rise: Cover the bowl with plastic wrap or a damp kitchen towel. Let it sit undisturbed in a warm, draft-free area for about 3 hours. During this time, the dough will expand significantly and develop visible bubbles on the surface.
- Prepare for Shaping: After the rise, lightly flour a clean work surface and your hands. Also, prepare a large bowl lined with parchment paper. Gently scrape the dough from the bowl onto the floured surface using a sturdy spatula or bench scraper. It will be very soft and sticky.
- Shape the Dough: Sprinkle the top of the dough with a little flour. Gently fold the dough toward the center 5–7 times to create a more compact, rounded shape. Tuck in the edges underneath as needed to form a smooth ball. Avoid over-handling to retain the airiness.
- Second Rest: Transfer the shaped dough onto the parchment paper inside the second bowl. Cover again and let it rest for 30 minutes while you preheat the oven.
- Preheat the Dutch Oven: Place your Dutch oven with the lid on inside your oven and preheat to 450°F (230°C). Let it heat fully for the entire 30-minute dough rest. This ensures the pot is hot enough to help the bread rise and form a crispy crust.
- Bake the Bread: Carefully remove the hot Dutch oven from the oven. Use the parchment paper to lift the dough and gently lower it into the pot. If the parchment sticks out too far, trim the excess to prevent burning. Cover with the lid and bake for 30 minutes.
- Uncover and Finish Baking: After 30 minutes, remove the lid and bake for an additional 8 to 12 minutes, or until the crust turns deep golden brown. Keep an eye on it in the final minutes to prevent overbrowning.
- Cool Before Slicing: Transfer the bread to a wire rack and allow it to cool completely—at least 45 minutes—before slicing. This step helps set the texture and prevents gumminess.
Notes
- Measuring Flour Accurately: For best results, spoon flour into your measuring cup and level it off with a flat edge. Avoid scooping directly from the bag, as it can pack the flour and throw off the balance.
- Water Temperature Matters: Use water that is hot to the touch but not scalding—between 120°F and 130°F. Water that is too hot can kill the yeast.
- Yeast Options: You can substitute active dry yeast for instant, but you’ll need to use ¾ teaspoon total. Dissolve it in ¼ cup warm water with a pinch of sugar and let it foam for 5–8 minutes before adding it to the dough. Reduce the remaining water to 1¼ cups.
- No Dutch Oven? A heavy oven-safe pot with a tight lid (ceramic or cast iron) works well too. Just confirm it’s safe at high temperatures.
- Storage Tips: Store the cooled bread in a paper bag or bread box at room temperature for up to 2 days. To refresh the crust, sprinkle with water and bake at 400°F for 5–7 minutes.
- Freezing Instructions: Wrap the whole loaf or individual slices tightly in plastic wrap and freeze for up to 3 months. Reheat in a 350°F oven for 10–15 minutes or toast slices as needed.
Chef’s Secrets for Artisan Success
The secret to great no knead artisan bread lies in time and temperature—not elbow grease.
Letting the dough rest for several hours is what develops the flavor and open crumb, so don’t rush it.
For best results, ensure your kitchen is warm but not hot—around 70–75°F is ideal.
A digital kitchen thermometer can help ensure your water stays within the yeast-friendly range of 120°F–130°F.
Another crucial trick: preheating the Dutch oven thoroughly. This step mimics a professional bread oven, creating the steam necessary for a crisp, crackly crust.
Finally, resist the temptation to slice the bread while it’s still hot—cooling it fully gives the interior time to finish setting, so you’ll get those perfect slices every time.
Delicious and Versatile Serving Ideas
This artisan-style bread shines in both simple and elevated meals.
Enjoy it warm with a generous smear of salted butter or dip it into a bowl of homemade soup like tomato basil or creamy mushroom.
Its firm-yet-fluffy structure also makes it ideal for open-faced sandwiches, avocado toast, or bruschetta.
Pair it with a charcuterie or cheese board, or slice and toast it to serve alongside scrambled eggs for breakfast.
Slightly stale slices make excellent croutons or a rustic base for savory bread pudding.
With its mild, clean flavor and hearty texture, this bread complements almost anything on your table.
Best Ways to Store Bread
Once fully cooled, your artisan loaf should be stored at room temperature in a paper bag, bread box, or loosely wrapped in a clean kitchen towel.
Avoid storing it in plastic, which traps moisture and softens the crust. The bread is best enjoyed within 2 days.
To revive the crust, lightly mist the loaf with water and warm it in a 400°F oven for 5–7 minutes.
For longer storage, wrap the loaf or individual slices tightly in plastic wrap or foil, then freeze for up to 3 months.
When ready to enjoy, thaw at room temperature and reheat in the oven for a freshly baked feel.
Frequently Asked Questions Answered Clearly
1. Can I use whole wheat flour instead?
Yes, you can substitute up to half the all-purpose flour with whole wheat flour. Keep in mind it will produce a slightly denser texture and a nuttier flavor.
You may also need to add a tablespoon or two of extra water to keep the dough hydrated.
2. What if I don’t have a Dutch oven?
No problem! Use any large, oven-safe pot with a tight-fitting lid. Cast iron, ceramic, or even a heavy stainless-steel pot will work. Just ensure it can withstand 450°F and is large enough to allow the dough to expand.
3. My dough didn’t rise—what went wrong?
Check your yeast first—if it’s expired or the water used was too hot, the yeast may have been killed.
Make sure to use warm (not boiling) water, and always store yeast in a cool, dry place. Also, ensure your kitchen isn’t too cold during the resting period.
4. Why is my bread crust too soft?
The crust needs steam and high heat to get that iconic crunch. Always preheat your Dutch oven and bake with the lid on for the first 30 minutes. If needed, bake uncovered a bit longer at the end to crisp up the top.
5. How can I tell when it’s fully baked?
The crust should be golden to deep brown and sound hollow when tapped. For extra precision, use an instant-read thermometer—the internal temperature should be around 200–205°F when fully baked.
This recipe is inspired by veganhuggs and has been carefully refined to enhance clarity, streamline preparation steps, and ensure accurate results. We’ve also included health benefits, nutritional highlights, and Must-Have Tools to help you get the best results every time you cook.
