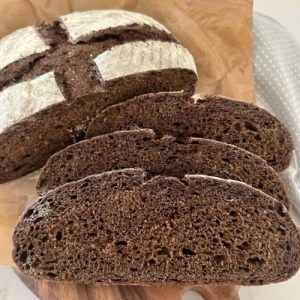
This hearty sourdough pumpernickel bread combines the earthy richness of dark rye flour with the subtle sweetness of molasses for a deeply satisfying loaf.
Packed with plant-based protein, gut-friendly fiber, and good-for-you minerals, it’s a wholesome alternative to refined breads.
Low in saturated fat and rich in complex carbs, this loaf not only fuels your body but also makes a versatile, everyday option—perfect for sandwiches, soups, or meal prep.
Sourdough Pumpernickel Bread
Equipment
- 1 Mixing Bowl
- 1 Digital Scale
- 1 Banneton basket
- 1 Dutch Oven
- 1 Wooden Spoon
- 1 Silicone Dough Scraper
- 1 Bench scraper
- Plastic wrap or damp towel
Ingredients
- 100 g active sourdough starter fed and bubbly
- 250 g bread flour
- 200 g dark rye flour or coarse rye meal
- 350 g water or brewed coffee for added depth
- 25 g molasses
- 10 g dark malt powder non-diastatic, or substitute cocoa powder
- 10 g salt
Instructions
- Autolyse & Initial Mixing: Start by combining the sourdough starter, water (or brewed coffee, if using), and molasses in a large mixing bowl. Stir until the liquids and starter blend into a smooth mixture. Next, add the dark rye flour, bread flour, malt powder (or cocoa), and salt. Mix thoroughly using the handle of a wooden spoon or your hand until no dry flour remains. The dough will look rough, sticky, and shaggy at this point—that’s perfectly fine.Cover the bowl with a damp towel or plastic wrap and allow it to rest for about 1 hour. This resting phase, called autolyse, helps the flour absorb liquid, making the dough easier to handle later.
- Forming the Dough Ball: Once autolyse is complete, gently gather the dough into a rough ball inside the bowl. To do this, scoop the dough from the edges, stretch it upward, and fold it back toward the center. Continue rotating the bowl and folding until the dough pulls together. Rye flour tends to be sticky and less elastic than wheat flour, so don’t worry if the dough feels tacky or looks less smooth than standard sourdough. After shaping it into a ball, cover again and rest for 30 minutes.
- Stretch & Fold for Strength: Now it’s time to build structure. Over the next 2 hours, perform 4–6 rounds of stretch and folds, spaced about 15 minutes apart.To do this, grab one edge of the dough, stretch it up gently, and fold it over the top. Rotate the bowl and repeat on all sides. Each round should include four folds. This step develops gluten, which rye flour naturally lacks, and helps create a strong, airy crumb. Expect stickiness and some tearing—that’s normal for rye-based doughs. By the last round, the dough should feel slightly more cohesive and elastic.
- Bulk Fermentation (First Rise): After completing the stretch and folds, cover the bowl and let the dough ferment at room temperature until it has almost doubled in size. Depending on the warmth of your kitchen, this can take anywhere from 4 to 8 hours. A well-fermented dough will appear puffy, airy, and jiggly, with visible bubbles just under the surface. Avoid letting it over-ferment, as rye dough can collapse if left too long.
- Shaping the Dough: Lightly dust your countertop with rice flour (preferred, since it won’t add gluten and reduces sticking). Using a silicone scraper, carefully turn the dough out of the bowl upside down—this means the sticky underside is now facing up. Gently shape the dough into your desired form, either a batard (oval) or place it directly into a loaf pan if you prefer an easier shape. To create surface tension, fold the dough inward toward the center, tucking the edges under as you go. Once shaped, transfer it into a banneton basket (seam-side up) or loaf pan. Dust with a little more rice flour if the dough feels tacky.
- Cold Fermentation (Second Rise): Cover the shaped dough loosely with a plastic bag or damp cloth and transfer it to the refrigerator for a long, cold fermentation. Leave it for at least 5 hours, but ideally between 12 and 36 hours. The extended chill not only slows fermentation but also enhances flavor, encourages a deeper sour tang, and helps form a firm outer skin that makes scoring much easier.
- Preheating the Oven & Dutch Oven: When you’re ready to bake, place your Dutch oven (with lid on) inside your oven and preheat to 230°C (450°F). Allow at least 45–60 minutes of preheating to ensure the Dutch oven and oven walls are fully heated. Keeping the dough cold in the fridge until the last possible moment helps achieve maximum oven spring.
- Scoring the Dough: Remove the dough from the refrigerator and gently place it onto a sheet of parchment paper cut large enough to act as a sling. Using a lame (bread scoring tool), razor blade, or sharp knife, score the top of the dough with one or more decisive cuts. This step guides the bread’s expansion in the oven, preventing uncontrolled cracking.
- Baking the Bread: Carefully transfer the dough, along with the parchment paper, into the preheated Dutch oven. Cover with the lid and bake for 30 minutes at 230°C (450°F). After 30 minutes, remove the lid, reduce the temperature to 210°C (410°F), and bake for another 10–15 minutes until the crust is dark brown and caramelized.This two-stage bake traps steam for oven spring, then crisps the crust to perfection.
- Cooling & Resting: Once baked, remove the bread from the Dutch oven and place it on a wire rack. Resist the urge to cut into it immediately! Because rye breads hold more moisture, they need at least 8–12 hours to fully cool and set. Cutting too early can result in a gummy texture. When cooled properly, your sourdough pumpernickel will slice beautifully and keep well for days.
Notes
- Rye Flour Variety: Use dark rye flour or coarse rye meal for authentic flavor. Pumpernickel-labeled flour works well if dark rye is unavailable.
- Molasses Substitution: Dark treacle or maple syrup can be used, though molasses provides the classic deep color and flavor.
- Starter Flexibility: A regular wheat sourdough starter works fine, but building a rye levain can enhance the earthy taste.
- Hydration Adjustment: Rye flour absorbs water differently; slight adjustments may be needed depending on your flour brand.
- Bulk Fermentation Timing: Warm kitchens accelerate fermentation; cooler environments may require longer. Dough should nearly double in size but not overproof.
- Cold Ferment Benefits: Longer refrigeration develops flavor, texture, and easier scoring. Between 12–36 hours works best.
- Baking Caution: Avoid opening the oven during the first 30 minutes to maintain steam for proper oven spring.
- Cooling Patience: Allow 8–12 hours for the bread to cool fully; this ensures clean slicing and prevents a gummy interior.
Chef’s Secrets For Perfect Bread
Achieving a perfect sourdough pumpernickel loaf is all about patience, temperature, and texture.
Always respect the autolyse and cold fermentation stages—these are critical for flavor development and dough structure.
When performing stretch and folds, be gentle yet thorough; folding encourages gluten formation without tearing the delicate rye.
Using rice flour during shaping prevents sticking without adding extra gluten.
Finally, scoring deeply and confidently allows the bread to expand beautifully in the oven, giving a rustic artisan appearance.
A hot Dutch oven is essential for optimal steam retention, resulting in a crispy crust and soft, moist crumb.
Serving Suggestions For Bread Pairings
Sourdough pumpernickel pairs beautifully with both savory and sweet accompaniments.
Serve slices with soft cheeses, smoked salmon, or avocado spread for a protein-packed snack.
It’s also excellent alongside hearty soups, stews, and roasted vegetables, where its dense texture holds up to rich flavors.
Toasting slices lightly and topping with nut butter or honey creates a quick breakfast or mid-morning snack.
For a fun twist, use this bread to make open-faced sandwiches with pickled vegetables, deli meats, or fresh herbs.
Its robust flavor allows for creative culinary combinations while maintaining balance.
Storage Tips To Maintain Freshness
To keep your pumpernickel bread at its best, store it at room temperature in a bread bag or wrapped in a clean kitchen towel for up to 3–4 days.
For longer storage, slice the loaf and freeze it in airtight bags; this allows you to take out only the slices you need without compromising freshness.
When ready to eat, toast or warm frozen slices to revive the texture.
Avoid storing in plastic at room temperature for extended periods, as this can trap moisture and make the crust soggy.
Proper cooling before storage is crucial to prevent condensation inside the wrapping.
Frequently Asked Questions
1. Can I use all-purpose flour instead?
Yes, you can replace bread flour with all-purpose flour, but the loaf may have a slightly less chewy texture.
Rye flour remains essential for authentic pumpernickel flavor, so do not skip it entirely.
2. Do I need a rye starter for this bread?
No, a regular wheat-based sourdough starter works perfectly.
However, using a rye levain enhances the earthy flavor and can intensify the sour profile, which many enthusiasts prefer.
3. How do I know if the dough is overproofed?
Overproofed rye dough appears extremely soft, wet, and may collapse when touched. Bubbles are excessive, and the dough loses its elasticity.
Ideally, the dough should nearly double in size and feel slightly wobbly but stable.
4. Can I bake this without a Dutch oven?
Yes, but a Dutch oven gives superior steam retention, helping the crust develop properly.
Without one, bake on a preheated baking stone or sheet and add a pan of boiling water to the oven to create steam.
5. How long will the bread stay fresh?
At room temperature, it stays fresh for about 3–4 days. Freezing sliced bread extends freshness up to 2–3 months.
Always cool completely before storing to maintain the proper texture and prevent moisture buildup.
