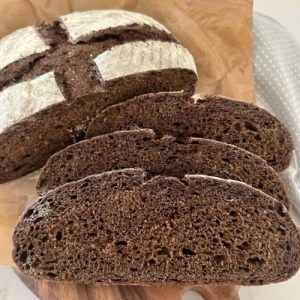
Sourdough Pumpernickel Bread
A rich, dark sourdough loaf made with rye flour, molasses, and a touch of malt powder. This bread delivers deep flavor, chewy texture, and wholesome nutrition—perfect for pairing with soups, cheeses, or spreads.
Equipment
- 1 Mixing Bowl
- 1 Digital Scale
- 1 Banneton basket
- 1 Dutch Oven
- 1 Wooden Spoon
- 1 Silicone Dough Scraper
- 1 Bench scraper
- Plastic wrap or damp towel
Ingredients
- 100 g active sourdough starter fed and bubbly
- 250 g bread flour
- 200 g dark rye flour or coarse rye meal
- 350 g water or brewed coffee for added depth
- 25 g molasses
- 10 g dark malt powder non-diastatic, or substitute cocoa powder
- 10 g salt
Instructions
- Autolyse & Initial Mixing: Start by combining the sourdough starter, water (or brewed coffee, if using), and molasses in a large mixing bowl. Stir until the liquids and starter blend into a smooth mixture. Next, add the dark rye flour, bread flour, malt powder (or cocoa), and salt. Mix thoroughly using the handle of a wooden spoon or your hand until no dry flour remains. The dough will look rough, sticky, and shaggy at this point—that’s perfectly fine.Cover the bowl with a damp towel or plastic wrap and allow it to rest for about 1 hour. This resting phase, called autolyse, helps the flour absorb liquid, making the dough easier to handle later.
- Forming the Dough Ball: Once autolyse is complete, gently gather the dough into a rough ball inside the bowl. To do this, scoop the dough from the edges, stretch it upward, and fold it back toward the center. Continue rotating the bowl and folding until the dough pulls together. Rye flour tends to be sticky and less elastic than wheat flour, so don’t worry if the dough feels tacky or looks less smooth than standard sourdough. After shaping it into a ball, cover again and rest for 30 minutes.
- Stretch & Fold for Strength: Now it’s time to build structure. Over the next 2 hours, perform 4–6 rounds of stretch and folds, spaced about 15 minutes apart.To do this, grab one edge of the dough, stretch it up gently, and fold it over the top. Rotate the bowl and repeat on all sides. Each round should include four folds. This step develops gluten, which rye flour naturally lacks, and helps create a strong, airy crumb. Expect stickiness and some tearing—that’s normal for rye-based doughs. By the last round, the dough should feel slightly more cohesive and elastic.
- Bulk Fermentation (First Rise): After completing the stretch and folds, cover the bowl and let the dough ferment at room temperature until it has almost doubled in size. Depending on the warmth of your kitchen, this can take anywhere from 4 to 8 hours. A well-fermented dough will appear puffy, airy, and jiggly, with visible bubbles just under the surface. Avoid letting it over-ferment, as rye dough can collapse if left too long.
- Shaping the Dough: Lightly dust your countertop with rice flour (preferred, since it won’t add gluten and reduces sticking). Using a silicone scraper, carefully turn the dough out of the bowl upside down—this means the sticky underside is now facing up. Gently shape the dough into your desired form, either a batard (oval) or place it directly into a loaf pan if you prefer an easier shape. To create surface tension, fold the dough inward toward the center, tucking the edges under as you go. Once shaped, transfer it into a banneton basket (seam-side up) or loaf pan. Dust with a little more rice flour if the dough feels tacky.
- Cold Fermentation (Second Rise): Cover the shaped dough loosely with a plastic bag or damp cloth and transfer it to the refrigerator for a long, cold fermentation. Leave it for at least 5 hours, but ideally between 12 and 36 hours. The extended chill not only slows fermentation but also enhances flavor, encourages a deeper sour tang, and helps form a firm outer skin that makes scoring much easier.
- Preheating the Oven & Dutch Oven: When you’re ready to bake, place your Dutch oven (with lid on) inside your oven and preheat to 230°C (450°F). Allow at least 45–60 minutes of preheating to ensure the Dutch oven and oven walls are fully heated. Keeping the dough cold in the fridge until the last possible moment helps achieve maximum oven spring.
- Scoring the Dough: Remove the dough from the refrigerator and gently place it onto a sheet of parchment paper cut large enough to act as a sling. Using a lame (bread scoring tool), razor blade, or sharp knife, score the top of the dough with one or more decisive cuts. This step guides the bread’s expansion in the oven, preventing uncontrolled cracking.
- Baking the Bread: Carefully transfer the dough, along with the parchment paper, into the preheated Dutch oven. Cover with the lid and bake for 30 minutes at 230°C (450°F). After 30 minutes, remove the lid, reduce the temperature to 210°C (410°F), and bake for another 10–15 minutes until the crust is dark brown and caramelized.This two-stage bake traps steam for oven spring, then crisps the crust to perfection.
- Cooling & Resting: Once baked, remove the bread from the Dutch oven and place it on a wire rack. Resist the urge to cut into it immediately! Because rye breads hold more moisture, they need at least 8–12 hours to fully cool and set. Cutting too early can result in a gummy texture. When cooled properly, your sourdough pumpernickel will slice beautifully and keep well for days.
Notes
- Rye Flour Variety: Use dark rye flour or coarse rye meal for authentic flavor. Pumpernickel-labeled flour works well if dark rye is unavailable.
- Molasses Substitution: Dark treacle or maple syrup can be used, though molasses provides the classic deep color and flavor.
- Starter Flexibility: A regular wheat sourdough starter works fine, but building a rye levain can enhance the earthy taste.
- Hydration Adjustment: Rye flour absorbs water differently; slight adjustments may be needed depending on your flour brand.
- Bulk Fermentation Timing: Warm kitchens accelerate fermentation; cooler environments may require longer. Dough should nearly double in size but not overproof.
- Cold Ferment Benefits: Longer refrigeration develops flavor, texture, and easier scoring. Between 12–36 hours works best.
- Baking Caution: Avoid opening the oven during the first 30 minutes to maintain steam for proper oven spring.
- Cooling Patience: Allow 8–12 hours for the bread to cool fully; this ensures clean slicing and prevents a gummy interior.
