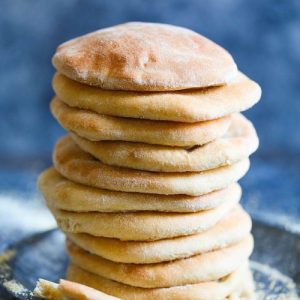
Experience the joy of homemade whole wheat pita bread—soft, fluffy, and irresistibly wholesome.
Packed with fiber from whole grains, heart-healthy olive oil, and plant-based protein, these pitas are a nutritious alternative to store-bought bread.
Quick to prepare and perfect for everyday meals, they make sandwiches, wraps, or dips effortlessly satisfying while supporting a balanced, health-conscious diet.
Whole Wheat Pita Bread
Equipment
- Electric mixer with dough hook
- Large mixing bowls (2)
- Rolling Pin
- Baking sheets (2)
- Parchment paper or silicone baking mats
- Clean kitchen towels
Ingredients
- 1¼ cups warm water 100–110°F
- 1¼- ounce packet active dry yeast
- 1 teaspoon honey
- 1½ cups all-purpose flour
- 1½ cups whole-wheat flour
- ¼ cup extra-virgin olive oil
- 1 teaspoon salt
Instructions
- Activate the Yeast: Start by pouring 1¼ cups of warm water (between 100–110°F) into the bowl of an electric mixer. Sprinkle in the 1¼-ounce packet of active dry yeast, followed by 1 teaspoon of honey. Gently stir to combine. Allow this mixture to rest for about 5 minutes until it becomes frothy and aromatic.This step ensures that the yeast is alive and ready to leaven the bread.
- Combine the Flours: In a large mixing bowl, sift together 1½ cups of all-purpose flour and 1½ cups of whole-wheat flour. Stir thoroughly to ensure the flours are evenly mixed. This combination balances the softness of all-purpose flour with the fiber-rich texture of whole wheat, giving your pita a tender yet wholesome structure.
- Make the Initial Dough: Gradually add about ½ cup of the flour mixture to the foamy yeast mixture. Stir until it forms a smooth, sticky batter. Cover the bowl with a clean kitchen towel and place it in a warm spot for 45 minutes to 1 hour. During this time, the dough will begin to rise and develop a light, airy texture.
- Knead in the Remaining Ingredients: Attach the dough hook to your electric mixer. Slowly add the remaining 2½ cups of flour mixture, about ½ cup at a time, along with ¼ cup of extra-virgin olive oil and 1 teaspoon of salt. Mix on low speed until a soft, cohesive dough forms. Then, increase the speed to medium-high and knead for 3 minutes. The dough should feel elastic, slightly tacky, and spring back gently when pressed.
- First Rise: Lightly oil a large bowl or coat it with nonstick spray. Transfer the kneaded dough to the bowl, turning it over once to coat all sides with a thin layer of oil. Cover with a clean towel and leave in a warm, draft-free spot for 45 minutes to 1 hour, until the dough has doubled in size. This first rise develops flavor and creates the airy structure characteristic of pita bread.
- Shape the Dough: Once the dough has doubled, gently punch it down to release excess air. Transfer it to a lightly floured surface. Divide the dough into 12 equal portions and shape each portion into a smooth, tight ball. This step ensures even baking and consistent puffing in the oven.
- Roll into Circles: Using a rolling pin, flatten each dough ball into a round about 5 inches in diameter. Aim for uniform thickness, around ¼ inch, so the pita puffs evenly while baking.Keep the rounds covered with a towel while working to prevent them from drying out.
- Prepare for Second Rise: Line two baking sheets with parchment paper or silicone baking mats. Arrange the rolled-out dough rounds on the sheets, leaving space between each one. Cover with a clean towel and allow the dough to rest for about 30 minutes. This second rise ensures the pitas puff up perfectly in the oven.
- Preheat the Oven: While the dough is resting, preheat your oven to 475°F (245°C). Position the oven rack in the center to promote even heat distribution.A fully preheated oven is crucial for the pitas to rise quickly and form their signature pocket.
- Bake the Pitas: Place the baking sheets in the preheated oven. Bake for 5–8 minutes, keeping a close eye on the pitas. They should puff fully and turn lightly golden but not brown. Remove them carefully using oven mitts to avoid burns.
- Cool and Serve: Transfer the baked pitas to a wire rack or a clean kitchen towel. Serve warm immediately, or let them cool completely for later use. These pitas are perfect for sandwiches, dips, or as a side to any meal. Store any leftovers in an airtight container to maintain softness.
Notes
- For best results, ensure water temperature is between 100–110°F to activate the yeast properly; water that is too hot may kill the yeast.
- Whole-wheat flour can make the dough slightly denser; combining it with all-purpose flour ensures a soft, fluffy texture.
- Pitas puff best in a very hot oven; preheating for at least 15 minutes is recommended.
- Do not over-flour the dough when rolling; a light dusting is enough to prevent sticking.
- Store leftover pitas in an airtight container at room temperature for up to 2 days, or freeze for longer storage.
Chef’s Secrets For Perfect Pitas
The key to perfectly puffed pita bread lies in the combination of a properly activated yeast, a well-kneaded dough, and a hot oven.
Ensure the dough is soft and elastic before the first rise, as this helps it stretch and create the characteristic pocket.
Let the dough rest sufficiently during both rises to develop flavor and structure.
Using parchment paper or a silicone mat prevents sticking and makes transferring the pitas easy.
For extra softness, brush lightly with olive oil after baking.
Serving Suggestions For Pita Bread
Whole wheat pitas are versatile and can complement a variety of meals.
Slice them open for sandwiches filled with hummus, grilled vegetables, or lean meats.
They make excellent accompaniments for Mediterranean dips such as tzatziki, baba ganoush, or babaganoush.
For a quick snack, warm a pita and serve with a drizzle of olive oil and sprinkle of za’atar.
You can also use them as mini pizza bases or cut into strips for homemade pita chips.
Storage Tips To Keep Fresh
To maintain the freshness and softness of your homemade pitas, store them in an airtight container at room temperature for up to 2 days.
For longer storage, wrap each pita individually in plastic wrap and place in a freezer-safe bag for up to 3 months.
When ready to use, thaw at room temperature and reheat in a warm oven or on a skillet for a few minutes.
Avoid refrigeration as it can dry the bread and make it less pliable.
Frequently Asked Questions
1. Can I use all whole-wheat flour?
Yes, but the pitas will be slightly denser and less airy. Mixing whole-wheat with all-purpose flour balances softness and fiber content, giving a fluffier texture.
2. Why didn’t my pitas puff up?
Common reasons include under-proofed dough, rolling the dough too thick, or baking in an oven that isn’t hot enough. Ensure proper rises and preheat the oven fully for best results.
3. Can I make the dough ahead of time?
Absolutely. After the first rise, you can refrigerate the dough for up to 24 hours. Bring it back to room temperature before shaping and baking.
4. Can I use another type of oil?
Yes, you can substitute extra-virgin olive oil with avocado or canola oil. Olive oil is preferred for flavor, but other neutral oils work as well.
5. How should I reheat leftover pitas?
Warm them in a preheated oven at 350°F for 3–5 minutes or on a skillet over medium heat for a minute on each side. Avoid microwaving too long, as it can make the bread chewy.
