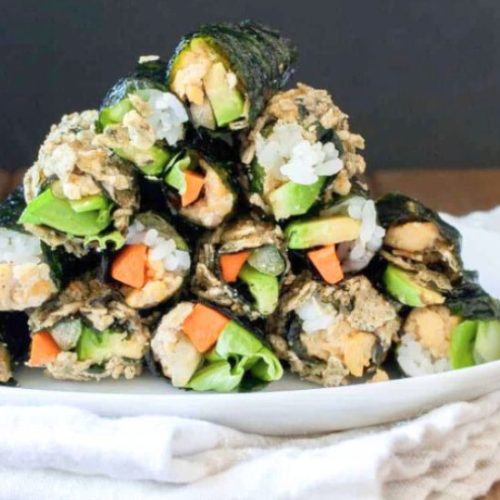
25-Minute Sushi Seaweed Snacks
Enjoy these healthy, customizable sushi seaweed snacks with creamy sauces and fresh vegetables. They’re high in plant-based protein, fiber-rich, and easy to make in under 30 minutes—ideal for lunch, snacks, or meal prep.
Equipment
- 2 Mixing Bowls
- 1 Cutting board
- 1 Chef’s knife
- Paper Towels (as needed)
- 1 Shallow Plate or Bowl
Ingredients
- 2 small packages seaweed snacks any flavor
- 1 cup cooked sticky white rice or brown rice
- 1 cup chickpeas about ½ can, divided
- 1 –3 tbsp vegan mayo or sauce of choice
- 1 –3 tbsp spicy cilantro cream or alternative sauce
- 1 –3 extra tbsp sauce for coating or dipping
- ½ avocado thinly sliced
- ½ carrot stick cut into matchsticks
- ½ celery stick cut into matchsticks
- ½ cucumber cut into matchsticks
- ¼ cup shredded lettuce
- ½ cup crushed chips optional, for crunch
Instructions
- Prepare the Seaweed Sheets: Lay your seaweed snack sheets between two slightly damp paper towels. Allow them to soften for 5–7 minutes. This gentle moisture makes the seaweed pliable and easier to roll without tearing. Avoid over-soaking, as too much water can make the sheets soggy and difficult to handle. While they rest, gather your fillings and sauces to streamline assembly.
- Mash the Chickpeas: Drain and rinse your chickpeas if using canned. Place them in a medium mixing bowl and mash thoroughly with a fork until smooth but slightly chunky for texture. Divide the mashed chickpeas evenly into two separate bowls. This allows you to create two distinct flavor bases for variety in your rolls.
- Mix the Flavored Sauces: In each bowl of mashed chickpeas, add your chosen sauces. One bowl might have vegan mayo, while the other can have spicy cilantro cream—or any preferred sauces. Stir until fully combined, ensuring the chickpeas absorb the creamy flavors. Adjust the amount of sauce according to your preference for creaminess and taste intensity.
- Prepare the Vegetables: Wash all vegetables thoroughly. Slice the avocado into thin, even slices. Cut the carrot, celery, and cucumber into matchstick-sized pieces. Shred the lettuce finely. Uniform cuts ensure the rolls are easy to assemble and provide a consistent texture in each bite.
- Assemble the Rolls: Remove one softened seaweed sheet and place it on a clean, flat surface. Layer a small amount of rice first, then add a portion of your mashed chickpea mixture. Add a few pieces of avocado, vegetables, and a sprinkle of shredded lettuce. Be mindful not to overfill—the key to a successful roll is a balance between fillings and the seaweed’s ability to hold them together.
- Roll the Seaweed Snacks: Gently fold the edge of the seaweed sheet over the fillings. Using your fingers, press and roll the sheet tightly, keeping the fillings snug inside. The sheet should naturally stick to itself, forming a compact roll. Repeat this process with the remaining sheets and fillings, experimenting with different combinations for flavor variety.
- Optional Crunchy Coating: For a crunchy exterior, spread your choice of sauce lightly over the outside of a completed roll. Place crushed chips in a shallow plate or bowl and roll the coated sushi gently in the crumbs, ensuring even coverage. This step adds a satisfying crunch and extra flavor dimension to the rolls.
- Serve and Enjoy: Arrange the rolls on a serving platter.Serve with extra sauce for dipping or enjoy them as-is. These sushi seaweed snacks are perfect for lunchboxes, snack times, or interactive family meals where everyone can customize their own roll.
- Storage Tips for Later: If not serving immediately, store the rolls in an airtight container in the refrigerator for up to 24 hours. Avoid pre-coating with chips if storing, as they may become soggy. Assemble crunchy coatings just before serving for maximum texture and flavor.
Notes
- Seaweed sheets should be softened just enough to roll; too wet will tear them.
- Customize fillings freely—use any vegetables, spreads, or proteins you enjoy.
- Crunchy coatings like crushed chips are optional but add a fun texture.
- Stick to moderate portions of sauce to avoid soggy rolls.
- Rolls are best eaten fresh but can be stored briefly in the fridge.
- This recipe is family-friendly and perfect for older babies or toddlers under supervision.
- Prepare vegetables and sauces ahead of time for faster assembly.