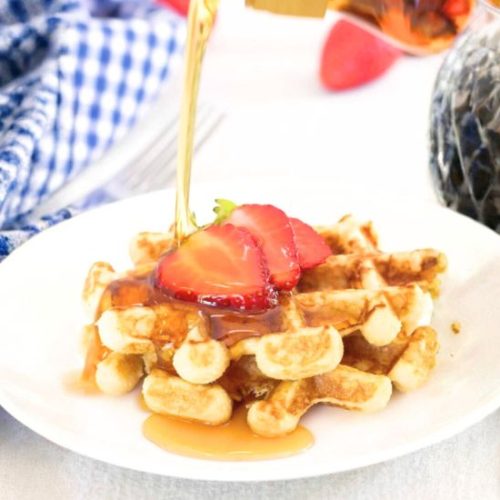
30-Minutes Coconut Flour Waffles
A wholesome, gluten-free waffle recipe using coconut flour, eggs, and healthy fats to create light, flavorful waffles perfect for breakfast or brunch.
Equipment
- 1 Non-Stick Waffle Maker
- 1 small mixing bowl
- 1 Medium mixing bowl
- 1 Whisk
- Measuring cups and spoons
- 1 Basting Brush or Cooking Spray
Ingredients
- ½ cup coconut flour loosely spooned
- ¼ teaspoon baking soda
- Pinch of salt
- Pinch of cinnamon
- 3 large eggs
- ½ cup milk coconut or almond milk recommended
- ¼ cup coconut oil or clarified butter melted
- ½ teaspoon vanilla extract
- Optional: 2 tablespoons liquid sweetener maple syrup or honey
Instructions
- Prepare Dry Ingredients Thoroughly: Begin by gathering your dry ingredients: coconut flour, baking soda, salt, and cinnamon. Using a small mixing bowl, measure out ½ cup of coconut flour—make sure to spoon it loosely into your measuring cup rather than scooping, as coconut flour is very absorbent and packing it tightly can throw off the recipe’s balance. Add ¼ teaspoon of baking soda for leavening, a pinch of salt to enhance flavor, and a pinch of cinnamon to add warmth and subtle spice. Whisk these dry components together gently but thoroughly until they are well combined and evenly distributed. This step ensures that your waffles will have a consistent texture and flavor throughout.
- Beat and Blend Wet Ingredients with Care: In a separate medium-sized mixing bowl, crack open 3 fresh eggs and beat them energetically using a whisk or hand mixer until the yolks and whites are fully combined and slightly frothy. Next, slowly incorporate ½ cup of your chosen milk—coconut or almond milk both work well for added flavor and creaminess—while continuing to whisk steadily. Pour in ¼ cup of melted coconut oil or clarified butter, ensuring it’s warm but not hot to avoid cooking the eggs prematurely. Add ½ teaspoon of pure vanilla extract for aroma and flavor depth.If you like a touch of sweetness, now is the time to mix in about 2 tablespoons of liquid sweetener such as maple syrup or honey. Whisk everything together thoroughly until the mixture is smooth and homogenous, with no streaks of oil or unmixed ingredients.
- Combine Dry and Wet Ingredients Carefully: Create a well in the center of your dry ingredient bowl, then gradually pour the wet mixture into it. Using a spatula or wooden spoon, gently fold and stir the batter together, ensuring all the flour is fully incorporated without overmixing. Coconut flour tends to absorb liquids quickly, so make sure the batter is well combined to avoid dry lumps but still light and airy. The final consistency should be thick but spoonable—not too runny. If the batter feels too stiff, you can add a splash more milk, one tablespoon at a time, until the desired texture is achieved.
- Preheat and Prepare Your Waffle Iron: Before cooking, plug in your waffle iron and set it to medium-high heat to allow it to preheat fully—this usually takes about 5 minutes. While waiting, lightly grease the waffle plates with coconut oil, melted butter, or use a cooking spray designed for high heat. This step is essential to prevent sticking and to help the waffles brown evenly and develop a crispy exterior. Using a basting brush for oil application ensures an even and thin coating without excess grease, preserving the delicate texture of the waffles.
- Cook the Waffles with Precision: Once your waffle iron signals that it’s ready, carefully spoon about 2 tablespoons of batter into each individual waffle cavity. Spread the batter slightly to fill the area, but avoid overfilling to prevent overflow during cooking. Close the lid gently and allow the waffles to cook undisturbed. Cooking time will vary depending on your waffle iron but typically takes between 3 to 5 minutes per batch. Look for a golden-brown color and a firm exterior before removing. If unsure, use a fork or toothpick to check for doneness—the inside should be cooked through without wet batter.Use a silicone spatula or wooden utensil to carefully lift each waffle out to avoid scratching your appliance.
- Serve Fresh with Your Favorite Toppings: Transfer the freshly cooked waffles to a wire rack or a plate lined with a paper towel to prevent sogginess.Serve immediately while warm for the best texture and flavor. These waffles pair beautifully with fresh fruit like berries or banana slices, a dollop of whipped coconut cream, a drizzle of maple syrup, or even dark chocolate chips for an indulgent treat. For a savory twist, consider topping with avocado, sautéed mushrooms, or a fried egg. Enjoy these waffles as a nourishing, delicious breakfast or brunch option that’s both wholesome and satisfying.
- Clean Up and Store Leftovers Properly: After cooking, unplug your waffle iron and allow it to cool completely before cleaning. Use a damp cloth or sponge to wipe the plates gently—avoid abrasive tools to maintain the non-stick surface. Leftover waffles can be stored in an airtight container in the refrigerator for up to 3 days.For longer storage, freeze waffles individually on a baking sheet before transferring to a freezer bag. Reheat frozen waffles in a toaster or oven for a crispy finish, preserving their delightful texture and taste.
Notes
- Use loosely packed coconut flour for accurate measurement, as it’s very absorbent.
- Adjust milk quantity slightly if batter seems too thick or too thin.
- For low-carb or keto versions, omit sweeteners or use sugar-free alternatives like monk fruit.
- Preheat waffle maker thoroughly for crisp, golden waffles.
- Lightly grease the waffle iron before each batch to prevent sticking.
- Serve waffles immediately for best texture or reheat leftovers in a toaster or oven.
- Add spices like cinnamon or nutmeg to customize flavor.