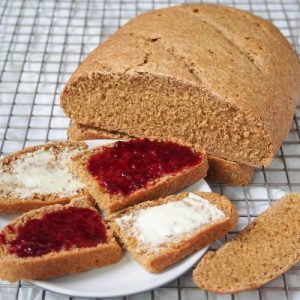
Authentic Swedish limpa bread
A soft, aromatic Swedish rye bread flavored with molasses, orange zest, and anise. This lightly sweet loaf has a hearty crumb and crisp crust, making it perfect for everyday meals, snacks, or sandwiches.
Equipment
- 1 Medium saucepan
- 1 Mixing Bowl (large)
- 1 Small spice grinder or mortar & pestle
- 1 Spatula or Wooden Spoon
- 1 Baking sheet (medium or half sheet)
- 1 Piece parchment paper
- (1) Cooling rack
Ingredients
- 1 cup milk
- 2 tablespoons molasses
- 2 tablespoons butter
- Zest of 1 orange about 1 tablespoon
- 1 teaspoon anise seeds or ground anise
- 1 cup rye flour
- 2 cups all-purpose flour
- 2 ¼ teaspoons instant yeast 1 packet
- 1 teaspoon salt
Instructions
- Warm and Infuse the Liquid Base: In a medium saucepan, combine the milk, molasses, butter, and freshly grated orange zest. Place the pan over medium heat and stir occasionally until the butter has completely melted and the molasses blends smoothly into the milk. The mixture should be well combined with a sweet, citrusy aroma. Remove from the heat and allow it to cool down until it’s lukewarm—this prevents the heat from harming the yeast later.
- Prepare the Anise Flavoring: If you are using whole anise seeds, grind them into a fine powder using a spice grinder or a mortar and pestle. This releases their natural oils and ensures the bread will have a subtle, evenly distributed licorice-like flavor. If using pre-ground anise, you can skip this step.
- Mix the Dry Ingredients: In a large mixing bowl, combine the rye flour, all-purpose flour, instant yeast, salt, and the ground anise. Use a whisk or spoon to mix thoroughly so the yeast and spices are evenly spread throughout the flour. This prevents clumping and ensures consistent flavor in every bite.
- Form the Dough: Pour the lukewarm milk mixture into the bowl of dry ingredients. Using a spatula or wooden spoon, begin mixing until a sticky dough starts to form. Once the mixture comes together, switch to using your hands to bring the dough into a rough ball.At this stage, it may feel slightly tacky, which is normal due to the rye flour.
- Knead the Dough: Lightly flour a clean work surface and transfer the dough onto it. Knead gently for about 5–7 minutes, pushing the dough forward with the heel of your hand, then folding it back over itself and turning it slightly each time. The dough will gradually become smoother and more elastic, although it won’t feel as silky as a wheat-only dough because of the rye. Avoid adding too much flour while kneading—just enough to prevent sticking.
- First Rise (Bulk Fermentation): Lightly oil a large bowl to prevent sticking. Shape the kneaded dough into a smooth ball and place it in the bowl. Cover the bowl with plastic wrap or a clean kitchen towel. Set it aside in a warm, draft-free spot and let the dough rise for about 1 hour, or until it has doubled in size. This stage allows the yeast to activate fully, creating air pockets that give the bread its soft crumb.
- Shape the Dough: Once the dough has risen, gently punch it down to release excess air. Turn it out onto a lightly floured surface and press it into a rectangle. Roll the dough into a log shape, tucking in the ends to create a smooth, rounded loaf.This shaping helps the bread hold its structure during baking.
- Second Rise (Proofing): Line a medium baking sheet with parchment paper and place the shaped dough onto it. Cover loosely with plastic wrap or a damp towel to prevent drying out. Allow the dough to proof for another 1 hour, or until it has doubled again in size. During this time, the loaf should become puffier and lighter to the touch.
- Preheat and Score the Bread: Toward the end of the second rise, preheat your oven to 350°F (175°C). Once the dough is ready, uncover it and, if desired, use a sharp knife or bread lame to score shallow slashes across the top. Scoring helps control the way the bread expands in the oven and adds a rustic, artisanal look.
- Bake the Limpa Bread: Place the tray in the preheated oven and bake for 35–40 minutes, or until the loaf is golden brown and the crust feels crisp. To check doneness, carefully lift the loaf with an oven glove and tap the bottom—it should sound hollow. If it doesn’t, return the bread to the oven for an additional 2–3 minutes.
- Cool Before Slicing: Once baked, transfer the bread to a cooling rack. Let it rest for at least 10–15 minutes before slicing. Cooling allows the crumb to set properly, ensuring clean slices and the best texture. Serve warm or at room temperature with butter, cheese, or your favorite spreads.
Notes
- Weighing ingredients ensures better accuracy and consistent results, especially when baking with rye flour.
- Lukewarm liquid is crucial—too hot can kill yeast, too cold can slow rising. Aim for around body temperature (100–110°F / 37–43°C).
- Rye flour creates a denser texture than wheat, so don’t expect an ultra-light loaf. That’s part of Limpa bread’s charm.
- Grinding whole anise seeds provides stronger flavor than pre-ground. Adjust the quantity based on taste preference.
- Scoring the loaf before baking isn’t essential but gives a rustic look and helps the bread expand evenly.
- Letting the bread cool before slicing keeps the crumb intact and prevents it from becoming gummy.
- Molasses adds sweetness and depth of flavor but can be replaced with honey or maple syrup for variation.