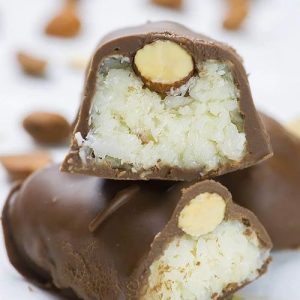
Chocolate Coconut Candy Bars
These no-bake Chocolate Coconut Candy Bars combine sweetened condensed milk, shredded coconut, roasted almonds, and milk chocolate for a quick and easy homemade treat. Fiber-rich, protein-packed, and full of good fats, they’re perfect for snacking, dessert, or gifting. Ready in just over an hour, they’re a simple way to satisfy your sweet cravings.
Equipment
- 1 8x8 inch baking dish
- Baking paper or aluminum foil
- Nonstick spray
- Mixing Bowl
- Spatula
- Knife
- Fork
- Tray lined with parchment paper
Ingredients
- 1 can 14 oz sweetened condensed milk
- 3 cups unsweetened shredded coconut adjust as needed
- 36 roasted almonds for 18 bars; 2 per bar
- 14 –16 oz milk chocolate chopped
Instructions
- Prepare Your Baking Dish: Start by lining an 8×8-inch baking dish with either parchment paper or aluminum foil. Make sure to leave an overhang on the sides—this will help you lift the candy bars out later with ease. Lightly spray the lining with nonstick spray to prevent sticking. Set the dish aside while you prepare the coconut mixture.
- Combine Sweetened Condensed Milk and Coconut: In a medium-sized mixing bowl, pour in the entire can of sweetened condensed milk. Gradually add 2 cups of unsweetened shredded coconut and stir until the mixture is well combined. The consistency should be thick but still slightly sticky. If it feels too runny to hold shape, slowly add more coconut, about ¼ cup at a time, until it’s moldable but not dry.
- Spread Coconut Mixture in Dish: Transfer the coconut mixture into your prepared baking dish. Wet your hands with a little water or lightly dampen a spatula to prevent sticking. Press the mixture firmly into the dish, spreading it into an even layer. Smooth the surface as much as possible. The goal is a uniform base that will make cutting and shaping the bars easier later.
- Arrange Roasted Almonds: Place roasted almonds evenly on top of the coconut layer. For 18 bars, use 36 almonds, arranging two per bar. Press the almonds gently into the coconut mixture so they stick, but don’t press too hard or the base may compress unevenly. This step gives the bars their signature nutty crunch.
- Firm the Mixture in Freezer: Place the baking dish in the freezer for 15–20 minutes. This allows the coconut-almond base to firm up, making it easier to cut into bars without crumbling. While waiting, prepare your cutting surface and parchment-lined tray for chocolate coating.
- Cut and Shape the Bars: After the base has firmed, carefully lift it out of the dish using the parchment or foil overhang. Transfer it to a cutting board. Using a sharp knife, cut the base into your desired number of bars (18 is recommended). Gently press the edges of each bar with your fingers to create smooth, rounded edges for a polished look. Return the cut bars to the freezer for an additional 30 minutes to harden fully.
- Melt the Chocolate: While the bars are firming, chop 14–16 oz of milk chocolate into small, even pieces. Melt the chocolate using a double boiler or microwave in 30-second intervals, stirring between each, until smooth and fully melted. Be careful not to overheat, as this can cause the chocolate to seize.
- Coat the Bars with Chocolate: Line a tray with parchment paper to catch any drips. Remove a few bars at a time from the freezer so the others remain firm.Using a fork, dip each bar into the melted chocolate, ensuring it is completely coated. Tap the fork gently on the side of the bowl to remove excess chocolate. Place the coated bars on the parchment-lined tray.
- Set the Chocolate: Place the chocolate-coated bars in the refrigerator or freezer until the chocolate has fully set, about 10–15 minutes. This step ensures the chocolate is firm and gives the bars a professional, glossy finish.
- Serve or Store: Once the chocolate is set, your bars are ready to enjoy. They can be stored in an airtight container in the refrigerator for up to 2 weeks, or in the freezer for longer storage. Perfect for quick snacks, dessert, or gifting, these bars combine sweet coconut, crunchy almonds, and creamy chocolate for an irresistible treat.
Notes
- The amount of shredded coconut may vary depending on the brand and moisture content—adjust gradually to achieve a moldable but not dry mixture.
- You can substitute roasted almonds with other nuts such as cashews or pecans if preferred.
- Use high-quality milk chocolate for the best flavor and smooth coating.
- Wetting your hands or spatula when pressing the coconut mixture helps prevent sticking.
- For cleaner chocolate coating, ensure bars are firm and cold before dipping.
- These bars are freezer-friendly and can be stored for up to a month.
