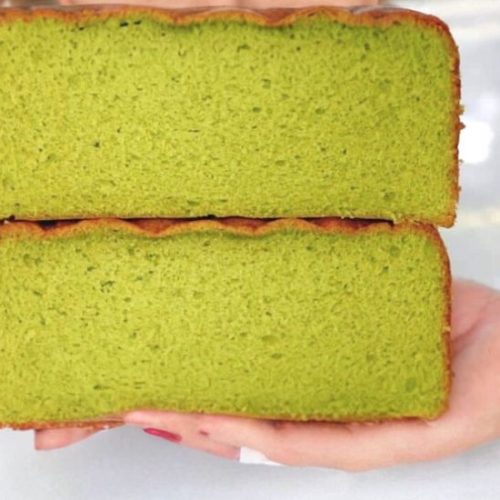
Delicious Matcha Sponge Cake
This matcha sponge cake delivers a light, fluffy texture infused with vibrant green tea flavor. Simple ingredients come together quickly to produce a healthy, satisfying dessert perfect for tea time or special celebrations.
Equipment
- 1 6-inch round cake pan
- 1 Fine Mesh Sieve
- 1 Stand mixer or hand mixer
- 1 silicone spatula
- Parchment paper (enough to line the pan)
Ingredients
- 100 g whole eggs about 2 large eggs
- 70 g granulated sugar ⅓ cup
- 55 g cake flour ½ cup
- 5 g matcha powder 2 teaspoons
- 15 g milk 1 tablespoon
- 15 g neutral oil 1 tablespoon, such as vegetable or canola
Instructions
- Preheat and Prepare the Oven: Begin by setting your oven temperature to 355°F (180°C). This moderate heat is essential to ensure the cake bakes evenly without drying out. While the oven warms, position the rack in the center to allow balanced air circulation, which promotes a consistent rise and golden color on your sponge cake.
- Prepare the Cake Pan: Line your 6-inch round cake pan with parchment paper to prevent sticking and promote easy cake release.To do this, cut a circle of parchment paper matching the pan’s bottom diameter, then gently press it into the pan. For the sides, cut strips of parchment paper or use a butter and flour dusting method: lightly grease the pan with softened butter, dust with flour, and tap out the excess. This extra step ensures the cake won’t stick and keeps the edges neat.
- Warm the Eggs and Sugar: In a heatproof mixing bowl, combine the whole eggs (about 100 grams) and granulated sugar (70 grams). Place this bowl over a pot of gently simmering water, creating a warm water bath. Constantly whisk the eggs and sugar as they warm, until the mixture reaches about 40–45°C (104–113°F)—warm to the touch, similar to a baby’s bath temperature. This warming step is crucial: it helps dissolve the sugar and allows the eggs to whip up into a stable, voluminous foam, which gives the sponge its light texture.
- Whip the Egg and Sugar Mixture to Fluffy Peaks: Transfer the warmed egg-sugar mixture to your stand mixer or hand mixer. Using the whisk attachment, beat on high speed until the batter becomes thick, pale, and fluffy. To test readiness, lift the whisk and let the batter fall back into the bowl — it should flow slowly and hold soft ribbons or lines on the surface for a few seconds before blending in. This peak stage traps air bubbles vital for the cake’s airy structure.
- Refine the Batter Texture at Low Speed: After achieving the fluffy peak, reduce the mixer speed to low and continue whisking briefly until the batter gains a shiny, smooth texture.This step gently tightens the foam by reducing large air bubbles, creating a finer crumb in the finished cake.
- Sift and Combine Dry Ingredients: Using your fine mesh sieve, sift together the cake flour (55 grams) and matcha powder (5 grams) directly over a bowl or the mixing bowl. This step removes any lumps and ensures the powdery ingredients are evenly mixed, which helps distribute the matcha’s vibrant green color and distinct flavor uniformly throughout the cake.
- Gently Fold Dry Ingredients Into Batter: Add the sifted cake flour and matcha mixture to the whipped egg batter. Using a flexible silicone spatula, carefully fold the dry ingredients in with slow, gentle strokes. The goal is to combine without deflating the aerated egg foam, so avoid vigorous stirring. Continue folding until the flour and matcha are fully incorporated and no streaks remain.
- Incorporate Milk and Oil Smoothly: Measure out the milk (15 grams) and oil (15 grams), then pour them evenly over the batter. Fold these liquids gently into the mixture using the same folding technique. Adding milk and oil at this stage contributes moisture and richness, resulting in a tender crumb and slight sheen on the cake’s surface. The batter should flow smoothly when dropped from the spatula, indicating proper consistency.
- Transfer Batter to Pan and Prepare for Baking: Pour the completed batter immediately into your prepared cake pan, smoothing the surface gently with your spatula for even thickness. Promptly transferring the batter ensures the trapped air doesn’t escape prematurely, which is critical for a good rise.
- Bake Until Perfectly Set: Place the cake pan in the preheated oven on the center rack. Bake for approximately 25 minutes if making one 6-inch cake batch. If you’re increasing to 1.5 batches for a taller cake, extend baking time to 30–35 minutes. For cupcakes, reduce baking time to about 15 minutes. Keep in mind, oven temperatures vary, so start checking doneness around the minimum time. The cake is ready when it springs back gently to the touch and a toothpick inserted into the center comes out clean.
- Cool and Remove Cake Without Damage: Once baked, immediately remove the pan from the oven. Carefully invert the pan onto a cooling rack or clean surface, allowing the cake to release upside down — this technique helps maintain the cake’s height and prevents collapsing as it cools. Let the cake cool completely before slicing to ensure clean cuts and the best texture.
Notes
- Use a kitchen scale for precise measurements to ensure consistent results.
- Warming the eggs and sugar in a water bath is essential for volume and texture.
- Gently fold dry ingredients to avoid deflating the whipped eggs.
- Adjust baking times depending on your oven’s characteristics and pan size.
- Let the cake cool completely upside down to maintain fluffiness and avoid collapse.
- Store wrapped tightly to keep the cake moist and fresh.
