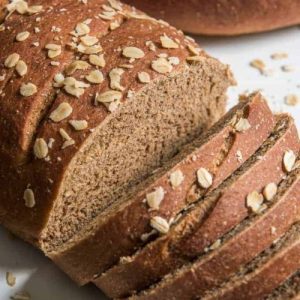
Easy Molasses Brown Bread
This sweet molasses brown bread is soft, slightly sweet, and full of wholesome flavor. Made with whole wheat flour, molasses, and honey, it’s fiber-rich, nutrient-dense, and perfect for sandwiches, rolls, or enjoying warm with butter. Easy to prepare and meal-prep friendly!
Equipment
- 1 Stand mixer with dough hook attachment
- 2 Large mixing bowls
- 1 plastic wrap or light kitchen towel
- 1 parchment paper (sheet pan lining)
- 2 Baking sheets
- 1 sharp knife or bread lame (for slashing loaves)
- 1 pastry brush (for butter)
Ingredients
- 2 ½ cups warm water
- 1 ½ tablespoons instant yeast
- ⅓ cup molasses
- 2 tablespoons unsweetened cocoa powder
- 3 tablespoons vegetable oil
- ⅓ cup honey
- 2 teaspoons table salt
- 3 cups 423 g whole wheat flour
- 3 –4 cups 423–564 g bread flour
- 3 tablespoons salted butter melted
- Old-fashioned oats for topping
Instructions
- Activate the Yeast Mixture: Start by pouring 2 ½ cups of warm water into the bowl of a stand mixer fitted with a dough hook. Make sure the water is warm (around 105°F–110°F) but not hot, as too much heat can kill the yeast. Sprinkle in the instant yeast, followed by the molasses, unsweetened cocoa powder, vegetable oil, honey, and salt. Add 2 cups of the whole wheat flour at this stage. Mix on low speed until everything is combined into a smooth, dark mixture. This step ensures the yeast begins to activate and the flavors start blending.
- Incorporate the Remaining Flour: With the mixer running on medium-low speed, gradually add the remaining whole wheat flour, then slowly introduce the bread flour, one cup at a time. Continue mixing until the dough begins to pull away from the sides of the bowl. You may not need the final cup of bread flour depending on humidity and flour density—what you’re aiming for is a dough that feels soft, elastic, and slightly tacky, but not overly sticky.
- Knead the Dough: Let the stand mixer knead the dough for 5–7 minutes on medium speed. If kneading by hand, transfer the dough to a lightly floured surface and knead for about 10 minutes, stretching and folding the dough until smooth and pliable. Proper kneading develops the gluten structure, which is key for achieving a light, fluffy crumb inside the bread.
- First Rise (Bulk Fermentation): Lightly grease a large mixing bowl with a bit of oil or nonstick spray. Place the dough inside, turning it once so that all sides are coated with a thin layer of oil—this prevents drying. Cover the bowl with either plastic wrap lightly sprayed with cooking spray or a clean kitchen towel. Allow the dough to rise in a warm, draft-free spot until it has doubled in size. This will take about 1 to 2 hours, depending on room temperature.
- Shape the Loaves: Once the dough has risen, punch it down gently to release excess gas. Turn it out onto a lightly floured surface and divide it into two or three equal portions, depending on whether you prefer larger or smaller loaves. Shape each piece into a smooth oval loaf by folding the edges under and tightening the surface tension. Place the shaped loaves onto parchment-lined baking sheets, making sure there’s enough space between them for expansion.
- Second Rise (Proofing): Cover the shaped loaves lightly with plastic wrap or a towel and let them rest for another 45–60 minutes. During this time, they should puff up and nearly double in size again. For a professional bakery-style finish, just before baking, you can use a very sharp knife, razor blade, or bread lame to make three shallow slashes across the top of each loaf. This allows steam to escape and gives the bread a beautiful rustic look.
- Bake the Bread: Preheat your oven to 375°F (190°C) about 15 minutes before baking. Place the loaves on the center rack and bake for 25 minutes. At this point, remove the bread briefly from the oven and lightly brush the tops with melted salted butter. Sprinkle with a handful of old-fashioned oats for extra texture and a rustic bakery-style appearance. Return the loaves to the oven and bake for an additional 5–7 minutes, or until the tops are deep golden brown and the bread sounds hollow when tapped on the bottom.
- Cool and Serve: Transfer the baked loaves to a wire cooling rack and allow them to rest for at least 20–30 minutes before slicing. Cutting too soon can cause the bread to become gummy inside. Once cooled slightly, slice and enjoy warm with butter, use for hearty sandwiches, or store for later use.
Notes
- The oats on top are mainly decorative, adding texture and a rustic look. They may fall off slightly when slicing, but they still add charm.
- If you prefer rolls instead of loaves, shape the dough into 12–14 rolls and reduce baking time to 15–18 minutes.
- For mini-loaves, divide into 6–8 smaller loaves and bake for 18–22 minutes.
- Molasses gives the bread its signature earthy sweetness and rich brown color; don’t skip it.
- Cocoa powder doesn’t make the bread taste like chocolate—it deepens the flavor and enhances the color.
- Honey adds natural sweetness while helping to create a soft, tender crumb.
- Use bread flour for strength and a lighter texture, while whole wheat flour boosts fiber and nutrition.
- This bread is freezer-friendly and can be made ahead for meal prep.
- For extra moisture, brush with melted butter immediately after baking.
- Always let bread cool at least 20 minutes before slicing to avoid a gummy texture.