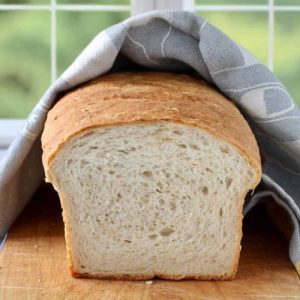
Honey Oatmeal Sandwich Bread
A soft, lightly sweetened sandwich bread made with honey, oats, and milk. High in fiber and protein, this loaf is perfect for breakfast, sandwiches, or meal prep. Easy to make, with a tender crumb and naturally rich flavor.
Equipment
- 9x5-inch loaf pan
- Stand Mixer with Dough Hook
- 2-cup glass measuring cup
- Mixing Bowls
- Wire rack
- Spray bottle for water
- Spoon or spatula
Ingredients
- 1 cup water
- 1 cup 89 g rolled oats (old-fashioned)
- 1 cup 227 g whole or 2% milk, warmed to 105–110°F
- 4 tbsp 56 g unsalted butter, melted and cooled, divided
- 3 tbsp 63 g honey
- 3 to 3 ¼ cups 428–467 g unbleached bread flour, plus more for dusting
- 2 ¼ tsp 7 g instant or active dry yeast
- 2 tsp 12 g salt
- Water in a spray bottle for creating steam
Instructions
- Prepare the Oat Mixture: Start by bringing 1 cup of water to a boil in a small saucepan over medium heat. Once it reaches a rolling boil, stir in 1 cup (89 g) of rolled oats. Cook the oats for about one minute, stirring continuously to prevent sticking. Remove the pan from the heat and allow the mixture to cool until it’s comfortably warm—below 115°F—so it won’t harm the yeast later. This step ensures the oats are soft, fragrant, and ready to incorporate into the dough.
- Mix the Milk, Honey, and Butter: In a 2-cup glass measuring cup, combine 1 cup (227 g) of warmed milk (105–110°F), 3 tablespoons (42 g) of the melted butter, and 3 tablespoons (63 g) of honey. Stir the mixture until it’s completely blended. The warm milk activates the yeast, while the honey adds natural sweetness, and the butter contributes moisture and richness to the dough.
- Combine Dry Ingredients in Stand Mixer: In the bowl of a stand mixer fitted with a dough hook, add the cooled oatmeal mixture, 3 cups (428 g) of unbleached bread flour, 2 1/4 teaspoons (7 g) of yeast, and 2 teaspoons (12 g) of salt. Turn the mixer to low speed and mix the ingredients for one minute, just enough to combine them evenly. This initial step distributes the yeast and salt throughout the flour and oatmeal, ensuring a uniform rise and flavor.
- Incorporate the Wet Ingredients: With the mixer running at medium speed (speed 4 on most stand mixers), slowly pour in the milk, honey, and butter mixture. Continue mixing for about 5 minutes, allowing the dough to form a cohesive, elastic texture. If the dough feels too sticky and wet, add the remaining flour one tablespoon at a time until the dough clears the sides of the bowl but still feels slightly tacky. Then, mix for an additional 5 minutes to develop the gluten fully, giving the bread structure and chewiness.
- First Rise: Lightly flour your work surface and turn the dough out of the mixing bowl. Give it a quick, gentle knead by hand, shaping it into a smooth ball. Place the dough into a lightly oiled bowl or dough rising bucket. Cover with a clean towel or lightly greased plastic wrap, and leave it in a warm, draft-free spot. Allow the dough to rise until doubled in size, which usually takes 45 to 90 minutes. The dough should feel airy and spring back slightly when gently pressed with a fingertip.
- Shape the Loaf: Prepare a 9×5 inch loaf pan by lightly spraying it with oil or lining it with parchment paper. Once the dough has risen, deflate it gently by pressing down with your hands. Transfer it to a lightly floured surface and press it into an 8×10 inch rectangle. Starting at one of the shorter edges, roll the dough tightly lengthwise into a log. Pinch the seam to seal it completely. Place the rolled dough seam-side down into the prepared loaf pan.
- Second Rise: Loosely cover the loaf with oiled plastic wrap or a clean kitchen towel. Let the dough rise again until it crests about 1 1/2 inches above the pan’s edge in the center. This second rise typically takes 40 to 90 minutes. During this time, preheat your oven to 350°F (175°C) with a rack positioned in the middle. Proper proofing ensures a light, airy texture in the final loaf.
- Prepare for Baking: Brush the top of the risen dough with the remaining melted butter. This adds flavor, a subtle golden color, and a tender crust. Fill a spray bottle with water and keep it handy—you’ll use it to create steam in the oven, which helps the bread develop a slightly crisp, shiny crust.
- Bake the Bread: Carefully place the loaf pan on the oven rack. Quickly spray the oven walls several times with water and immediately close the door to trap the steam. Bake for 40 to 50 minutes, or until the loaf reaches an internal temperature of 200–210°F. The crust should be golden brown and the bread should sound hollow when tapped gently.
- Cool the Bread: Remove the loaf from the oven and carefully transfer it from the pan to a wire cooling rack. Allow the bread to cool completely for about two hours before slicing. Cooling is essential—it allows the crumb to set and prevents the loaf from becoming gummy when cut. Once cooled, slice into 18 even pieces and enjoy!
Notes
- Use old-fashioned rolled oats for best texture; instant oats may create a mushy crumb.
- Warm milk should not exceed 110°F to prevent killing the yeast.
- Dough should feel slightly sticky after mixing; avoid adding too much flour.
- Second rise (proofing) is essential for a light, fluffy loaf—don’t rush it.
- Brushing the top with butter before baking improves crust color and flavor.
- Spray oven walls with water to create steam for a tender, soft crust.
- Cool the bread completely before slicing to avoid a gummy texture.
- Store at room temperature in an airtight container for up to 3 days.
- Freezing the loaf works well for long-term storage; slice before freezing.
- Adjust honey to taste if a sweeter loaf is desired.
