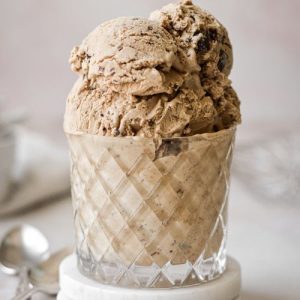
Mocha Chip Ice Cream
A quick and easy no-churn ice cream featuring creamy peanut butter, dark chocolate chips, and espresso. High in protein and healthy fats, this dessert is rich, satisfying, and ready in just 8 hours—perfect for an everyday treat or meal prep.
Equipment
- Large mixing bowl ×1
- Electric mixer (handheld or stand) ×1
- Ice cream container with lid ×1
- Spatula ×1
Ingredients
- 1 can 14 oz / 397 g sweetened condensed milk
- ½ cup 128 g creamy peanut butter
- 2 tsp 8 g vanilla extract
- ½ tsp coarse kosher salt or ¼ tsp table salt
- 2 tbsp 6 g espresso powder
- 2 cups 490 ml cold heavy whipping cream
- 3 oz 85 g dark chocolate, finely chopped
Instructions
- Prepare the Base Mixture: Begin by placing a large mixing bowl on a stable surface. Pour in the entire can of sweetened condensed milk. Using an electric mixer on medium speed, start to beat the milk until it’s smooth and creamy. Next, add the creamy peanut butter, making sure to scrape the sides of the bowl so every bit blends evenly. Then, pour in the vanilla extract and sprinkle in the coarse kosher salt. Finally, add the espresso powder. Continue beating on medium speed for 2-3 minutes until the mixture becomes thick, smooth, and well combined, forming a rich and glossy base for your ice cream.
- Whip the Cream: Take a separate clean mixing bowl and pour in the cold heavy whipping cream. Using a chilled whisk attachment or hand mixer, begin whipping the cream at medium speed. Whip steadily until the cream starts to increase in volume and soft peaks form when the whisk is lifted. Soft peaks mean the cream holds shape but slightly droops at the tip. This step is crucial, as the whipped cream gives your ice cream a light, airy texture while keeping it creamy and scoopable.
- Fold in the Whipped Cream: Once the cream has reached soft peaks, gently fold it into the prepared peanut butter-espresso base. Use a spatula and carefully lift the mixture from the bottom to the top, rotating the bowl as you fold. Take your time and avoid over-mixing, as this helps maintain the fluffy texture of the whipped cream while fully integrating it with the base. The mixture should become slightly lighter in color and beautifully smooth.
- Incorporate the Chocolate Chips: Take the finely chopped dark chocolate and evenly sprinkle it over the folded mixture. Using your spatula, gently fold the chocolate in, making sure every scoop of ice cream has a few chocolate pieces. This step adds delightful texture and bursts of rich chocolate flavor throughout.
- Transfer to Freezer Container: Choose a freezer-safe ice cream container with a secure lid. Spoon the mixture into the container carefully, spreading it evenly with your spatula. Tap the container lightly on the counter to remove any air pockets. Smooth the top for an even finish. Cover the container tightly with the lid to prevent freezer burn and maintain a creamy consistency.
- Freeze Until Firm: Place the container in the coldest part of your freezer. Allow the ice cream to freeze for at least 8 hours, ideally overnight, to ensure it becomes firm enough to scoop. Avoid checking it too frequently, as temperature changes can affect texture.
- Serve and Enjoy: When ready to serve, remove the container from the freezer and let it sit at room temperature for 5–10 minutes. This brief resting time makes scooping easier and ensures a perfect creamy texture. Use an ice cream scooper to portion into bowls or cones, and enjoy your homemade mocha chip ice cream, rich with peanut butter, chocolate, and espresso flavor.
Notes
- Use your favorite peanut butter—natural, creamy, or lightly salted varieties all work.
- For a more intense coffee flavor, increase espresso powder by 1 tsp.
- Dark chocolate can be substituted with semi-sweet or milk chocolate for a milder taste.
- If ice cream is too firm after freezing, let it sit at room temperature for 5–10 minutes before scooping.
- Whipped cream must be cold when beating to ensure soft peaks form properly.
- Make sure to fold, not stir aggressively, to maintain a fluffy texture.
- This recipe is high in protein and healthy fats, making it a satisfying treat.