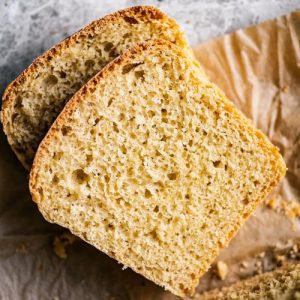
Quick and Simple Spelt Bread
A soft, lightly sweet spelt bread made entirely with whole grain flour. High in fiber and plant-based protein, it’s quick to prepare and perfect for sandwiches, toast, or meal prep. Easy to knead, rise, and bake, this wholesome loaf keeps well and adds a healthy, satisfying touch to your everyday meals.
Equipment
- Large mixing bowl (1)
- Wooden spoon (1)
- Stand mixer with dough hook (optional)
- Loaf pan, 9x5 in / 23x13 cm (1)
- Tea towel or plate (1)
- Parchment paper (optional)
Ingredients
- 60 ml warm water ¼ cup
- 1 tablespoon honey or maple syrup
- 2 ¼ teaspoons active dry yeast
- 250 ml non-dairy milk 1 cup; can use dairy milk
- 3 tablespoons olive oil
- ~500 g whole sprouted spelt flour 3–3 ½ cups
- 1 teaspoon sea salt
Instructions
- Activate the Yeast: Start by warming 60 ml (¼ cup) of water until it is pleasantly warm but not hot—about 38–40°C (100–105°F). Pour it into a large mixing bowl or the bowl of a stand mixer. Stir in 1 tablespoon of honey or maple syrup until dissolved. Sprinkle 2 ¼ teaspoons of active dry yeast evenly over the surface. Let it sit undisturbed for about 10 minutes. During this time, the yeast should become foamy and bubbly, signaling that it’s alive and ready to work. If no foam appears, your yeast may be expired or water too hot, so start over with fresh yeast.
- Combine Wet Ingredients with Initial Flour: Once the yeast mixture is foamy, add 250 ml (1 cup) of non-dairy milk and 3 tablespoons of olive oil. Stir gently to combine the liquids. Next, add 2 cups (approximately 300 grams) of whole sprouted spelt flour and 1 teaspoon of sea salt. Mix using a wooden spoon until the mixture forms a loose, shaggy dough. At this stage, the dough will appear sticky and uneven, which is completely normal. The goal is just to bring everything together.
- Knead the Dough: Gradually add the remaining flour, about ½ cup at a time, kneading well after each addition. You can knead by hand on a lightly floured surface or use a stand mixer fitted with a dough hook. Continue kneading for 6–8 minutes (or slightly less if using a mixer), until the dough becomes smooth, elastic, and springy to the touch. It should feel soft but not overly sticky. If it sticks excessively to your fingers or the work surface, lightly dust with a bit more flour.
- First Rise (Proofing): Grease a large bowl lightly with olive oil and place the dough inside, turning once to coat all sides. Cover the bowl with a clean tea towel or a large plate to prevent drafts. Set it in a warm, draft-free area for about 1 hour, or until the dough doubles in size. This first rise allows the yeast to develop flavor and structure in the bread.
- Shape the Loaf: After the dough has risen, gently punch it down to release excess air without deflating it completely. Turn the dough onto a lightly floured surface and shape it into a loaf by folding the edges underneath and smoothing the top. Place it into a parchment-lined or greased standard-size loaf pan (around 9x5 in / 23x13 cm). Tuck any loose ends neatly under the loaf. Cover loosely with a tea towel for the second rise.
- Second Rise: Allow the shaped loaf to rise in a warm spot for an additional 30 minutes. Meanwhile, preheat your oven to 180°C (350°F). The dough should puff slightly, giving a light, airy texture to your final bread. The second rise ensures the loaf achieves the perfect soft interior without collapsing during baking.
- Bake the Bread: Place the loaf in the preheated oven and bake for approximately 45 minutes. The bread should turn a deep golden brown, and if you gently tap the bottom, it will sound hollow—a classic sign of fully baked bread. Keep an eye on the crust to prevent over-browning.
- Cool and Serve: Remove the loaf from the oven and carefully lift it out of the pan. Place it on a cooling rack and let it rest for at least 10 minutes before slicing. This resting period allows the interior to set and makes slicing easier. Serve warm or at room temperature with your favorite spreads, soups, or sandwiches.
- Storage Tips: Store the bread in an airtight container at room temperature for up to 3 days. For longer storage, slice and freeze the loaf; it keeps well for up to a month. Thaw slices at room temperature or toast directly from the freezer for fresh, soft bread anytime.
Notes
- Whole spelt flour, light spelt, or sprouted spelt can be used interchangeably depending on preference.
- Adjust the kneading time if using a stand mixer, as it works faster than hand kneading. Stop once the dough is smooth and no longer sticky.
- Ensure water is warm but not hot when activating yeast; high temperatures can kill the yeast.
- If your dough feels slightly sticky after kneading, resist adding too much extra flour; it will still bake into a soft loaf.
- A standard 9x5 in (23x13 cm) loaf pan works best, but slightly larger or smaller pans are fine—adjust baking time accordingly.
