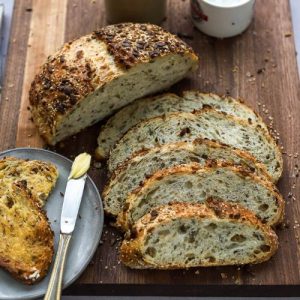
Rustic Seed Bread
A simple, no-knead artisan bread loaded with nutritious seeds. Soft on the inside, crunchy on the outside, and packed with protein, fiber, and healthy fats—perfect for sandwiches, toast, or a quick wholesome snack.
Equipment
- Large mixing bowl (1)
- Danish dough whisk or wooden spoon (1)
- Plastic wrap or shower cap (1)
- Shallow bowl or baking sheet for seeds (1)
- Proofing basket (1)
- Kitchen towel (1)
- Dutch oven (1)
- Parchment Paper (1 sheet)
- Lame or sharp knife (1)
- Wire cooling rack (1)
Ingredients
- 450 g unbleached all-purpose flour
- 150 g seed mixture divided: pumpkin, poppy, sesame, chia, flax, sunflower
- 13 g kosher salt
- 3 g active dry yeast
- 310 g warm water around 85°F
Instructions
- Combine Dry Ingredients: In a large mixing bowl, add 450 g of unbleached all-purpose flour, 100 g of your seed mixture (reserve the rest for the crust), 13 g kosher salt, and 3 g active dry yeast. Using a whisk or your fingers, mix everything together thoroughly until the salt and yeast are evenly distributed and the seeds are fully incorporated. This ensures an even rise and flavor throughout your bread.
- Add Warm Water: Measure 310 g of warm water, ideally around 85°F (slightly warmer than room temperature but not hot to touch). Pour the water gradually into the dry mixture. Using a Danish dough whisk, wooden spoon, or sturdy spatula, stir continuously until the ingredients come together into a sticky, shaggy dough with no dry patches.
- Pinch and Scrape: Lightly dampen your hands and gently pinch the dough to ensure all flour is hydrated. Scrape down the sides of the bowl to gather any flour stuck to the edges. This step helps the dough form a uniform texture without kneading.
- First Proofing – Slow Rise: Cover the bowl tightly with plastic wrap or a clean shower cap to prevent drying out. Place the bowl on your countertop at room temperature. Allow the dough to proof for 12–18 hours. The exact time depends on the ambient temperature: cooler rooms slow the rise, while warmer rooms speed it up. The dough should nearly double in size and have bubbles forming throughout, indicating a healthy fermentation.
- Prepare Seeds for Coating: While the dough is proofing, pour the remaining 50 g of the seed mixture into a shallow bowl or spread it on a small baking sheet.These seeds will coat the crust, creating a flavorful and crunchy exterior.
- Shape the Dough: Once the dough has proofed, gently scrape it onto a lightly floured work surface. Handle it carefully to avoid deflating the airy structure. Bring all four corners of the dough into the center to form a rough ball. Let it rest for 5 minutes to relax the gluten, then repeat by folding the corners into the center again, forming a tight, smooth boule.
- Coat with Seeds: Spray or lightly brush the surface of the dough with water to help the seeds adhere. Roll and press the dough gently into the prepared seed mixture, making sure it is evenly coated on all sides. This will give your bread a beautiful, crunchy, golden-brown crust once baked.
- Second Proofing: Place the shaped, seeded dough into a proofing basket lined with a clean kitchen towel or lightly floured surface. Cover it loosely with another towel and let it rise for about 1.5 hours at room temperature. The dough should puff up slightly and feel airy to the touch.
- Preheat Oven and Dutch Oven: About 30 minutes before baking, place a Dutch oven on the middle rack of your oven and preheat it to 450°F. Preheating the Dutch oven ensures the bread gets an initial burst of steam, which helps create a crisp, artisan-style crust.
- Prepare for Baking: Once proofed, carefully invert the dough onto a small piece of parchment paper. Using a lame or sharp knife, score the top of the bread with a few slashes. These cuts allow steam to escape in a controlled manner, preventing the loaf from bursting unpredictably while baking.
- Bake with Lid On: Using thick oven mitts, carefully lift the preheated Dutch oven and place the dough, along with the parchment paper, inside. Cover with the lid and bake for 25 minutes. This trapped steam helps the bread expand fully while keeping the crust tender initially.
- Bake with Lid Off: After 25 minutes, remove the lid carefully and continue baking for another 25 minutes. The bread should turn a deep golden brown, and the seeds should emit a fragrant, toasted aroma. The crust will be crisp and satisfyingly crunchy.
- Cool Completely: Once baked, use oven mitts to remove the bread and transfer it to a wire cooling rack. Allow the loaf to cool completely for at least 1 hour. Cooling helps the interior set and prevents a gummy texture when slicing.
- Slice and Serve: After cooling, use a serrated knife to slice the bread. Enjoy it plain, with butter, or as a base for sandwiches. The combination of soft, airy crumb and crunchy, nutty seeds makes each bite satisfying and full of flavor.
Notes
- Use warm water around 85°F to activate the yeast without killing it.
- The first proofing can be done anywhere from 12–18 hours depending on room temperature; colder environments may need longer.
- Handle the dough gently to retain its airy structure; avoid over-flouring.
- Scoring the top is crucial for a controlled expansion and beautiful crust.
- Preheating the Dutch oven ensures the loaf develops a crisp, golden crust.
- Cooling completely before slicing prevents a gummy texture inside.
- Customize the seed mixture with your favorite seeds or nuts for added flavor.
