Sourdough Rye Bread
A classic, chewy sourdough rye loaf with deep, nutty flavor and a lightly crisp crust. Packed with fiber and plant-based protein, this bread is perfect for sandwiches, toast, or meal prep. With simple ingredients and easy techniques, it’s a healthy and satisfying option for everyday baking.
Equipment
- 1 large mixing bowl
- 1 Digital Scale
- 1 Banneton or Floured Bowl
- 1 Dutch Oven
- 1 Wooden Spoon
- 1 Silicone Dough Scraper
- 1 Lame or Sharp Knife
- Cling Film or Damp Tea Towel
Ingredients
- 100 g Sourdough Starter fed and bubbly
- 250 g Bread Flour
- 200 g Rye Flour light or dark
- 350 g Water
- 25 g Molasses
- 10 g Salt
- Optional: 15 g Caraway Seeds ≈ 2 tbsp
Instructions
- Preparing Your Starter Mixture: Start by weighing your 100g of active, bubbly sourdough starter into a large ceramic or glass mixing bowl. Add 350g of water and 25g of molasses. Mix these together gently until combined. The molasses helps boost the flavor, enrich the color, and provides extra sugars for fermentation. This is the foundation of your dough, so ensure it’s fully incorporated but don’t worry about making it perfectly smooth yet.
- Autolyse: Hydrating Your Flours: Next, add 250g bread flour, 200g rye flour, and 10g salt directly into the starter mixture. Use the end of a wooden spoon to fold the flours into the liquid. The dough will look shaggy and sticky at this stage, which is normal. Cover the bowl loosely with cling film or a damp tea towel and allow it to rest for approximately 1 hour. This “autolyse” step gives the flours time to absorb water fully, enhancing gluten development and improving dough texture.
- Forming the Initial Dough Ball: After autolyse, it’s time to bring the dough together. Using your hands, work the dough from the edges, gently stretching it up and folding it over itself until a rough, cohesive ball forms. Rye flour is sticky, so this process might feel messy initially. About 20–25 folds should be sufficient. Once your dough is shaped, cover it again and let it rest for 30 minutes to relax the gluten and prepare for stretch and folds.
- Stretch and Fold: Building Dough Structure: To give the dough strength and elasticity, perform 4–6 sets of stretch and folds over the next 2–3 hours. For each set, grab one side of the dough, stretch it upward, and fold it over the center. Repeat for all four sides. Wait 15 minutes between each set to allow the dough to rest and relax. If you’re including caraway seeds, fold them in during the second round. This step is crucial for developing the right structure, as rye flour alone doesn’t have strong gluten.
- Bulk Fermentation: Letting the Dough Rise: Once the stretch and folds are complete, cover the dough with plastic wrap or a damp towel. Let it ferment at room temperature until it nearly doubles in size. Depending on your home’s temperature, this could take several hours or overnight. The dough should feel soft, bubbly, and slightly wobbly, with visible air pockets. Avoid over-fermentation; if it passes the doubled mark, the bread may collapse during baking.
- Shaping the Dough: Lightly dust a clean countertop with rice flour to prevent sticking. Gently ease the dough from the bowl onto the surface using a silicone scraper. Place it upside down so the smooth side touches the counter, which makes shaping easier. Using gentle hands, form the dough into a tight boule or batard, depending on your preference. Place the shaped dough into a well-floured banneton seam-side down, or use a floured bowl or basket. Lightly dust with rice flour if necessary, but handle carefully to preserve the air bubbles formed during fermentation.
- Cold Fermentation: Enhancing Flavor: Cover the shaped dough loosely with a plastic bag or damp tea towel and place it in the fridge. Allow it to rest for a minimum of 5 hours and up to 36 hours. Longer fermentation deepens flavor, creates beautiful crust blisters, and strengthens the dough for better oven spring. Leaving it in the fridge also forms a slight skin on the dough, which makes scoring easier.
- Preheating for Baking: About an hour before baking, preheat your oven to 230°C (450°F). Place your Dutch oven inside to heat thoroughly. Preheating ensures maximum oven spring when the dough is placed inside. Keep your dough in the fridge until the very last minute; cold dough hitting a hot Dutch oven will result in a better rise and crispier crust.
- Scoring and Preparing for the Oven: Remove the dough from the fridge and gently transfer it onto a piece of parchment paper, leaving enough excess to act as handles for moving it into the Dutch oven. Using a sharp lame or knife, score the top with a few shallow cuts. Scoring allows the bread to expand in a controlled manner and gives the loaf its artisan appearance.
- Baking the Sourdough Rye Bread: Carefully lift the dough using the parchment paper and place it into the hot Dutch oven. Cover with the lid and bake at 230°C (450°F) for 30 minutes. Then, remove the lid and reduce the oven temperature to 210°C (410°F), baking an additional 10–15 minutes to achieve a deep, golden crust. Spritzing the dough lightly with water before covering is optional but can enhance crust texture.
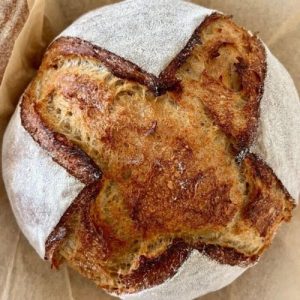
- Cooling and Serving: Once baked, carefully remove the bread from the Dutch oven and place it on a wire rack. Allow it to cool fully for up to 12 hours. Because this bread is high in moisture, slicing too early can result in a gummy texture. Once cooled, the loaf will have a chewy interior, crisp crust, and rich, complex flavor—perfect for everyday meals, sandwiches, or toast.
Notes
- Starter Flexibility: You can use any active sourdough starter; a rye-specific levain will enhance flavor but is optional.
- Flour Choices: Dark or light rye flour works; darker rye adds a richer flavor and color.
- Caraway Seeds: Optional, but fold in during the second stretch and fold for best distribution.
- Fermentation Timing: Bulk fermentation varies by temperature; dough should nearly double and show visible air bubbles.
- Cold Proofing: Refrigerate for 5–36 hours; longer proofing develops flavor and improves crust texture.
- Handling Sticky Dough: Rye dough is sticky; minimal handling preserves air bubbles for a better rise.
- Baking Tips: Preheat Dutch oven for a hot bake; scoring controls expansion and gives artisan appearance.
- Cooling Time: Cool fully (up to 12 hours) before slicing to ensure a firm crumb.
